검게 그슬려 돌아옴 ㅋㅋ
입구는 그냥 조촐(?) 한데

들어가서 보면 나름 넓고 괜찮다. 금액대비 대만족!

'개소리 왈왈 > 육아관련 주저리' 카테고리의 다른 글
| 지상용 선풍기? (2) | 2026.07.12 |
|---|---|
| 타이어 손상 (3) | 2026.06.29 |
| 베란다 문 잠금장치 수리 (2) | 2026.06.23 |
| 바쁜주말 (2) | 2026.05.31 |
| 밀크티 타블렛(s6 lite) 초기화 하기 (0) | 2026.05.23 |
검게 그슬려 돌아옴 ㅋㅋ
입구는 그냥 조촐(?) 한데
들어가서 보면 나름 넓고 괜찮다. 금액대비 대만족!
| 지상용 선풍기? (2) | 2026.07.12 |
|---|---|
| 타이어 손상 (3) | 2026.06.29 |
| 베란다 문 잠금장치 수리 (2) | 2026.06.23 |
| 바쁜주말 (2) | 2026.05.31 |
| 밀크티 타블렛(s6 lite) 초기화 하기 (0) | 2026.05.23 |
RFID 관련 규격 정리중
claude 랑 이야기 하다 보니
type A / type B는 part 2 RF 출력, 신호 인터페이스 관련(modulation 등) 차이이고
mifare / desfire / ntag 등은 type A를 쓴다고 한다.
part 4 에서 전송 프로토콜 혐상을 하고 나서 APDU로 통신을 하는 듯.
Part 1: Physical characteristics
Part 2: Radio frequency power and signal interface
Part 3: Initialization and anticollision
Part 4: Transmission protocol
| 익성전자 is3400 usb hid 모드 (0) | 2026.07.23 |
|---|---|
| mifare classic 1k - access control (0) | 2026.07.16 |
| MCT(Mifare classic Tool) 앱에서 사용하는 키 (0) | 2026.07.16 |
| Proxmark, mfoc, mfcuk (0) | 2026.07.15 |
| mifare classic 1k 구조 (0) | 2026.07.15 |
순식간에 완만해 지는 곡선. 하지만 얼마나 더 떨궈야 하나 부터 고민해보면
뒤로 갈수록 기울기는 점점 완만해지고, 도달에 원하는 수치까지의 시간은 예상외로 길어지게 된다.
학습율 0.04
0~10000 까지의 학습
0~2000
2000~4000
4000~6000
6000~8000
학습율 0.01
0~9000 정도 까지의 학습

아래는 구간에 대한 y축 스케일이 다른 확대 버전.
0~2000 epoch

2000~4000

4000~6000

6000~8000

8000~10000

올라가냐 내려가냐 희망고문하는게 무슨 주식같냐 -_-
| LLM 지식 증류(knowledge distilation), lora (0) | 2026.07.18 |
|---|---|
| sLLM (경량 언어모델) (0) | 2026.07.18 |
| claude code /model (0) | 2026.07.08 |
| claude code 세션 정보 (0) | 2026.07.06 |
| claude.ai / claude code (0) | 2026.07.03 |
어... 지금까지 내가 보던게 training loss가 아니라 validation loss 였나 보다?
그나저나 일정 수치 이하로 안떨어지는건 over fit은 아닌것 같은데 머지?
[링크 : https://itmaster98.tistory.com/233]
평탄화 되면 잘 학습된거라는데.. 그 값이 0.xxx 이렇게 수렴하지 않고 3.xxxx 이렇게 되어도 되나?
[링크 : https://blog.naver.com/dkdaf/224309817150]
어.. 그러고 보니 validation set을 몇 장 안넣어 둔 거 같은데..
그래서 높게 나오나?
[링크 : https://hei-jung.github.io/machine-learning/why-is-my-validation-loss-lower-than-my-training-loss/]
학습속도 0.0005 ~ 0.001 사이 (어떤 모델, 학습인진 모르겠으나..)
[링크 : https://sulung-sulung.tistory.com/18]
초기 학습 시작시에 높은 값이 뜨긴 하지만 그래도 만 단위 까지 본적은 없음.
반대로 학습율이 너무 높다던가. 정 안되면 loss function을 바꿔봐야 하나?
[링크 : https://oniss.tistory.com/35]
학습곡선이 진동이 크면 batch 를 늘리는 것도 방법(메모리 사용량 증가)
[링크 : https://hyen4110.tistory.com/12]
[링크 : https://velog.io/@jhlee508/인공지능-Loss가-더-작다고-Accuracy가-더-높은-것은-아니다]
| moviad / 딥러닝 학습율 (0) | 2026.06.25 |
|---|---|
| moviad ssd-mobilenetv2 on imx8mp (0) | 2026.06.24 |
| moviad / stftpm / 1080 ti / webcam feat claude (0) | 2026.06.19 |
| moviad stfpm (0) | 2026.06.18 |
| ubuntu 26.04 + 3070 + tensorflow + python 3.14 + docker... (0) | 2026.06.17 |
MCT 에서도 FF0780 이 기본값인것 같은데
이걸 2진수로 바꾸면 1111 1111 0000 0111 1000 0000(2) 이 된다.

이걸 Access bit에 넣으면
C3_3 만 1이 되는건데
C3_3 에서 _3은 블록구분이니까 sector trailer에 대해서만 C3 = 1로 셋팅된 상황

3번은 sector trailer block 이고
0~2번은 data block

sector trailer의 C1/C2/C3 = 0/0/1 인 조건은
keyA read(never) / wirte (key A)
keyA read(key A) / wirte (key A)
access bit read(Key A) / write (Key A) 인데 transport configuration 에서는 Key B로도 읽힌다고 한다.

data block의 C1/C2/C3 = 0/0/0 인 조건은
read - Key A or B
write - Key A or B
increment - Key A or B
decrement, transfer, restor - Key A or B
즉, A나 B 중에 매칭이 되면 모든 데이터를 읽고 쓸 수 있는 셋팅이다.

| 익성전자 is3400 usb hid 모드 (0) | 2026.07.23 |
|---|---|
| iso/iec 14443-1/2/3/4 (0) | 2026.07.16 |
| MCT(Mifare classic Tool) 앱에서 사용하는 키 (0) | 2026.07.16 |
| Proxmark, mfoc, mfcuk (0) | 2026.07.15 |
| mifare classic 1k 구조 (0) | 2026.07.15 |
앱에서도 나오지만
키를 입력해서 쓸수 있는건 아니고
미리 정의된 사전에서 사용해보는 구조이고
여기서 사용하는 키는 앱에 파일로 저장되어 있는것 같다.
근데 특이한게.. D3.. 어쩌구 키는 hotel-std.keys에 속하지 않고
이걸 제외하면 std < hotel < extended 로 전부 포함되어 있다.
| std.keys | hotel-std.keys | extended-std.keys |
| # Standard keys FFFFFFFFFFFF A0A1A2A3A4A5 D3F7D3F7D3F7 |
# Keys that are known to # work for some hotel locks. # exteded-std.keys might # have more working keys. FFFFFFFFFFFF 2A2C13CC242A 8A19D40CF2B5 A0A1A2A3A4A5 B578F38A5C61 0000014B5C31 96A301BCE267 44AB09010845 85FED980EA5A D3B595E9DD63 AFBECD121004 34B16CD59FF8 BB2C0007D022 58AC17BF3629 B62307B62307 AFBECD120454 842146108088 9EBC3EB37130 34D3C568B348 91FF18E63887 4D8B8B95FDEE 354A787087F1 4A306E62E9B6 135B88A94B8B |
# More well known keys # that can be found publicly # Standard keys FFFFFFFFFFFF A0A1A2A3A4A5 D3F7D3F7D3F7 000000000000 ... # 너무 많아서 생략 |
| iso/iec 14443-1/2/3/4 (0) | 2026.07.16 |
|---|---|
| mifare classic 1k - access control (0) | 2026.07.16 |
| Proxmark, mfoc, mfcuk (0) | 2026.07.15 |
| mifare classic 1k 구조 (0) | 2026.07.15 |
| CUID 복제 안되는 rfid 카드 -_ㅠ (0) | 2025.12.03 |
[링크 : https://proxmark.com/]
[링크 : https://www.proxmarkbuilds.org/]
| hf search hf mf chk -* hf mf nested --1k --blk 0 -a -k ffffffffffff hf mf chk --dump hf mf dump hf mf restore --1k --uid "UID8자리" |
[링크 : https://www.clien.net/service/board/lecture/16933467]
[링크 : https://m.blog.naver.com/ndb796/221126191197]
| $ apt-cache search mfoc forensics-all - Debian Forensics Environment - essential components (metapackage) indi-dreamfocuser - INDI driver for DeamFocuser focuser mfoc - MIFARE Classic offline cracker python-mdanalysis-doc - analyse molecular dynamics files and trajectories ( documentation) python3-mdanalysis - analyse molecular dynamics files and trajectories $ apt-cache search mfcuk forensics-all - Debian Forensics Environment - essential components (metapackage) mfcuk - MiFare Classic Universal toolKit |
| mifare classic 1k - access control (0) | 2026.07.16 |
|---|---|
| MCT(Mifare classic Tool) 앱에서 사용하는 키 (0) | 2026.07.16 |
| mifare classic 1k 구조 (0) | 2026.07.15 |
| CUID 복제 안되는 rfid 카드 -_ㅠ (0) | 2025.12.03 |
| 출입카드 복제 (CUID) (0) | 2025.03.20 |
1k 이긴 한데 다 쓸 순 없고
1 block = 16 bytes
1 sector = 4 block
그래서 0~15 sector / 0~63 block 으로 구성

value block 라는걸로 access bit에 체크하면 increment / decrement / store / transfer 명령으로 잔액이 계산된다고 하는데
trailer 블럭이라고 매 섹터의 마지막 블록에 저장된 값에 의해서 access bit를 설정이 가능한것으로 보인다.

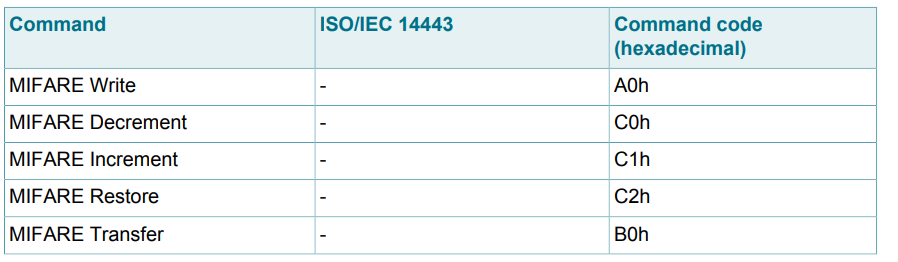
주로 쓴건 Read(0x30), Write(0xA0) 인데
0xC0 / 0xC1 / 0xC2 / 0xB0 명령으로 increment / decrement / restore / transfer 가 수행이 가능하다.
[링크 : https://www.nxp.com/docs/en/data-sheet/MF1S50YYX_V1.pdf]
[링크 : https://support.ccs.com.ph/portal/en/kb/articles/mifare-classic-1k-memory-structure]
| MCT(Mifare classic Tool) 앱에서 사용하는 키 (0) | 2026.07.16 |
|---|---|
| Proxmark, mfoc, mfcuk (0) | 2026.07.15 |
| CUID 복제 안되는 rfid 카드 -_ㅠ (0) | 2025.12.03 |
| 출입카드 복제 (CUID) (0) | 2025.03.20 |
| libpcsclite on cpp (0) | 2025.03.18 |
ros의 rviz로 다빈치 로봇 다뤄보기
[링크 : https://pinkwink.tistory.com/906]
[링크 : https://pinkwink.kr/882]
[링크 : https://github.com/jhu-dvrk/dvrk-ros]
[링크 : https://pinkwink.kr/903] rviz 사용해보기 (urdf 생성-검증)
| ubuntu 22.04 / libfreenect2 / ros / 2760p(i5-2520m) 실패 (0) | 2026.07.10 |
|---|---|
| ros kinect slam (0) | 2026.07.08 |
| ros2 with kinect v2 시도... 3회차 (0) | 2025.05.22 |
| ros2 with kinect v2 시도... 2회차 (0) | 2025.05.22 |
| ros2 with kinect v2 일단 실패 (0) | 2025.05.21 |
다빈치 수술 로봇 같이 특정 점을 반드시 지나도록 할 때 그 지나는 점을 RCM 이라고 한다.
TCP 랑은 다르다는데.. 이해가 잘 안가는 중 ㅠㅠ
[링크 : https://pinkwink.kr/756]
| 로봇 제어 Move (0) | 2026.07.08 |
|---|---|
| elephant robototics mycobot ros2 (0) | 2026.07.03 |
| mycobot ros1/ros2 (0) | 2026.07.02 |
| gcode (g-code) (0) | 2026.07.01 |
| mycobot280 pi / TCP(tool center point) (0) | 2026.06.30 |

|
