'파일방' 카테고리의 다른 글
| trickle - 대역폭 제한 (0) | 2026.07.28 |
|---|---|
| gary's mod - 게리모드 (0) | 2026.06.24 |
| ventoy 업그레이드 (0) | 2026.06.23 |
| microhttpd (0) | 2026.06.05 |
| tmux (0) | 2026.05.11 |
| trickle - 대역폭 제한 (0) | 2026.07.28 |
|---|---|
| gary's mod - 게리모드 (0) | 2026.06.24 |
| ventoy 업그레이드 (0) | 2026.06.23 |
| microhttpd (0) | 2026.06.05 |
| tmux (0) | 2026.05.11 |
유저 레벨에서 트래픽 제한해주는 유틸리티
ai에게 대역폭 제한해달라고 하니 이걸 추천해준다.
근데 vLLM docker 에서 설치하려니 후보가 없다고 -_-
[링크 : https://github.com/mariusae/trickle]
[링크 : https://manpages.ubuntu.com/manpages/focal/man1/trickle.1.html]
| open3D (0) | 2026.10.29 |
|---|---|
| gary's mod - 게리모드 (0) | 2026.06.24 |
| ventoy 업그레이드 (0) | 2026.06.23 |
| microhttpd (0) | 2026.06.05 |
| tmux (0) | 2026.05.11 |
으아아아 어려워
멀하려고하면 죄다 창작마당에서 받아서 추가하고 해야하나?
[링크 : https://steamcommunity.com/sharedfiles/filedetails/?id=104575630] ragdoll mover
[링크 : https://steamcommunity.com/sharedfiles/filedetails/?id=2091771251]
E 누르고 마우스
혹은 E 누르고 WASD 로 태양 위치 조절
[링크 : https://steamcommunity.com/sharedfiles/filedetails/?id=2713963980] sun editor
[링크 : https://www.youtube.com/watch?v=CU1qrvlvgiI]
[링크 : https://steamcommunity.com/sharedfiles/filedetails/?id=111895870] stop motion helper
[링크 : https://www.youtube.com/watch?v=XuMSqB_5sdI]
LUA 콘솔
| open3D (0) | 2026.10.29 |
|---|---|
| trickle - 대역폭 제한 (0) | 2026.07.28 |
| ventoy 업그레이드 (0) | 2026.06.23 |
| microhttpd (0) | 2026.06.05 |
| tmux (0) | 2026.05.11 |
그냥 깔면 알아서 업데이트 된...다?
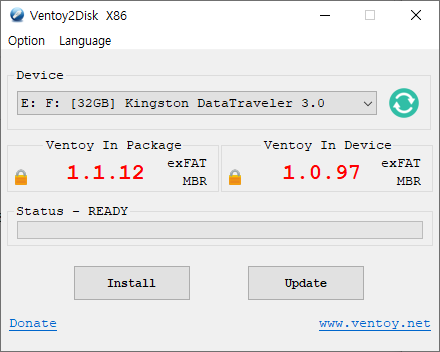
ISO 파일은 바뀌지 않고 안전하다고 하니 일단 ㄱㄱ
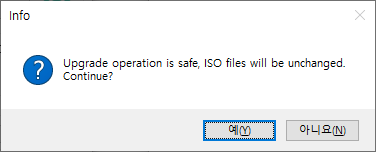
우옹
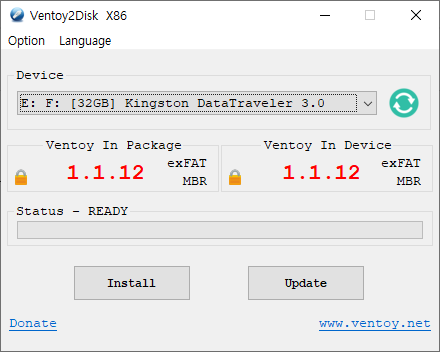
어? 26.04가 아니라 24.04.4 설치 실패 버그픽스????
|
| trickle - 대역폭 제한 (0) | 2026.07.28 |
|---|---|
| gary's mod - 게리모드 (0) | 2026.06.24 |
| microhttpd (0) | 2026.06.05 |
| tmux (0) | 2026.05.11 |
| appimage , AppImageLauncher (0) | 2026.04.20 |
lighthttpd 보다 얼마나 더 가볍길래 micro를 붙인걸까?
C로 작성된 웹서버. rest 까지 지원은 무리겠지? ㅜㅠ
| gary's mod - 게리모드 (0) | 2026.06.24 |
|---|---|
| ventoy 업그레이드 (0) | 2026.06.23 |
| tmux (0) | 2026.05.11 |
| appimage , AppImageLauncher (0) | 2026.04.20 |
| usb device tree viewer (0) | 2026.02.22 |
tmux는 기본적으로 ctrl-b 단축키로 모드 전환하는데
screen이 ctrl-a를 쓰다보니 대부분 바꾸어서 쓰는듯.
| $ cat ~/.tmux.conf # remap prefix to Control + a set -g prefix C-a # bind 'C-a C-a' to type 'C-a' bind C-a send-prefix unbind C-b |
| C-a c 새 창 열기 C-a 0~9 창 이동 단축키 C-a n 다음 창 C-a p 이전 창 C-a " 세로 패널 나누기 C-a % 가로 패널 나누기 C-a 방향키 해당 방향 으로 패널 이동 |
[링크 : https://gist.github.com/andreyvit/2921703]
얘도 동일하게 detach가 있나보다.
| C-a d detach |
[링크 : https://blog.naver.com/jaydee88/221330638931]
기본으로는 안되고 단축키를 할당해주어야 마우스로 패널 크기 조정이 가능한가보다.
| set -g mouse on setw -g mode-keys vi # Use Alt-arrow keys without prefix key to switch panes bind -n M-Left select-pane -L bind -n M-Right select-pane -R bind -n M-Up select-pane -U bind -n M-Down select-pane -D # Shift arrow to switch windows bind -n S-Left previous-window bind -n S-Right next-window # scrollback buffer size increase set -g history-limit 100000 # change window order bind-key -n C-S-Left swap-window -t -1 bind-key -n C-S-Right swap-window -t +1 # disable window name auto change set-option -g allow-rename off # bar color set -g status-bg black set -g status-fg white # toggle pane title visibility bind T run 'zsh -c "arr=( off top ) && tmux setw pane-border-status \${arr[\$(( \${arr[(I)#{pane-border-status}]} % 2 + 1 ))]}"' # rename pane bind t command-prompt -p "(rename-pane)" -I "#T" "select-pane -T '%%'" |
[링크 : https://hydragon-cv.info/entry/tmux에서-마우스-사용하기]
+
2026.05.28
ctrl b - s // 먼가 가로 정렬해서 미리보기 느낌. 엔터 치면 미리보기 종료
ctrl b - w // 창 목록 떠서 고를수 있음
[링크 : https://www.reddit.com/r/tmux/comments/1dhsqsg/display_all_windows_side_by_side/?tl=ko]
| ventoy 업그레이드 (0) | 2026.06.23 |
|---|---|
| microhttpd (0) | 2026.06.05 |
| appimage , AppImageLauncher (0) | 2026.04.20 |
| usb device tree viewer (0) | 2026.02.22 |
| exaone 경량 모델 (0) | 2026.02.04 |
간간히 appimage 확장자로 받아서 실행하는건 봤는데 어떻게 만들어지나는 몰라서 찾아봄
[링크 : https://appimagelauncher.com/]
[링크 : https://github.com/TheAssassin/AppImageLauncher]
[링크 : https://github.com/linuxdeploy/linuxdeploy-plugin-appimage]
| microhttpd (0) | 2026.06.05 |
|---|---|
| tmux (0) | 2026.05.11 |
| usb device tree viewer (0) | 2026.02.22 |
| exaone 경량 모델 (0) | 2026.02.04 |
| podman (0) | 2026.01.25 |
| tmux (0) | 2026.05.11 |
|---|---|
| appimage , AppImageLauncher (0) | 2026.04.20 |
| exaone 경량 모델 (0) | 2026.02.04 |
| podman (0) | 2026.01.25 |
| elinks (0) | 2026.01.20 |
어짜다 우연히(?)
EXAONE-3.5-7.8B-Instruct-AWQ
라는 키워드로 검색.
| Quickstart We recommend to use transformers>=4.43 and autoawq>=0.2.7.post3. Here is the code snippet to run conversational inference with the model: import torch from transformers import AutoModelForCausalLM, AutoTokenizer model_name = "LGAI-EXAONE/EXAONE-3.5-7.8B-Instruct-AWQ" model = AutoModelForCausalLM.from_pretrained( model_name, torch_dtype=torch.bfloat16, trust_remote_code=True, device_map="auto" ) tokenizer = AutoTokenizer.from_pretrained(model_name) # Choose your prompt prompt = "Explain how wonderful you are" # English example prompt = "스스로를 자랑해 봐" # Korean example messages = [ {"role": "system", "content": "You are EXAONE model from LG AI Research, a helpful assistant."}, {"role": "user", "content": prompt} ] input_ids = tokenizer.apply_chat_template( messages, tokenize=True, add_generation_prompt=True, return_tensors="pt" ) output = model.generate( input_ids.to("cuda"), eos_token_id=tokenizer.eos_token_id, max_new_tokens=128, do_sample=False, ) print(tokenizer.decode(output[0])) |
[링크 : https://huggingface.co/LGAI-EXAONE/EXAONE-3.5-7.8B-Instruct-AWQ]
[링크 : https://github.com/LG-AI-EXAONE/EXAONE-3.5]
[링크 : https://www.lgresearch.ai/blog/view?seq=506]
[링크 : https://wikidocs.net/274703]
| appimage , AppImageLauncher (0) | 2026.04.20 |
|---|---|
| usb device tree viewer (0) | 2026.02.22 |
| podman (0) | 2026.01.25 |
| elinks (0) | 2026.01.20 |
| platformio (0) | 2026.01.17 |
데몬 필요없이 docker와도 명령어 레벨에서 어느정도 호환이 되는것 같긴한데
[링크 : https://servermon.tistory.com/847]
윈도우에서는 WSLv2가 필요 하다는데, 의외로 데비안 계열에도 이미 포함되어 있는걸 보면 유명한듯?
| Windows On Windows, each Podman machine is backed by a virtualized Windows Subsystem for Linux (WSLv2) distribution. Once installed, the podman command can be run directly from your Windows PowerShell (or CMD) prompt, where it remotely communicates with the podman service running in the WSL environment. Alternatively, you can access Podman directly from the WSL instance if you prefer a Linux prompt and Linux tooling. See the Podman for Windows guide for setup and usage instructions. Debian The podman package is available in the Debian 11 (Bullseye) repositories and later. sudo apt-get -y install podman |
[링크 : https://podman.io/docs/installation]
[링크 : https://podman.io/]
| usb device tree viewer (0) | 2026.02.22 |
|---|---|
| exaone 경량 모델 (0) | 2026.02.04 |
| elinks (0) | 2026.01.20 |
| platformio (0) | 2026.01.17 |
| directFB2 (0) | 2026.01.09 |

|


