그 와중에(?) none, low, medium, high, xhigh 를 지원하는데 모델에서 되는게 먼지 찾아봐야 할 듯
from openai import OpenAI
client = OpenAI()
prompt = """ Write a bash script that takes a matrix represented as a string with format '[1,2],[3,4],[5,6]' and prints the transpose in the same format. """
*** Error completing request *** Arguments: ('https://github.com/d8ahazard/sd_dreambooth_extension.git', ['ads', 'localization', 'installed'], 'hide', 'or', 0, '') {} Traceback (most recent call last): File "/mnt/Downloads/stable-diffusion-webui/modules/call_queue.py", line 74, in f res = list(func(*args, **kwargs)) File "/mnt/Downloads/stable-diffusion-webui/modules/ui_extensions.py", line 407, in install_extension_from_index ext_table, message = install_extension_from_url(None, url) File "/mnt/Downloads/stable-diffusion-webui/modules/ui_extensions.py", line 352, in install_extension_from_url check_access() File "/mnt/Downloads/stable-diffusion-webui/modules/ui_extensions.py", line 24, in check_access assert not shared.cmd_opts.disable_extension_access, "extension access disabled because of command line flags" AssertionError: extension access disabled because of command line flags
--server-name=0.0.0.0. 주고 하고 있었는데 이걸 빼고 하니 에러없이 진행된다.
플러그인은 외부사용시에는 설치 못하게 막아둔듯.
Initializing Dreambooth Dreambooth revision: 4244f6b2cf810a0a4dd83a3534b27d92b82e4c21 Checking xformers... Checking bitsandbytes... Checking bitsandbytes (ALL!) Installing bitsandbytes Successfully installed bitsandbytes-0.49.2 cuda-bindings-13.3.1 cuda-pathfinder-1.5.5 cuda-toolkit-13.0.2 nvidia-cublas-13.1.1.3 nvidia-cuda-cupti-13.0.85 nvidia-cuda-nvrtc-13.0.88 nvidia-cuda-runtime-13.0.96 nvidia-cudnn-cu13-9.20.0.48 nvidia-cufft-12.0.0.61 nvidia-cufile-1.15.1.6 nvidia-curand-10.4.0.35 nvidia-cusolver-12.0.4.66 nvidia-cusparse-12.6.3.3 nvidia-cusparselt-cu13-0.8.1 nvidia-nccl-cu13-2.29.7 nvidia-nvjitlink-13.0.88 nvidia-nvshmem-cu13-3.4.5 nvidia-nvtx-13.0.85 torch-2.12.0 triton-3.7.0 Checking Dreambooth requirements... [Installed version of accelerate: 0.21.0 [Dreambooth] accelerate v0.21.0 is already installed. [Installed version of bitsandbytes: 0.49.2 [Dreambooth] bitsandbytes v0.45.2 is already installed. [Dreambooth] dadaptation v3.2 is not installed. Successfully installed dadaptation-3.2 [Dreambooth] diffusers v0.32.2 is not installed. Successfully installed diffusers-0.38.0 importlib_metadata-9.0.0 safetensors-0.8.0 zipp-4.1.0 [Dreambooth] discord-webhook v1.3.1 is not installed. Successfully installed discord-webhook-1.4.1 [Installed version of fastapi: 0.94.0 [Dreambooth] fastapi v0.94.0 is already installed. [Installed version of gitpython: 3.1.32 [Dreambooth] gitpython v3.1.32 is already installed. [Installed version of pillow: 9.5.0 [Dreambooth] pillow v11.3.0 is not installed. Successfully installed pillow-12.2.0 [Dreambooth] pytorch_optimizer v3.4.0 is not installed. Successfully installed pytorch_optimizer-3.10.1 [Installed version of tomesd: 0.1.3 [Dreambooth] tomesd v0.1.3 is already installed. [Installed version of tqdm: 4.67.3 [Dreambooth] tqdm v4.67.1 is already installed. [Installed version of transformers: 4.30.2 [Dreambooth] transformers v4.49.0 is not installed. Successfully installed click-8.4.1 hf-xet-1.5.1 huggingface-hub-1.19.0 tokenizers-0.22.2 transformers-5.11.0 [Dreambooth] xformers v0.0.27.post2 is not installed. Successfully installed xformers-0.0.35 [Dreambooth] tensorboard v2.18.0 is not installed. Successfully installed absl-py-2.4.0 grpcio-1.81.1 markdown-3.10.2 tensorboard-2.20.0 tensorboard-data-server-0.7.2 werkzeug-3.1.8 [+] accelerate version 0.21.0 installed. [+] diffusers version 0.38.0 installed. [+] transformers version 5.11.0 installed. [+] bitsandbytes version 0.49.2 installed. [+] xformers version 0.0.35 installed.
textual inversion은 할 수 있는게 많지 않다는데, 그럴싸하게 나온것 같았는데 아닌가?!
LoRA(Low-Rank Adaptation, 저 랭크 적응?)은 Stable Diffusion 모델을 세부 조정하기 위한 학습 기법입니다. Stable Diffusion에는 Dreambooth와 textual inversion과 같은 학습기법도 있는데, LoRA 는 뭐가 다를까요? LoLA는 파일 크기와 학습 능력간에 적절한 균형을 이루고 있습니다. Dreambooth는 강력하지만, 모델 파일의 크기가 매우 큽니다(2~7GB). 텍스 인버전(textual inversion)은 파일이 아주 작지만(100KB 정도), 할 수 있는 게 많지 않습니다. LoRA는 이 두가지의 중간쯤이라고 보시면 됩니다. 파일 크기는 2~200MB 정도로 부담스럽지 않으며, 학습능력도 괜찮은 편입니다
개인정보 유출 통지 [데이원컴퍼니] 안녕하세요. 데이원컴퍼니입니다. 당사 서비스*를 이용해 주시는 고객님께 안내드립니다. ※ 패스트캠퍼스, 콜로소, 제로베이스, 마이라이트, 뉴스프레소, 리스픽, 샤이니영어, 워너스픽. 당사는 지난 6월 8일, 시스템 내 보안 사고가 발생했을 가능성을 인지하여 관련 위협을 즉시 차단하고 보완 조치를 완료하였습니다. 현재까지 확인된 바로는, 당사가 사용 중인 GitHub 서비스의 마스터 계정 키값이 불상의 시점에 탈취되었으며, 이를 통해 5월 9일 최초로 당사 서비스에 침입이 이루어지면서 본 사고가 발생한 것으로 파악되고 있습니다. 조사 결과, 고객님의 개인정보(이름, 이메일 주소, 전화번호, 암호화된 비밀번호)가 유출되었음을 확인하였습니다. 아울러 주소 및 직무·직책 정보를 입력하신 고객님의 경우, 해당 정보까지 유출된 것으로 확인되었습니다. ※ 뉴스프레소, 마이라이트, 워너스픽, 샤이니영어 서비스 고객님 일부의 경우, 택배 메모 정보가 포함되어 있을 수 있습니다. 현재 사고와 관련된 서비스의 사용자 계정 키 및 주요 권한을 제거하였으며, 재발 방지 조치를 완료하였습니다. 현재까지 고객님 정보가 공개되거나 악용된 정황은 확인되지 않았으나, 고객님의 안전을 위해 계정 비밀번호의 변경을 요청드리며, 아래 유의사항을 안내드립니다. ※ 이메일이나 문자로 의심스러운 링크나 연락을 받으실 경우: - 클릭하거나 개인정보를 입력하지 마시고, - 관할 경찰서(☎112) 또는 한국인터넷진흥원(☎118)으로 신고해 주시기 바랍니다. ※ 피해 접수 또는 기타 문의 사항: - 담당부서 (☎02-501-9396 또는 customer-service@day1company.co.kr)로 연락해 주시기 바랍니다. 당사는 고객 정보 보호를 최우선으로 삼아 전사 보안 시스템 점검과 강화 조치를 지속적으로 진행하고 있습니다. 고객 여러분께서 안심하고 서비스를 이용하실 수 있도록 재발 방지에 최선을 다하겠습니다 감사합니다. 주식회사 데이원컴퍼니 드림
Loss: 0.1782198 Step: 394 Last prompt: a dirty painting of i1683731685, art by portrait of usada pekora Last saved embedding: <none> Last saved image: <none>
Loss: 0.0547138 Step: 395 Last prompt: a painting of _1_1756696475_w360, art by portrait of usada pekora Last saved embedding: <none> Last saved image: <none>
Loss: 0.0913988 Step: 397 Last prompt: a dark painting of hPSbz8dGC0Kzj_e0C25DrQ1IkVSk1fKm3shxQYY_pNi-qD6BnEUCNIuEtYe1a1ri6IHTBFJ7gRuuSrE34KdmxQ, art by portrait of usada pekora Last saved embedding: <none> Last saved image: <none>
Loss: 0.0651186 Step: 398 Last prompt: a rendering of ZpuilhK8qsxjuj_Z3nPoINJNXYOYKZv72wVg-943xSclKQ_xs_qC1bJJM32gGWUuJBNEBaMaAQJQzxaJ7txuHg, art by portrait of usada pekora Last saved embedding: <none> Last saved image: <none>
Loss: 0.0029331 Step: 499 Last prompt: a nice painting of DhB_-h44CoXqInpAmvHWVzqKGNprsXK6bjNO0nCG0waQX72PREOmRxL9tBvqKFcuxnZULq3L3vFskLcRSeNQvA, art by portrait of usada pekora Last saved embedding: <none> Last saved image: <none>
콘솔창 열어보면 먼가 되는거 같긴한데..
gpu도 열심히 갈려 나가는 중. 으어어 온도 괜찮을까?
처음으로 gpu fan 60% 돌파!
cpu가 아주 노는건 아니고, 파일 퍼준다고 조금 사용되는 것 같다.
좀 돌다 보니 이런게 막 나온다.
일종의 evaluation 단계에서 하나 빼보는건가?
아마 학습 단계에서 500개마다 save an image 되어있는 부분이, 이렇게 이미지로 나오는 듯
학습 돌리고 나서 usada가 들어간걸 찾아보는데
safetensors는 없고 embeddings와 model/hypernetworks 에 pt 확장자로 존재한다.
/mnt/Downloads/stable-diffusion-webui$ find ./ -name *usada* ./embeddings/portrait of usada pekora.pt ./textual_inversion/2026-06-10/portrait of usada pekora ./textual_inversion/2026-06-10/portrait of usada pekora/images/portrait of usada pekora-1500.png ./textual_inversion/2026-06-10/portrait of usada pekora/images/portrait of usada pekora-3500.png ./textual_inversion/2026-06-10/portrait of usada pekora/images/portrait of usada pekora-500.png ./textual_inversion/2026-06-10/portrait of usada pekora/images/portrait of usada pekora-3000.png ./textual_inversion/2026-06-10/portrait of usada pekora/images/portrait of usada pekora-2500.png ./textual_inversion/2026-06-10/portrait of usada pekora/images/portrait of usada pekora-2000.png ./textual_inversion/2026-06-10/portrait of usada pekora/images/portrait of usada pekora-1000.png ./textual_inversion/2026-06-10/portrait of usada pekora/images/portrait of usada pekora-4000.png ./textual_inversion/2026-06-10/portrait of usada pekora/embeddings/portrait of usada pekora-500.pt ./textual_inversion/2026-06-10/portrait of usada pekora/embeddings/portrait of usada pekora-3500.pt ./textual_inversion/2026-06-10/portrait of usada pekora/embeddings/portrait of usada pekora-4000.pt ./textual_inversion/2026-06-10/portrait of usada pekora/embeddings/portrait of usada pekora-3000.pt ./textual_inversion/2026-06-10/portrait of usada pekora/embeddings/portrait of usada pekora-1000.pt ./textual_inversion/2026-06-10/portrait of usada pekora/embeddings/portrait of usada pekora-2500.pt ./textual_inversion/2026-06-10/portrait of usada pekora/embeddings/portrait of usada pekora-2000.pt ./textual_inversion/2026-06-10/portrait of usada pekora/embeddings/portrait of usada pekora-1500.pt ./textual_inversion/2026-06-10/portrait of usada pekora/image_embeddings/portrait of usada pekora-1500.png ./textual_inversion/2026-06-10/portrait of usada pekora/image_embeddings/portrait of usada pekora-3500.png ./textual_inversion/2026-06-10/portrait of usada pekora/image_embeddings/portrait of usada pekora-500.png ./textual_inversion/2026-06-10/portrait of usada pekora/image_embeddings/portrait of usada pekora-3000.png ./textual_inversion/2026-06-10/portrait of usada pekora/image_embeddings/portrait of usada pekora-2500.png ./textual_inversion/2026-06-10/portrait of usada pekora/image_embeddings/portrait of usada pekora-2000.png ./textual_inversion/2026-06-10/portrait of usada pekora/image_embeddings/portrait of usada pekora-1000.png ./textual_inversion/2026-06-10/portrait of usada pekora/image_embeddings/portrait of usada pekora-4000.png ./models/hypernetworks/portrait of usada pekora.pt
26K 6월 11 00:24 'portrait of usada pekora.pt' 84M 6월 10 23:12 'portrait of usada pekora.pt'
26K 6월 10 23:38 'portrait of usada pekora-1000.pt' 26K 6월 10 23:45 'portrait of usada pekora-1500.pt' 26K 6월 10 23:53 'portrait of usada pekora-2000.pt' 26K 6월 11 00:01 'portrait of usada pekora-2500.pt' 26K 6월 11 00:08 'portrait of usada pekora-3000.pt' 26K 6월 11 00:16 'portrait of usada pekora-3500.pt' 26K 6월 11 00:24 'portrait of usada pekora-4000.pt' 26K 6월 10 23:30 'portrait of usada pekora-500.pt'
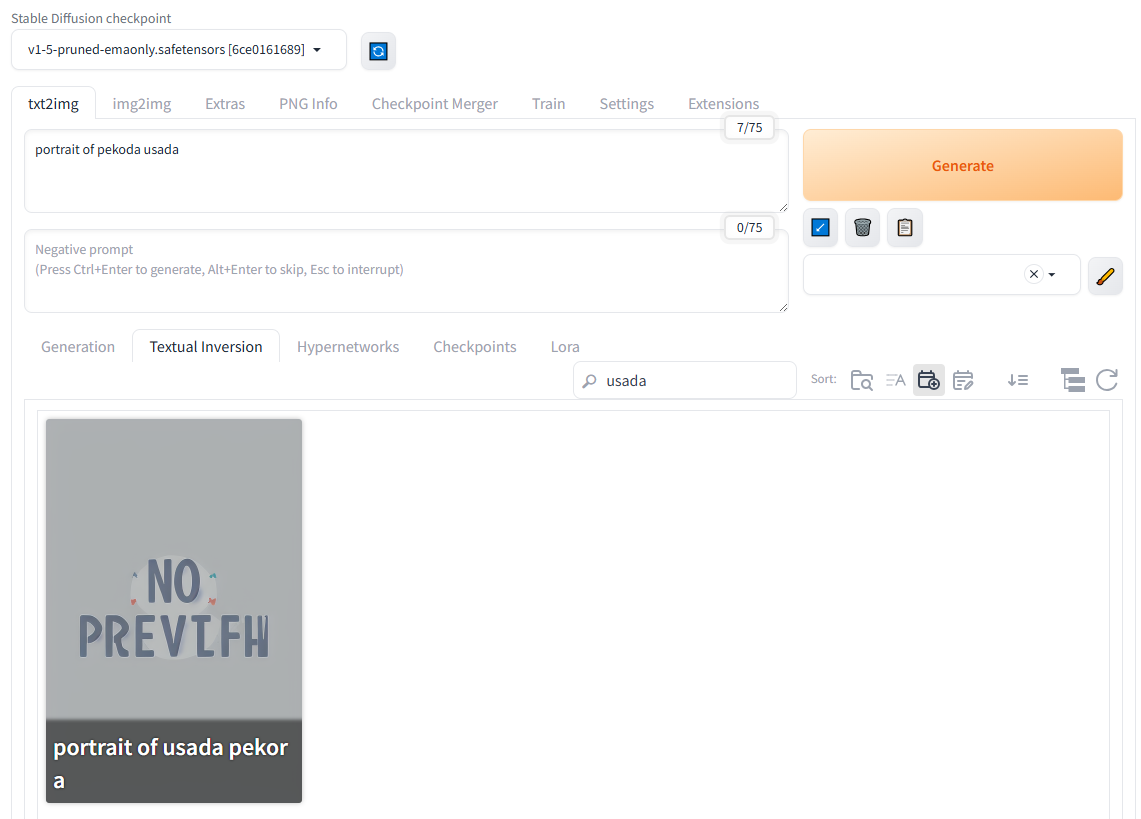
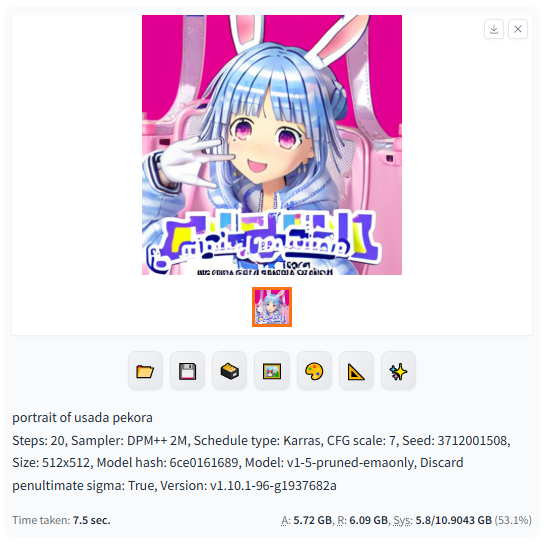
txt2img 에서 refresh 해보니 아래와 같이 뜬다.
그냥 자동으로 추가되고, generate 누르니 아래와 같이 생성된다.
그나저나 저 이미지는 "portrait of usada pekora" 가 아니면 비슷하게라도 그려지지 않는거 보면
{"choices":[{"finish_reason":"stop","index":0,"message":{"role":"assistant","content":"Python은 표준 라이브러리만으로도 매우 빠르고 간단하게 HTTP 서버를 만들 수 있게 해줍니다.\n\n요구 사항에 따라 두 가지 예제를 제공해 드립니다.\n\n1. **가장 간단한 예제 (파일 서빙):** Python의 내장 `http.server` 모듈을 사용하는 방법. (가장 빠르게 서버를 띄우는 방법)\n2. **커스터마이징 예제 (맞춤 응답):** `BaseHTTPRequestHandler`를 상속받아 GET 요청 등에 대해 직접 응답 내용을 정의하는 방법. (실제 웹 개발의 기본 원리 학습)\n\n---\n\n## 💡 예제 1: 가장 간단한 HTTP 서버 (파일 서빙)\n\n이 방법은 실제 웹 프레임워크를 사용하지 않고, 현재 디렉터리에 있는 파일들을 웹에서 불러올 때(서빙할 때) 사용됩니다. 서버를 띄우는 코드를 작성할 필요 없이, 명령어 한 줄로 가능합니다.\n\n### 💻 코드 (실행 명령어)\n\n```bash\n# Python 3 환경에서 실행\npython3 -m http.server 8000\n```\n\n### 🚀 실행 방법\n\n1. 서버로 사용할 파일들(HTML, 이미지 등)이 있는 디렉터리로 이동합니다.\n2. 위의 명령어를 실행합니다.\n3. 브라우저를 열고 `http://localhost:8000` 에 접속하면 해당 디렉터리의 파일 목록이 보입니다.\n\n**✅ 장점:** 코드가 거의 필요 없고, 즉시 작동합니다.\n**❌ 단점:** 특정 URL 요청에 대해 복잡한 비즈니스 로직을 처리할 수 없습니다.\n\n---\n\n## 🛠️ 예제 2: 맞춤 응답을 처리하는 HTTP 서버 (BaseHTTPRequestHandler 사용)\n\n만약 특정 URL(`http://localhost:8000/hello`)에 접속했을 때, **사용자 정의 메시지**를 반환하고 싶다면 이 방식을 사용해야 합니다.\n\n이 코드는 `http.server` 모듈의 기본 핸들러 클래스를 상속받아, `do_GET` 메소드를 오버라이드(재정의)하여 우리가 원하는 응답을 직접 구성합니다.\n\n### 💻 코드 (`custom_server.py`)\n\n```python\nimport http.server\nimport socketserver\n\n# 사용할 포트 지정\nPORT = 8000\n\nclass CustomHTTPRequestHandler(http.server.BaseHTTPRequestHandler):\n \"\"\"\n HTTP 요청(GET, POST 등)을 처리하는 사용자 정의 핸들러 클래스입니다.\n \"\"\"\n \n def do_GET(self):\n \"\"\"\n GET 요청이 들어왔을 때 실행되는 메서드입니다.\n \"\"\"\n print(f\"--- GET 요청 수신: {self.path} ---\")\n \n # 1. 특정 경로에 대한 응답 처리\n if self.path == '/hello':\n # 응답할 콘텐츠\n response_content = \"안녕하세요! 이것은 커스텀 서버가 보낸 응답입니다.\"\n \n # HTTP 응답 헤더 설정 (상태 코드: 200 OK, Content-Type: text/plain)\n self.send_response(200)\n self.send_header(\"Content-type\", \"text/plain\")\n self.send_header(\"Content-Length\", str(len(response_content)))\n self.end_headers()\n \n # 응답 본문(Body) 전송\n self.wfile.write(bytes(response_content, \"utf-8\"))\n \n # 2. 기본 경로 (/)에 대한 응답 처리\n elif self.path == '/':\n response_content = \"환영합니다! /hello 경로로 접속해 보세요.\"\n self.send_response(200)\n self.send_header(\"Content-type\", \"text/html\")\n self.end_headers()\n self.wfile.write(bytes(response_content, \"utf-8\"))\n \n # 3. 정의되지 않은 경로에 대한 응답 (404 Not Found)\n else:\n self.send_response(404)\n self.send_header(\"Content-type\", \"text/plain\")\n self.end_headers()\n self.wfile.write(bytes(\"404 Not Found\", \"utf-8\"))\n\n\n# 서버를 띄우는 설정\nHandler = CustomHTTPRequestHandler\n\nwith socketserver.TCPServer((\"\", PORT), Handler) as httpd:\n print(f\"*** 서버가 http://localhost:{PORT} 에서 실행 중입니다. ***\")\n print(\"테스트 경로: http://localhost:8000/hello\")\n print(\"---------------------------------------------------\")\n try:\n httpd.serve_forever()\n except KeyboardInterrupt:\n print(\"\\n서버를 종료합니다.\")\n httpd.server_close()\n```\n\n### 🚀 실행 방법\n\n1. 위 코드를 `custom_server.py` 파일로 저장합니다.\n2. 터미널에서 다음 명령어를 실행합니다.\n ```bash\n python3 custom_server.py\n ```\n3. **테스트:**\n * `http://localhost:8000/` 에 접속하면 \"환영합니다!\"가 보입니다.\n * `http://localhost:8000/hello` 에 접속하면 \"안녕하세요! 이것은 커스텀 서버가 보낸 응답입니다.\"가 보입니다.\n\n### ✨ 동작 원리 해설\n\n* **`socketserver`**: 네트워크 소켓을 관리하고 클라이언트 연결을 받아주는 역할을 합니다.\n* **`BaseHTTPRequestHandler`**: HTTP 요청을 파싱하고 응답을 보낼 수 있는 기본 템플릿을 제공합니다.\n* **`do_GET(self)`**: 클라이언트가 `GET` 요청을 보냈을 때 이 함수가 실행됩니다.\n* **`self.send_response(200)`**: 클라이언트에게 응답 상태 코드(200=성공, 404=찾을 수 없음 등)를 보냅니다.\n* **`self.send_header(...)`**: 응답의 종류(Content-type)와 크기(Content-Length) 등의 메타데이터를 보냅니다.\n* **`self.wfile.write(...)`**: 실제 웹 브라우저가 읽을 수 있는 응답 내용(HTML, 텍스트 등)을 전송합니다.\n\n---\n\n## 📚 요약 및 추천\n\n| 구분 | 예제 1: `http.server` | 예제 2: `BaseHTTPRequestHandler` |\n| :--- | :--- | :--- |\n| **용도** | 정적 파일(Static File) 서빙 | 특정 URL에 대한 동적 응답 처리 |\n| **난이도** | ⭐ (매우 쉬움) | ⭐⭐ (중간) |\n| **특징** | 코드 없이 명령어 실행 | HTTP 프로토콜을 직접 제어 |\n| **추천 상황** | 간단한 테스트 서버, 파일 배포 | **웹 개발의 기초 원리 학습** |\n| **실무 사용** | 파일 공유 시 | **Flask/Django 같은 프레임워크 학습의 출발점** |\n\n**👉 만약 실제 서비스를 만들고 싶다면:** 예제 2로 기초 원리를 이해하신 후, **Flask**나 **FastAPI** 같은 경량 프레임워크를 사용하시는 것을 강력히 추천드립니다. 이 프레임워크들이 위의 복잡한 `do_GET` 코드를 훨씬 간결하게 처리해 줍니다.","reasoning_content":"Here's a thinking process that leads to the suggested response:\n\n1. **Analyze the Request:** The user wants an example of an HTTP server written in Python.\n\n2. **Determine the Scope/Level of the Example:**\n * *Option 1: Simple, built-in module (`http.server`).* This is the easiest and fastest way to fulfill the request for a *basic* example. It demonstrates functionality without complex code.\n * *Option 2: Using the `socket` module.* This is much harder, requires handling HTTP protocols manually, and is overkill for a standard \"example.\"\n * *Option 3: Using a framework (Flask/Django).* While common in production, this isn't a *pure* Python HTTP server example using standard libraries, and it might confuse the user if they just want to see how the basic protocol works.\n\n3. **Select the Best Approach (Option 1: `http.server` and Customization):**\n * The best approach is to first provide the simplest, runnable solution using `http.server`.\n * Then, provide a slightly more advanced example (inheriting from `BaseHTTPRequestHandler`) to show how one would customize the handling of different HTTP methods (GET, POST, etc.).\n\n4. **Draft the Code (Simple Server):**\n * Need to import `http.server` and `socketserver`.\n * Need to define the port (e.g., 8000).\n * Need to run the server. (This is the quickest way to run a basic server.)\n\n5. **Draft the Code (Customized Server - The \"Educational\" Example):**\n * Need to import `http.server` and `BaseHTTPRequestHandler`.\n * Define a class (e.g., `SimpleHTTPRequestHandler`).\n * Override the `do_GET` method.\n * In `do_GET`, write the HTTP response structure (Status Line, Headers, Body).\n * Handle the server startup using `http.server.HTTPServer`.\n\n6. **Review and Refine the Explanation (Crucial Step):**\n * The explanation must be clear, easy to follow, and explain *why* the code works.\n * *Add Instructions:* How to save, how to run, and how to test (using a browser or `curl`).\n * *Structure:* Present the simple example first, followed by the advanced/customizable example.\n\n7. **Final Polish (Self-Correction during drafting):** Make sure the custom server example *properly* sends the Content-Type and Content-Length so the browser displays it correctly. (The provided code handles this.)\n\n**(The resulting output matches the structured response provided below.)**"}}],"created":1781067647,"model":"gemma-4-E4B-it-Q4_K_M.gguf","system_fingerprint":"b9553-9e3b928fd","object":"chat.completion","usage":{"completion_tokens":2288,"prompt_tokens":26,"total_tokens":2314,"prompt_tokens_details":{"cached_tokens":6}},"id":"chatcmpl-Mbe6PZU7iilj6DVEI59YH4eoDksRPZXj","timings":{"cache_n":6,"prompt_n":20,"prompt_ms":328.529,"prompt_per_token_ms":16.42645,"prompt_per_second":60.8774263459238,"predicted_n":2288,"predicted_ms":40048.23,"predicted_per_token_ms":17.50359702797203,"predicted_per_second":57.13111415910266}}
시스템 프롬프트를 (role:system) 웹으로는 해봤는데 cli 에서도 가능한지 찾아보는 중
파일에도 넣을수 있고, 미리 넣을수도 있지만 런타임 중에 변경은 불가능 한건가?
llama-b9553$ ./llama-cli --help | grep -i sys -p, --prompt PROMPT prompt to start generation with; for system message, use -sys --mlock force system to keep model in RAM rather than swapping or compressing --numa TYPE attempt optimizations that help on some NUMA systems if run without this previously, it is recommended to drop the system -sys, --system-prompt PROMPT system prompt to use with model (if applicable, depending on chat -sysf, --system-prompt-file FNAME a file containing the system prompt (default: none) hunyuan-vl, kimi-k2, llama2, llama2-sys, llama2-sys-bos, llama2-sys-strip, llama3, llama4, megrez, minicpm, mistral-v1, hunyuan-vl, kimi-k2, llama2, llama2-sys, llama2-sys-bos, llama2-sys-strip, llama3, llama4, megrez, minicpm, mistral-v1,
llama-b9553$ ./llama-cli --help | grep -i prom -tb, --threads-batch N number of threads to use during batch and prompt processing (default: -c, --ctx-size N size of the prompt context (default: 0, 0 = loaded from model) --keep N number of tokens to keep from the initial prompt (default: 0, -1 = -p, --prompt PROMPT prompt to start generation with; for system message, use -sys -f, --file FNAME a file containing the prompt (default: none) -bf, --binary-file FNAME binary file containing the prompt (default: none) number of threads to use during batch and prompt processing (default: --verbose-prompt print a verbose prompt before generation (default: false) --display-prompt, --no-display-prompt whether to print prompt at generation (default: true) -co, --color [on|off|auto] Colorize output to distinguish prompt and user input from generations -sys, --system-prompt PROMPT system prompt to use with model (if applicable, depending on chat -sysf, --system-prompt-file FNAME a file containing the system prompt (default: none) -r, --reverse-prompt PROMPT halt generation at PROMPT, return control in interactive mode will not be interactive if first turn is predefined with --prompt
-M Instead of outputting the result of preprocessing, output a rule suitable for make describing the dependencies of the main source file. The preprocessor outputs one make rule containing the object file name for that source file, a colon, and the names of all the included files, including those coming from -include or -imacros command line options.
Unless specified explicitly (with -MT or -MQ), the object file name consists of the name of the source file with any suffix replaced with object file suffix and with any leading directory parts removed. If there are many included files then the rule is split into several lines using \-newline. The rule has no commands. This option does not suppress the preprocessor's debug output, such as -dM. To avoid mixing such debug output with the dependency rules you should explicitly specify the dependency output file with -MF, or use an environment variable like DEPENDENCIES_OUTPUT . Debug output will still be sent to the regular output stream as normal.
Passing -M to the driver implies -E, and suppresses warnings with an implicit -w.
-MM Like -M but do not mention header files that are found in system header directories, nor header files that are included, directly or indirectly, from such a header.
This implies that the choice of angle brackets or double quotes in an #include directive does not in itself determine whether that header will appear in -MM dependency output. This is a slight change in semantics from GCC versions 3.0 and earlier. -MF file When used with -M or -MM, specifies a file to write the dependencies to. If no -MF switch is given the preprocessor sends the rules to the same place it would have sent preprocessed output. When used with the driver options -MD or -MMD, -MF overrides the default dependency output file.
-MG In conjunction with an option such as -M requesting dependency generation, -MG assumes missing header files are generated files and adds them to the dependency list without raising an error. The dependency filename is taken directly from the "#include" directive without prepending any path. -MG also suppresses preprocessed output, as a missing header file renders this useless.
This feature is used in automatic updating of makefiles. -MP This option instructs CPP to add a phony target for each dependency other than the main file, causing each to depend on nothing. These dummy rules work around errors make gives if you remove header files without updating the Makefile to match.
This is typical output: test.o: test.c test.h
test.h: -MT target Change the target of the rule emitted by dependency generation. By default CPP takes the name of the main input file, deletes any directory components and any file suffix such as .c, and appends the platform's usual object suffix. The result is the target. An -MT option will set the target to be exactly the string you specify. If you want multiple targets, you can specify them as a single argument to -MT, or use multiple -MT options.
For example, -MT '$(objpfx)foo.o' might give
$(objpfx)foo.o: foo.c -MQ target Same as -MT, but it quotes any characters which are special to Make. -MQ '$(objpfx)foo.o' gives $$(objpfx)foo.o: foo.c The default target is automatically quoted, as if it were given with -MQ. -MD -MD is equivalent to -M -MF file, except that -E is not implied. The driver determines file based on whether an -o option is given. If it is, the driver uses its argument but with a suffix of .d, otherwise it takes the name of the input file, removes any directory components and suffix, and applies a .d suffix.
If -MD is used in conjunction with -E, any -o switch is understood to specify the dependency output file, but if used without -E, each -o is understood to specify a target object file. Since -E is not implied, -MD can be used to generate a dependency output file as a side-effect of the compilation process.
-MMD Like -MD except mention only user header files, not system header files.