### 1. System Status
#### `get_modify_version()`
#### `clear_queue()`
#### `check_async_or_sync()`
#### `get_system_version()`
#### `get_basic_version()`
#### `get_error_information()`
#### `clear_error_information()`
#### `get_reboot_count()`
### 2. Overall Status
#### `power_on()`
#### `power_off()`
#### `is_power_on()`
#### `release_all_servos()`
#### `focus_servo(servo_id)`
#### `is_controller_connected()`
#### `read_next_error()`
#### `get_fresh_mode()`
#### `set_fresh_mode()`
#### `set_free_mode()`
#### `is_free_mode()`
#### `focus_all_servos()`
#### `set_vision_mode()`
### 3.MDI Mode and Operation
#### `get_angles()`
#### `get_angles_plan()`
#### `send_angle(id, degree, speed)`
#### `send_angles(angles, speed)`
#### `get_coords()`
#### `get_coords_plan()`
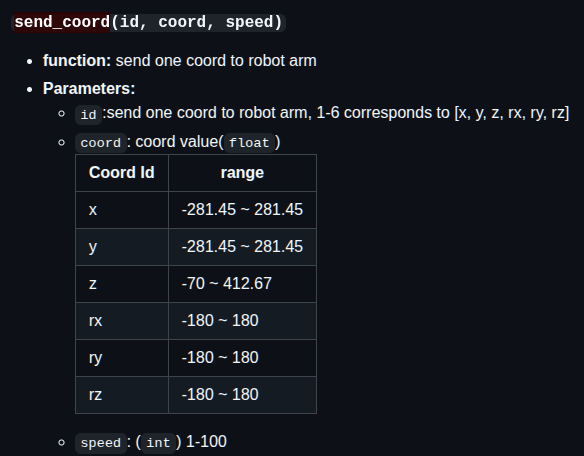
#### `send_coord(id, coord, speed)`
#### `send_coords(coords, speed, mode)`
#### `pause()`
#### `sync_send_angles(angles, speed, timeout=15)`
#### `sync_send_coords(coords, speed, mode=0, timeout=15)`
#### `get_angles_coords()`
#### `is_paused()`
#### `resume()`
#### `stop()`
#### `is_in_position(data, flag)`
#### `is_moving()`
#### `angles_to_coords(angles)`
#### `solve_inv_kinematics(target_coords, current_angles)`
#### `drag_start_record()`
#### `drag_end_record()`
#### `drag_get_record_data()`
#### `drag_get_record_len()`
#### `drag_clear_record_data()`
### 4. JOG Mode and Operation
#### `jog_angle(joint_id, direction, speed)`
#### `jog_coord(coord_id, direction, speed)`
#### `jog_rpy(end_direction, direction, speed)`
#### `jog_increment_angle(joint_id, increment, speed)`
#### `jog_increment_coord(id, increment, speed)`
#### `set_encoder(joint_id, encoder, speed)`
#### `get_encoder(joint_id)`
#### `set_encoders(encoders, speed)`
#### `get_encoders()`
### 5. Running status and Settings
#### `get_joint_min_angle(joint_id)`
#### `get_joint_max_angle(joint_id)`
#### `set_joint_min(id, angle)`
#### `set_joint_max(id, angle)`
### 6. Joint motor control
#### `is_servo_enable(servo_id)`
#### `is_all_servo_enable()`
#### `set_servo_calibration(servo_id)`
#### `release_servo(servo_id)`
#### `focus_servo(servo_id)`
#### `set_servo_data(servo_id, data_id, value, mode=None)`
#### `get_servo_data(servo_id, data_id, mode=None)`
#### `joint_brake(joint_id)`
### 7. 9g Servo
#### `move_round()`
#### `set_four_pieces_zero()`
### 8. Servo state value
#### `get_servo_speeds()`
#### `get_servo_voltages()`
#### `get_servo_status()`
#### `get_servo_temps()`
### 9. Robotic arm end IO control
#### `set_color(r, g, b)`
#### `set_digital_output(pin_no, pin_signal)`
#### `get_digital_input(pin_no)`
#### `set_pin_mode(pin_no, pin_mode)`
### 10. Robotic arm end gripper control
#### `set_gripper_state(flag, speed, _type_1=None)`
#### `set_gripper_value(gripper_value, speed, gripper_type=None)`
#### `gripper_stop()`
#### `set_gripper_calibration()`
#### `is_gripper_moving()`
#### `get_gripper_value()`
#### `set_pwm_output(channel, frequency, pin_val)`
#### `set_HTS_gripper_torque(torque)`
#### `get_HTS_gripper_torque()`
#### `get_gripper_protect_current()`
#### `set_gripper_protect_current(current)`
#### `init_gripper()`
### 11. Set bottom IO input/output status
#### `set_basic_output(pin_no, pin_signal)`
#### `get_basic_input(pin_no)`
### 12. WLAN Setting
#### `set_ssid_pwd(account, password)`
#### `get_ssid_pwd()`
#### `set_server_port(port)`
### 13. TOF
#### `get_tof_distance()`
### 14. Communication mode
#### `set_transponder_mode(mode)`
#### `get_transponder_mode()`
### 15. Cartesian space coordinate parameter setting
#### `set_tool_reference(coords)`
#### `get_tool_reference(coords)`
#### `set_world_reference(coords)`
#### `get_world_reference()`
#### `set_reference_frame(rftype)`
#### `get_reference_frame()`
#### `set_movement_type(move_type)`
#### `get_movement_type()`
#### `set_end_type(end)`
#### `get_end_type()`
### 16. Raspberry pi -- GPIO
#### `gpio_init()`
#### `gpio_output(pin, v)`
### 17. utils (module)
#### `utils.get_port_list()`
#### `utils.detect_port_of_basic()` |