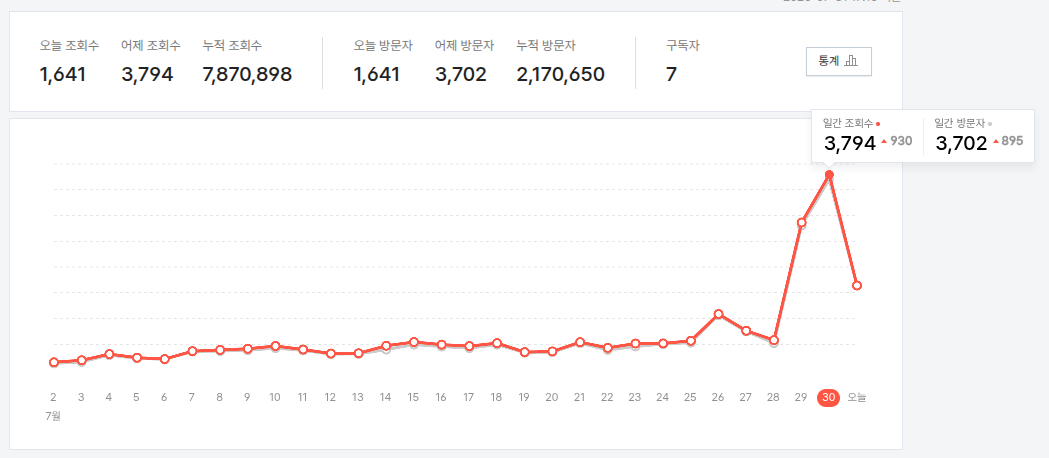
아 밑바닥에 깔려있어야 마음의 평화가 온다고 -_-
왜 또 점프시켜서 밑바닥을 안보이게 하냐고?!?!?

'개소리 왈왈 > 블로그' 카테고리의 다른 글
| -_- (0) | 2025.08.18 |
|---|---|
| 누가 거짓말을 하고 있는걸까? (0) | 2025.08.07 |
| 오랫만에 해피빈 기부 (0) | 2025.07.22 |
| 블로그 방문자 수 정상화(?) (0) | 2025.07.20 |
| 이틀후 블로그 통계 정상화 (7) | 2025.07.17 |
아 밑바닥에 깔려있어야 마음의 평화가 온다고 -_-
왜 또 점프시켜서 밑바닥을 안보이게 하냐고?!?!?

| -_- (0) | 2025.08.18 |
|---|---|
| 누가 거짓말을 하고 있는걸까? (0) | 2025.08.07 |
| 오랫만에 해피빈 기부 (0) | 2025.07.22 |
| 블로그 방문자 수 정상화(?) (0) | 2025.07.20 |
| 이틀후 블로그 통계 정상화 (7) | 2025.07.17 |
맨날 리눅스에서만 하다가 노트북 바꾸기 귀찮아서(!!) 윈도우에서도 해보려고 발악중
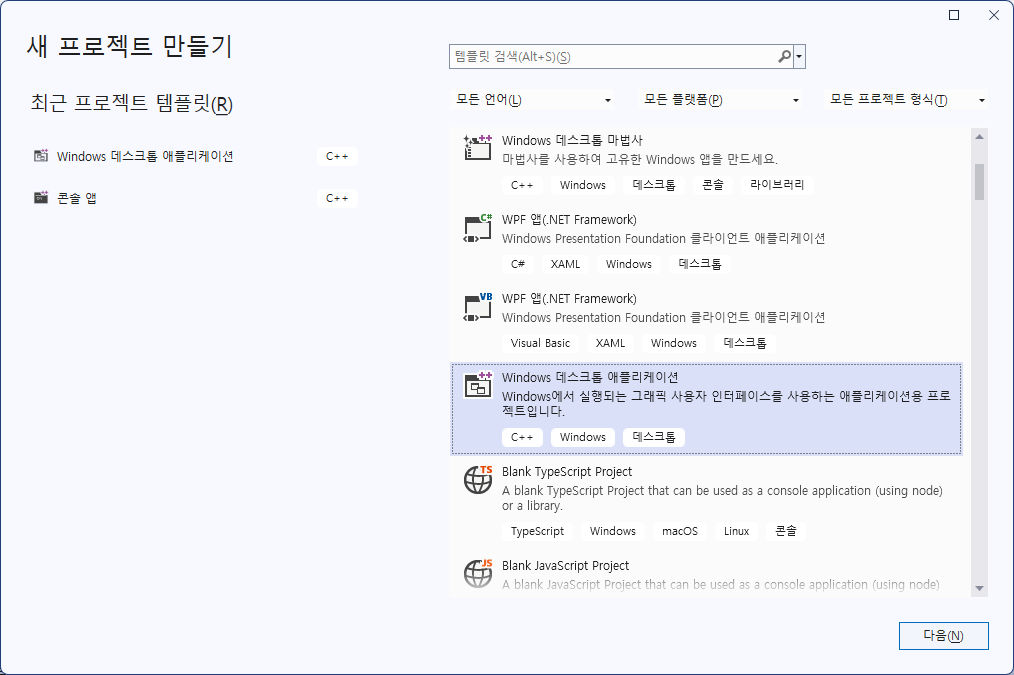
일단은 visual studio 에서 콘솔앱으로는 안되서
Windows 데스크탑 애플리케이션으로 프로젝트를 생성

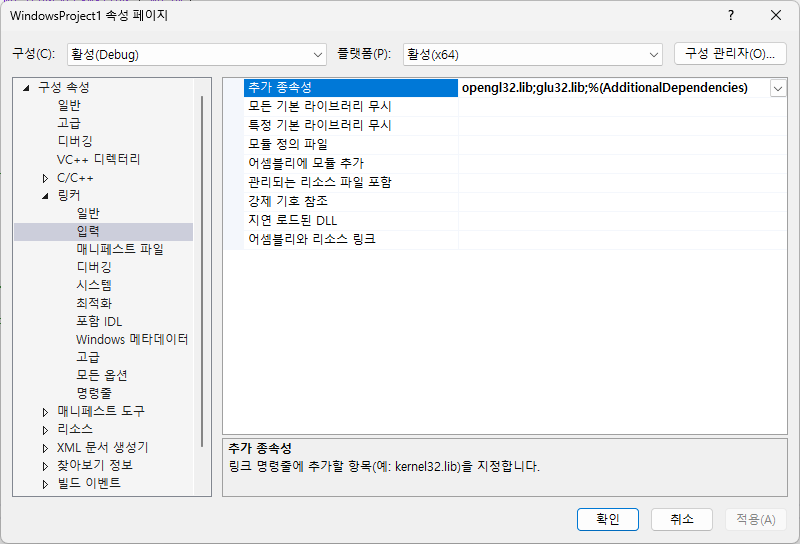
프로젝트 설정에 링커 - 입력 - 추가 종속성에

opengl32.lib 와 glu32.lib를 추가해주면 끝

[링크 : https://makingrobot.tistory.com/155]
F5 눌러서 빌드하니 잘 뜬다.

아래는 gemini가 생성해준 소스코드.
#include <windows.h> // Win32 API 헤더
#include <gl/gl.h> // OpenGL 핵심 헤더
#include <gl/glu.h> // GLU 유틸리티 헤더
// OpenGL 렌더링 컨텍스트 핸들
HGLRC g_hRC = NULL;
// 디바이스 컨텍스트 핸들
HDC g_hDC = NULL;
// 윈도우 핸들
HWND g_hWnd = NULL;
// 인스턴스 핸들
HINSTANCE g_hInstance = NULL;
// 창 클래스 이름 (유니코드 문자열)
LPCWSTR szWindowClass = L"OpenGLWindow";
// 창 제목 (유니코드 문자열)
LPCWSTR szTitle = L"Simple OpenGL Triangle (No GLUT)";
// OpenGL 초기화 함수
void InitOpenGL() {
// 배경색을 검정색으로 설정 (RGBA 값)
glClearColor(0.0f, 0.0f, 0.0f, 1.0f);
// 현재 매트릭스를 프로젝션 매트릭스로 설정
glMatrixMode(GL_PROJECTION);
// 2D 직교 투영 설정 (좌표계: x=0.0~200.0, y=0.0~200.0)
gluOrtho2D(0.0, 200.0, 0.0, 200.0);
}
// 그리기 함수
void DrawScene() {
// 컬러 버퍼 클리어
glClear(GL_COLOR_BUFFER_BIT);
// 삼각형 그리기 시작
glBegin(GL_TRIANGLES);
// 첫 번째 꼭지점: 빨간색 (위쪽)
glColor3f(1.0f, 0.0f, 0.0f);
glVertex2i(100, 150);
// 두 번째 꼭지점: 녹색 (왼쪽 아래)
glColor3f(0.0f, 1.0f, 0.0f);
glVertex2i(50, 50);
// 세 번째 꼭지점: 파란색 (오른쪽 아래)
glColor3f(0.0f, 0.0f, 1.0f);
glVertex2i(150, 50);
glEnd(); // 삼각형 그리기 끝
// 프론트 버퍼와 백 버퍼 교체 (더블 버퍼링 사용 시)
SwapBuffers(g_hDC);
}
// OpenGL 활성화 함수
// 창 핸들(hWnd), 디바이스 컨텍스트 포인터(hDC), 렌더링 컨텍스트 포인터(hRC)를 인자로 받음
void EnableOpenGL(HWND hWnd, HDC* hDC, HGLRC* hRC) {
PIXELFORMATDESCRIPTOR pfd;
int iFormat;
// 픽셀 형식 기술자 구조체를 0으로 초기화
ZeroMemory(&pfd, sizeof(pfd));
// 픽셀 형식 기술자 구조체의 크기 설정
pfd.nSize = sizeof(pfd);
// 픽셀 형식 기술자 버전 설정
pfd.nVersion = 1;
// 픽셀 형식 플래그 설정: 윈도우에 그리기, OpenGL 지원, 더블 버퍼링 사용
pfd.dwFlags = PFD_DRAW_TO_WINDOW | PFD_SUPPORT_OPENGL | PFD_DOUBLEBUFFER;
// 픽셀 타입 설정: RGBA 색상 모드
pfd.iPixelType = PFD_TYPE_RGBA;
// 색상 비트 깊이 설정: 32비트 색상
pfd.cColorBits = 32;
// 깊이 버퍼 비트 깊이 설정: 16비트 깊이 버퍼
pfd.cDepthBits = 16;
// 레이어 타입 설정: 메인 평면
pfd.iLayerType = PFD_MAIN_PLANE;
// 윈도우의 디바이스 컨텍스트를 얻음
*hDC = GetDC(hWnd);
// 주어진 픽셀 형식 기술자에 가장 적합한 픽셀 형식을 찾음
iFormat = ChoosePixelFormat(*hDC, &pfd);
// 디바이스 컨텍스트에 픽셀 형식을 설정
SetPixelFormat(*hDC, iFormat, &pfd);
// OpenGL 렌더링 컨텍스트 생성
*hRC = wglCreateContext(*hDC);
// 현재 스레드의 디바이스 컨텍스트에 렌더링 컨텍스트를 연결
wglMakeCurrent(*hDC, *hRC);
// OpenGL 초기화 함수 호출
InitOpenGL();
}
// OpenGL 비활성화 함수
// 창 핸들(hWnd), 디바이스 컨텍스트(hDC), 렌더링 컨텍스트(hRC)를 인자로 받음
void DisableOpenGL(HWND hWnd, HDC hDC, HGLRC hRC) {
// 현재 렌더링 컨텍스트를 해제
wglMakeCurrent(NULL, NULL);
// 렌더링 컨텍스트를 삭제
wglDeleteContext(hRC);
// 디바이스 컨텍스트를 해제
ReleaseDC(hWnd, hDC);
}
// 윈도우 프로시저 (메시지 처리 콜백 함수)
// 윈도우 핸들, 메시지 코드, 추가 정보(wParam, lParam)를 인자로 받음
LRESULT CALLBACK WndProc(HWND hWnd, UINT message, WPARAM wParam, LPARAM lParam) {
switch (message) {
// 윈도우 생성 시 발생하는 메시지
case WM_CREATE:
// OpenGL 활성화 함수 호출
EnableOpenGL(hWnd, &g_hDC, &g_hRC);
break;
// 윈도우가 다시 그려져야 할 때 발생하는 메시지
case WM_PAINT:
// 그리기 함수 호출
DrawScene();
// WM_PAINT 메시지를 유효화 (반복적인 WM_PAINT 메시지 방지)
ValidateRect(hWnd, NULL);
break;
// 윈도우 크기 변경 시 발생하는 메시지
case WM_SIZE:
// 뷰포트 크기를 윈도우 크기에 맞게 조정 (선택 사항)
// L_PARAM에서 새 너비와 높이를 추출하여 glViewport 함수에 전달
// glViewport(0, 0, LOWORD(lParam), HIWORD(lParam));
break;
// 윈도우 닫기 버튼 클릭 시 발생하는 메시지
case WM_CLOSE:
// 윈도우 파괴 메시지를 보냄
DestroyWindow(hWnd);
break;
// 윈도우가 파괴될 때 발생하는 메시지
case WM_DESTROY:
// OpenGL 비활성화 함수 호출
DisableOpenGL(hWnd, g_hDC, g_hRC);
// 메시지 루프를 종료하는 메시지를 보냄
PostQuitMessage(0);
break;
// 처리하지 않는 다른 메시지들은 기본 윈도우 프로시저로 전달
default:
return DefWindowProc(hWnd, message, wParam, lParam);
}
return 0;
}
// WinMain 함수 (Windows 애플리케이션의 진입점)
// 인스턴스 핸들, 이전 인스턴스 핸들, 명령줄 문자열, 표시 상태 플래그를 인자로 받음
int WINAPI WinMain(HINSTANCE hInstance, HINSTANCE hPrevInstance, LPSTR lpCmdLine, int nCmdShow) {
WNDCLASS wc; // 윈도우 클래스 구조체
MSG msg; // 메시지 구조체
BOOL bDone = FALSE; // 메시지 루프 종료 플래그
g_hInstance = hInstance; // 현재 인스턴스 핸들 저장
// 윈도우 클래스 스타일 설정: 고유한 DC, 수평/수직 리드로우 시 다시 그리기
wc.style = CS_OWNDC | CS_HREDRAW | CS_VREDRAW;
// 윈도우 프로시저 함수 포인터 설정
wc.lpfnWndProc = WndProc;
// 추가 클래스 메모리 (0)
wc.cbClsExtra = 0;
// 추가 윈도우 메모리 (0)
wc.cbWndExtra = 0;
// 인스턴스 핸들 설정
wc.hInstance = hInstance;
// 아이콘 설정 (기본 애플리케이션 아이콘)
wc.hIcon = LoadIcon(NULL, IDI_APPLICATION);
// 커서 설정 (기본 화살표 커서)
wc.hCursor = LoadCursor(NULL, IDC_ARROW);
// 배경 브러시 설정 (검정색 솔리드 브러시)
wc.hbrBackground = (HBRUSH)GetStockObject(BLACK_BRUSH);
// 메뉴 이름 (없음)
wc.lpszMenuName = NULL;
// 윈도우 클래스 이름 설정 (LPCWSTR)
wc.lpszClassName = szWindowClass;
// 윈도우 클래스 등록 시도
if (!RegisterClass(&wc)) {
// 등록 실패 시 메시지 박스 표시 (유니코드 문자열 사용)
MessageBox(NULL, L"Window Registration Failed!", L"Error", MB_ICONEXCLAMATION | MB_OK);
return 0; // 프로그램 종료
}
// 윈도우 생성 시도
g_hWnd = CreateWindowEx(
WS_EX_APPWINDOW, // 확장된 윈도우 스타일: 작업 표시줄에 앱으로 표시
szWindowClass, // 윈도우 클래스 이름 (LPCWSTR)
szTitle, // 윈도우 제목 (LPCWSTR)
// 윈도우 스타일: 오버랩된 창, 형제 윈도우 영역 클리핑, 자식 윈도우 영역 클리핑
WS_OVERLAPPEDWINDOW | WS_CLIPSIBLINGS | WS_CLIPCHILDREN,
CW_USEDEFAULT, CW_USEDEFAULT, // x, y 위치 (기본값 사용)
400, 400, // 윈도우 너비, 높이
NULL, // 부모 윈도우 핸들 (없음)
NULL, // 메뉴 핸들 (없음)
hInstance, // 인스턴스 핸들
NULL // 추가 생성 데이터 (없음)
);
// 윈도우 생성 실패 시
if (!g_hWnd) {
// 메시지 박스 표시 (유니코드 문자열 사용)
MessageBox(NULL, L"Window Creation Failed!", L"Error", MB_ICONEXCLAMATION | MB_OK);
return 0; // 프로그램 종료
}
// 윈도우를 화면에 표시
ShowWindow(g_hWnd, nCmdShow);
// 윈도우를 업데이트하여 WM_PAINT 메시지 발생
UpdateWindow(g_hWnd);
// 메시지 루프
while (!bDone) {
// 메시지 큐에서 메시지를 확인 (메시지가 없어도 즉시 반환)
if (PeekMessage(&msg, NULL, 0, 0, PM_REMOVE)) {
// 종료 메시지 (WM_QUIT) 수신 시
if (msg.message == WM_QUIT) {
bDone = TRUE; // 루프 종료 플래그 설정
}
else {
// 키보드 메시지를 번역 (예: VK_SHIFT -> WM_KEYDOWN)
TranslateMessage(&msg);
// 메시지를 해당 윈도우의 윈도우 프로시저로 디스패치
DispatchMessage(&msg);
}
}
else {
// 메시지가 없을 때 지속적으로 그리기 (게임 루프와 유사)
DrawScene();
}
}
// 프로그램 종료 코드 반환
return (int)msg.wParam;
}
| openGL VAO ABO (0) | 2025.08.20 |
|---|---|
| openGL display list, deprecated (0) | 2025.08.20 |
| openGL light (0) | 2025.07.30 |
| openGL shade (0) | 2025.07.30 |
| openGL 은선제거 (0) | 2025.07.29 |
양면을 모두 조명처리하도록 설정하려면 아래의 명령을 쓰면 된다고 한다.
폴리곤을 줄이기 위해서 두께가 없는 면으로 구성된 녀석을 광원을 주려면 이렇게 해야만 culling 에서 문제가 안되려나?
| glLightModeli(GL_LIGHT_MODEL_TWO_SIDED, GL_TRUE); |
[링크 : https://wjdgh283.tistory.com/m/entry/OpenGL로-배우는-컴퓨터-그래픽스-Chapter-03-그래픽-컬러처리-1]
광원을 켜면 glColor로 설정한 건 무시된다고.
그래서 glMaterialfv()로 값을 설정해야 한다고 하는데, 광원의 종류를 객체별로 지정해주는 건가?
| glMaterialfv( GL_FRONT, GL_AMBIENT_AND_DIFFUSE, materialAmbient ); glMaterialfv( GL_FORNT, GL_SPECULAR, materialSpecular ); glMaterialf( GL_FRONT, GL_SHININESS, 60.0f ); |
[링크 : https://sungcheol-kim.gitbook.io/opengl-tutorial/chapter10]
| openGL display list, deprecated (0) | 2025.08.20 |
|---|---|
| visual studio 2002 에서 openGL 예제 실행 (0) | 2025.07.30 |
| openGL shade (0) | 2025.07.30 |
| openGL 은선제거 (0) | 2025.07.29 |
| openGL 스터디용 gemini 생성 코드 (0) | 2025.07.16 |
opengl에서 지원하는 쉐이드(면 색상 칠하기)는 flat과 gouraud 뿐이라는데
한 20년 전에 퐁은 어떻게 한거였지?
| I digged around a bit. You can use the fixed function pipeline and set glLightModeli(GL_LIGHT_MODEL_TWO_SIDE, 1); GL will then light backfaces with your back material and reversed normals. |
[링크 : https://gamedev.stackexchange.com/questions/9228/double-sides-face-with-two-normals]
| flat / Gouraud |
[링크 : https://gofo-coding.tistory.com/entry/OpenGL-Lighting-Shading]
phong은 쉐이더 써야한다고
[링크 : https://dev-sbee.tistory.com/35]
| visual studio 2002 에서 openGL 예제 실행 (0) | 2025.07.30 |
|---|---|
| openGL light (0) | 2025.07.30 |
| openGL 은선제거 (0) | 2025.07.29 |
| openGL 스터디용 gemini 생성 코드 (0) | 2025.07.16 |
| opengl texture (0) | 2025.05.30 |
숨겨진 선이나 면을 제거하는 건데
폴리곤의 방향에 따라서 해당 면을 앞면으로 판단해 렌더하냐 안하냐를 설정해 주어야 한다.
그런데 폴리곤의 normal vector를 이용해 cpu로 처리하는거 보다 이렇게 gpu에서 처리하도록 구현되어 있...겠지?
| glEnable(GL_CULL_FACE); glFrontFace(GL_CW); glCullFace(GL_BACK); glEnable(GL_DEPTH_TEST); |
[링크 : https://blog.naver.com/thooy/10097790648]
| Name glCullFace — specify whether front- or back-facing polygons can be culled C Specification void glCullFace( GLenum mode); Parameters mode Specifies whether front- or back-facing polygons are candidates for culling. Symbolic constants GL_FRONT, GL_BACK, and GL_FRONT_AND_BACK are accepted. The initial value is GL_BACK. |
[링크 : https://registry.khronos.org/OpenGL-Refpages/es2.0/xhtml/glCullFace.xml]
| 은선 제거 기법에는 다음과 같은 기법들이 있다. . 최대 최소법에 의한 은선 처리 . 법선 벡터법에 의한 은선 처리 . 능선 탐색법에 의한 은선 처리 . 공간 접근 . 객체 공간 알고리즘 . 리스트 순위 알고리즘 . 이미지 공간 알고리즘 . 워노크 알고리즘 . 프랭크린 알고리즘 . 웨일러-아델톤 알고리즘 |
[링크 : https://blog.naver.com/hwa7132/100096580196]
[링크 : https://learnopengl.com/Advanced-OpenGL/Face-culling]
[링크 : https://funnypr.tistory.com/m/entry/OpenGL-Normal-Vector]
[링크 : https://usingsystem.tistory.com/m/487]
[링크 : https://www.gamedev.net/forums/topic/620304-opengl-frustum-culling-with-glrotatef/]
| openGL light (0) | 2025.07.30 |
|---|---|
| openGL shade (0) | 2025.07.30 |
| openGL 스터디용 gemini 생성 코드 (0) | 2025.07.16 |
| opengl texture (0) | 2025.05.30 |
| blender in openGL (0) | 2025.04.28 |
X-CUBE-EEPROM 이 stm32f103 프로젝트에서 안보여서 찾아보는데
어...라... 왜 F만 빠져있냐 =_=
[링크 : https://www.st.com/resource/en/application_note/an4894-how-to-use-eeprom-emulation-on-stm32-mcus-stmicroelectronics.pdf]
[링크 : https://www.st.com/en/embedded-software/x-cube-eeprom.html]
[링크 : https://m.blog.naver.com/chcbaram/223153496808] << STM32G
| STM32C0 series, STM32G0 series, STM32G4 series, STM32H5 series, STM32L4 series, STM32L4+ series, STM32L5 series, STM32U0 series, STM32U3 series, STM32U5 series, STM32WB series, STM32WL series Reference documents EEPROM emulation solutions and application notes are available for other STM32 series as listed below. [1] Application note STM32F0 series EEPROM emulation in STM32F0xx microcontrollers (AN4061) [2] Application note STM32F1 series EEPROM emulation in STM32F10x microcontrollers (AN2594) [3] Application note STM32F2 series EEPROM emulation in STM32F2xx microcontrollers (AN3390) [4] Application note STM32F3 series EEPROM emulation in STM32F30x/STM32F31x STM32F37x/STM32F38x microcontrollers (AN4056) [5] Application note STM32F4 series EEPROM emulation in STM32F40x/STM32F41x microcontrollers (AN3969) [6] Application note Building wireless applications with STM32WB series microcontrollers (AN5289) [7] Reference manual STM32H563/H573 and STM32H562 Arm®-based 32-bit MCUs (RM0481)  ● eeprom.c: it contains C code for the following project routines: EE_Init() EE_Format() EE_FindValidPage() EE_VerifyPageFullWriteVariable() EE_ReadVariable() EE_PageTransfer() EE_WriteVariable() ● eeprom.h: it contains the routine prototypes and some declarations |
가입 후 아래 링크에서 다운로드 받아야 사용할 수 있나 보다.
대충 봐서는 2개의 섹터를 오가면서 write 하는 듯. wear leveling 등은 구현이 안되어 있을 것 같네

[링크 : https://www.st.com/en/embedded-software/stsw-stm32010.html]
| EEPROM emulation for stm32 (0) | 2025.10.16 |
|---|---|
| stm32 cpp (0) | 2025.08.08 |
| stm32f103ret flash program / erase 테스트 (0) | 2025.07.28 |
| HAL_FLASH_Program (0) | 2025.07.21 |
| stm32cubeide build analyzer (0) | 2025.07.21 |
RDMA 한번 써보고 싶다고 눈돌아 가는 중
MCX354A-FCBT
ConnectX®-3 VPI Single and Dual QSFP+ Port Adapter Card
ethernet / infiniband 지원

그나저나 이걸 지원하는 트랜시버 드럽게 비싸네!
MC2210411-SR4
| 지름...신? (0) | 2025.08.06 |
|---|---|
| 줍줍 (0) | 2025.08.04 |
| ultarnav fn 키와 access ibm (0) | 2025.07.28 |
| 어라 갑자기 크롬 잘 된다? (0) | 2025.07.23 |
| lenovo E15 fan 부품 검색 (0) | 2025.06.27 |
패키지 설치
| $ sudo apt-get install snmpd |
snmpd.conf 설정. 크게 두개만 변경했다.
위에는 localhost 대신 docker에서 돌아가는 녀석들을 위해 다 열어줬고,
rocommunity public을 하면 23440 라인이 읽히는데 반해 기본값은 47 라인만 읽힌다.
| $ sudo vi /etc/snmp/snmpd.conf 49 #agentaddress 127.0.0.1,[::1] 50 agentaddress 0.0.0.0,[::1] 72 #rocommunity public default -V systemonly 73 rocommunity public |
서비스 재기동
| $ sudo systemcl restart snmpd |
읽어보기
| $ snmpwalk -m all -v 2c -c public localhost |
혹시 버전을 지정하지 않았다면 아래와 같이 securityName이 명시되지 않았다고 못 읽는다.
| $ snmpwalk -m all -c public localhost snmpwalk: No securityName specified |
libreNMS에 등록하니
아래와 같이 나오는데 굳이 번역(?)하면 "만의 부두에 앉아있는 중" 인가.
설정 파일에서 sysLocation에 기본으로 박혀있는 듯.
| 18 sysLocation Sitting on the Dock of the Bay 19 sysContact Me <me@example.org> |

[링크 : https://freewings.tistory.com/76]
[링크 : https://wikidocs.net/269110]
| libreNMS FDB? (0) | 2025.07.28 |
|---|---|
| win 10 snmp 서비스 (0) | 2025.07.24 |
| zabbix docker 설치 (1) | 2025.07.23 |
| libreNMS on docker (0) | 2025.07.22 |
| iptime snmp mib (0) | 2025.07.21 |
multiple slave 모드라는걸 지원해서, 1:6 까지 뿌릴수 있다고 한다.
[링크 : https://arduinomaker.tistory.com/38]
[링크 : https://blog.naver.com/mapes_khkim/221882273978]
| Key Features • Worldwide 2.4GHz ISM band operation • Up to 2Mbps on air data rate • Ultra low power operation • 11.3mA TX at 0dBm output power • 12.3mA RX at 2Mbps air data rate • 900nA in power down • 22µA in standby-I • On chip voltage regulator • 1.9 to 3.6V supply range • Enhanced ShockBurst™ • Automatic packet handling • Auto packet transaction handling • 6 data pipe MultiCeiver™ • Air compatible with nRF2401A, 02, E1 and E2 • Low cost BOM • ±60ppm 16MHz crystal • 5V tolerant inputs • Compact 20-pin 4x4mm QFN package  |
[링크 : https://cdn.sparkfun.com/datasheets/Wireless/Nordic/nRF24L01_Product_Specification_v2_0.pdf]
| ads1115 복수 장치 읽기 (0) | 2025.08.02 |
|---|---|
| 패시브 부저 (0) | 2025.08.01 |
| 오랫만에 부품지름 (0) | 2025.07.29 |
| 1.8인치 TFT LCD with SDcard (0) | 2024.10.18 |
| 아두이노 FFB 휠 소스코드 (0) | 2024.10.11 |
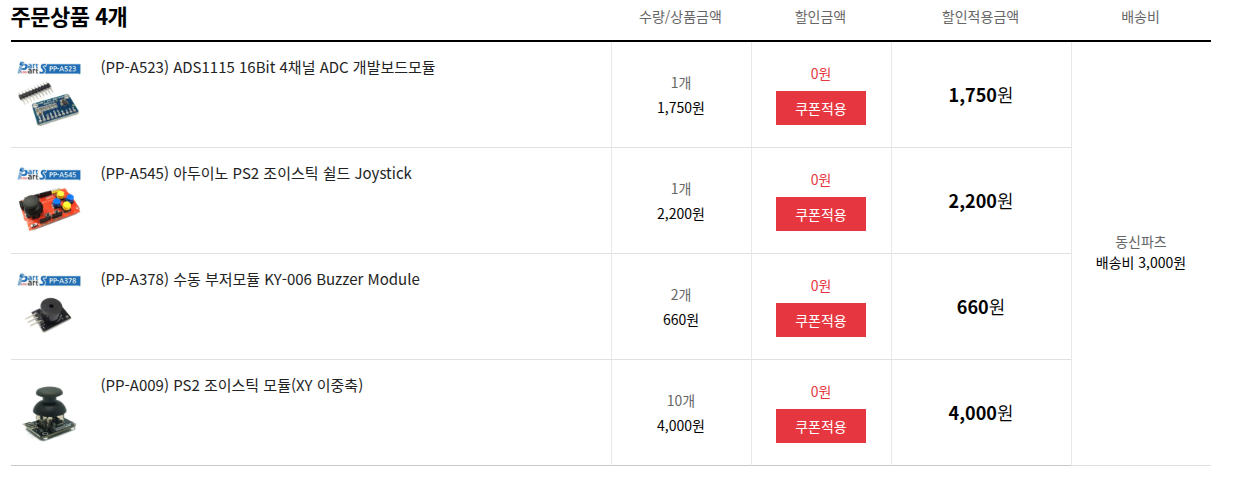
아니 쓰지도 못하고 재워두는거 왜 사는지 나도 이해가 안되지만 일단 지름 ㅋㅋㅋ
nRF24는 있어서 사려다가 패스

| 패시브 부저 (0) | 2025.08.01 |
|---|---|
| nRF24L01 복수 장치 통신 (0) | 2025.07.29 |
| 1.8인치 TFT LCD with SDcard (0) | 2024.10.18 |
| 아두이노 FFB 휠 소스코드 (0) | 2024.10.11 |
| arducam esp8266 https post 예제 (0) | 2024.01.31 |