Programming/qt2026. 6. 30. 12:24

uml 외부와 내부를 연결해주려면 Q_PROPERTY를 이용해서 변수를 지정하고

해당 변수를 건드릴 함수를 연동해주면 된다.

class UIController : public QObject
{
    Q_OBJECT

    // ── 페이지 ──────────────────────────────────────────────
    Q_PROPERTY(int currentPage
               READ  currentPage
               WRITE setCurrentPage
               NOTIFY currentPageChanged)

    // ── 센서 / 데이터 값 ────────────────────────────────────
    Q_PROPERTY(double temperature
               READ  temperature
               NOTIFY temperatureChanged)

    Q_PROPERTY(double progress
               READ  progress
               NOTIFY progressChanged)

    // ── 텍스트 ──────────────────────────────────────────────
    Q_PROPERTY(QString statusText
               READ  statusText
               NOTIFY statusTextChanged)

[링크 : https://doc.qt.io/qt-6/qtqml-cppintegration-exposecppattributes.html]


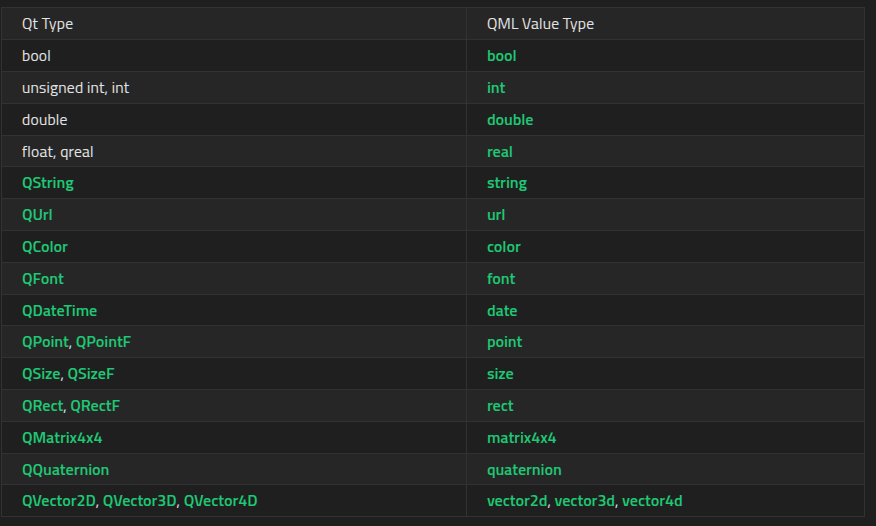
다만 Q_PROPERTY로 연결이 가능한 타입에는 제한이 있다.

개인이 만든 구조체 등은 못 넘기는 듯?

[링크 : https://doc.qt.io/qt-6/qtqml-cppintegration-data.html]

'Programming > qt' 카테고리의 다른 글

qt signal / slot, connect() Qt::AutoConnection  (0) 2026.06.30
qt5 qml 다국어지원  (0) 2026.06.30
qt5 qml connections  (0) 2026.06.30
qt 동적 해상도 대응  (0) 2026.06.29
QT 다국어 지원, qm 만 교체 할수 있도록 변경  (0) 2026.06.29
Posted by 구차니
Programming/qt2026. 6. 30. 11:39

claude에게 qt5 qml 예제를 만들어 달라고 하고  코드 분석중

이전에는 못봤던 Connections 라는 키워드가 눈에 띈다

// Main.qml
ApplicationWindow {
    id: root

    // uiController.currentPage 변화 → StackLayout 전환
    Connections {
        target: uiController
        // Qt5(Qt5.4+)는 함수형 핸들러 onXxxChanged 동일하게 지원
        onCurrentPageChanged: {
            stack.currentIndex = uiController.currentPage
        }
    }

    ColumnLayout {
        anchors.fill: parent
        spacing: 0
        // ── 페이지 스택 (StackedWidget 대응) ──────────────
        StackLayout {
            id: stack
            Layout.fillWidth: true
            Layout.fillHeight: true
            currentIndex: 0

            Loader { source: "HomePage.qml" }
            Loader { source: "DataPage.qml" }
            Loader { source: "SettingsPage.qml" }
        }


engine 에다가 setContextProperty 하는건 engine.load() 이후에 해도 적용되긴 한다.

// main.cpp
    // ── 인스턴스 생성 ─────────────────────────────────────
    SocketClient  socketClient;
    UIController  uiController;

    // ── 소켓 → UI 컨트롤러 시그널 연결 ───────────────────
    QObject::connect(&socketClient, &SocketClient::pageChangeRequested,
                     &uiController,  &UIController::onPageChange);

    QObject::connect(&socketClient, &SocketClient::valueChangeRequested,
                     &uiController,  &UIController::onValueChange);

    QObject::connect(&socketClient, &SocketClient::textChangeRequested,
                     &uiController,  &UIController::onTextChange);

    // ── QML 엔진 설정 ─────────────────────────────────────
    QQmlApplicationEngine engine;

    // QML에서 'socketClient', 'uiController' 이름으로 접근 가능
    engine.rootContext()->setContextProperty("socketClient", &socketClient);
    engine.rootContext()->setContextProperty("uiController", &uiController);


// socketclient.h
class SocketClient : public QObject
{
    Q_OBJECT
    Q_PROPERTY(bool connected READ isConnected NOTIFY connectedChanged)
    Q_PROPERTY(QString clientAddress READ clientAddress NOTIFY clientAddressChanged)

public:
    explicit SocketClient(QObject *parent = nullptr);
    ~SocketClient();

    bool isConnected() const { return m_socket != nullptr; }
    QString clientAddress() const { return m_clientAddress; }

    Q_INVOKABLE void startListening(int port = 9000);
    Q_INVOKABLE void stopListening();

signals:
    void connectedChanged();
    void clientAddressChanged();

    // 파싱된 명령 시그널
    void pageChangeRequested(int index);


// uicontroller.cpp
void UIController::setCurrentPage(int page)
{
    if (m_currentPage == page) return;
    m_currentPage = page;
    emit currentPageChanged();
}

void UIController::onPageChange(int index)
{
    setCurrentPage(index);
}


[링크 : https://swjs.tistory.com/entry/QTQML-QML의-Connections]

[링크 : https://doc.qt.io/qt-6/ko/qml-qtqml-connections.html]

'Programming > qt' 카테고리의 다른 글

qt5 qml 다국어지원  (0) 2026.06.30
qt5 qml Q_PROPERTY  (0) 2026.06.30
qt 동적 해상도 대응  (0) 2026.06.29
QT 다국어 지원, qm 만 교체 할수 있도록 변경  (0) 2026.06.29
QGraphicsProxyWidget  (0) 2026.06.05
Posted by 구차니
Programming/qt2026. 6. 29. 14:57

열심히 AI 갈구면서 테스트


아래의 클래스 추가

// UIScale.h
#pragma once

#include <QWidget>

namespace UIScale
{
    void scale(QWidget *w);
    void scaleTree(QWidget *root);
}


// UIScale.cpp

#include "UIScale.h"

#include <QGuiApplication>
#include <QScreen>
#include <QDebug>

namespace
{
    constexpr int BASE_WIDTH  = 800;
    constexpr int BASE_HEIGHT = 480;
}

void UIScale::scale(QWidget *w)
{
    if (!w)
        return;

    // 이미 적용했으면 종료
    if (w->property("_scaled").toBool())
        return;

    QScreen *screen = QGuiApplication::primaryScreen();
    if (!screen)
        return;

    QSize screenSize = screen->availableGeometry().size();

    const double sx = double(screenSize.width())  / BASE_WIDTH;
    const double sy = double(screenSize.height()) / BASE_HEIGHT;

    QRect r = w->geometry();

    w->setGeometry(
        int(r.x()      * sx),
        int(r.y()      * sy),
        int(r.width()  * sx),
        int(r.height() * sy));

    w->setProperty("_scaled", true);
}

void UIScale::scaleTree(QWidget *root)
{
    scale(root);

    const auto widgets = root->findChildren<QWidget *>();

    for (QWidget *w : widgets)
    {
        qDebug().noquote()
        << QString("%1")
              .arg(w->objectName());
        scale(w);
    }
}


해당 위젯의 showEvent()를 오버라이드 해서 사용한다.

scaleTree()만 실행해도 잘된다.(어짜피 tree에서 순회하면서 쭈욱 여는거라)

그런데 widget 들은 확대되서 잘 나오는데

stylesheet에서 background로 박아둔 녀석도 같이 확대되서 이상하게 작동하는 지라

스타일시트 엔진(?)은 따로 움직여서 손을 봐줘야 한다고.

void cycle::showEvent(QShowEvent *event)
{
    qDebug() << "helo";
    UIScale::scaleTree(this);
    this->update();
    this->repaint();

    QString ss = this->styleSheet();
    this->setStyleSheet("");
    this->setStyleSheet(ss);
}

[링크 : https://chatgpt.com/share/6a420896-c94c-83e8-9459-3c016987a64f]

'Programming > qt' 카테고리의 다른 글

qt5 qml Q_PROPERTY  (0) 2026.06.30
qt5 qml connections  (0) 2026.06.30
QT 다국어 지원, qm 만 교체 할수 있도록 변경  (0) 2026.06.29
QGraphicsProxyWidget  (0) 2026.06.05
QT 다국어 언어 설정 전파  (0) 2026.06.05
Posted by 구차니
Programming/qt2026. 6. 29. 10:49

현재 사용중인 코드는 좀 다르긴한데

잘 보면 :/i18n 으로 해서 리소스 파일에서 끌어오게 되어있다.

int main(int argc, char *argv[])
{
    QApplication app(argc, argv);

    QTranslator myappTranslator;
    if (myappTranslator.load(QLocale::system(), u"myapp"_s, u"_"_s, u":/i18n"_s))
        app.installTranslator(&myappTranslator);

    return app.exec();
}

[링크 : https://doc.qt.io/qt-6/ko/i18n-source-translation.html]


그러면.. 이 경로만 바꾸어 주고 빌드 시스템에서

lrealse를 수동으로 해주면 이미지와 함께 배포하게 하면 충분히 하나로 합치지 않고 배포가 가능할 것 같긴한데..


빌드 디렉토리에서 i18n 으로 검색해보니 qrc 관련해서 우겨 넣는게 보인다.

$ grep -rn i18n .
grep: ./main.o: 바이너리 파일 일치함
./qrc_qmake_qmake_qm_files.cpp:3903:  // i18n
./qrc_qmake_qmake_qm_files.cpp:3963:  // :/i18n
./qrc_qmake_qmake_qm_files.cpp:3966:  // :/i18n/untitled_pt_PT.qm
./qrc_qmake_qmake_qm_files.cpp:3969:  // :/i18n/untitled_ko_KR.qm
./qrc_qmake_qmake_qm_files.cpp:3972:  // :/i18n/untitled_fr_FR.qm
./qrc_qmake_qmake_qm_files.cpp:3975:  // :/i18n/untitled_sk_SK.qm
./qrc_qmake_qmake_qm_files.cpp:3978:  // :/i18n/untitled_en_US.qm
./qrc_qmake_qmake_qm_files.cpp:3981:  // :/i18n/untitled_el_GR.qm
./qrc_qmake_qmake_qm_files.cpp:3984:  // :/i18n/untitled_ru_RU.qm
./qrc_qmake_qmake_qm_files.cpp:3987:  // :/i18n/untitled_es_ES.qm
./qmake_qmake_qm_files.qrc:2:<qresource prefix="i18n">


ts-files에 이름을 넣고 -qm에 생성될 파일을 넣으면되니까 어찌 되려나?

$ lrelease --help
Usage:
    lrelease [options] -project project-file
    lrelease [options] ts-files [-qm qm-file]

lrelease is part of Qt's Linguist tool chain. It can be used as a
stand-alone tool to convert XML-based translations files in the TS
format into the 'compiled' QM format used by QTranslator objects.

Passing .pro files to lrelease is deprecated.
Please use the lrelease-pro tool instead, or use qmake's lrelease.prf
feature.

Options:
    -help  Display this information and exit
    -idbased
           Use IDs instead of source strings for message keying
    -compress
           Compress the QM files
    -nounfinished
           Do not include unfinished translations
    -removeidentical
           If the translated text is the same as
           the source text, do not include the message
    -markuntranslated <prefix>
           If a message has no real translation, use the source text
           prefixed with the given string instead
    -project <filename>
           Name of a file containing the project's description in JSON format.
           Such a file may be generated from a .pro file using the lprodump tool.
    -silent
           Do not explain what is being done
    -version
           Display the version of lrelease and exit

[링크 : https://chatgpt.com/share/6a41cebb-e8bc-83ee-9207-6d9ef47ff0ca]


일단은.. 파일 validation을 넣고 실행하게 해야 안전할 것 같은데..
'Programming > qt' 카테고리의 다른 글

qt5 qml connections  (0) 2026.06.30
qt 동적 해상도 대응  (0) 2026.06.29
QGraphicsProxyWidget  (0) 2026.06.05
QT 다국어 언어 설정 전파  (0) 2026.06.05
QT 자식 위젯으로 생성 / 부모 위젯 연결  (0) 2026.06.05
Posted by 구차니

먼가 설치하려는데 먼가 안되서, venv 사용 해보는 중

$ pip3 install keras mobilenet-v3 numpy tensorflow
error: externally-managed-environment

× This environment is externally managed
╰─> To install Python packages system-wide, try apt install
    python3-xyz, where xyz is the package you are trying to
    install.
    
    If you wish to install a non-Debian-packaged Python package,
    create a virtual environment using python3 -m venv path/to/venv.
    Then use path/to/venv/bin/python and path/to/venv/bin/pip. Make
    sure you have python3-full installed.
    
    If you wish to install a non-Debian packaged Python application,
    it may be easiest to use pipx install xyz, which will manage a
    virtual environment for you. Make sure you have pipx installed.
    
    See /usr/share/doc/python3.14/README.venv for more information.

note: If you believe this is a mistake, please contact your Python installation or OS distribution provider. You can override this, at the risk of breaking your Python installation or OS, by passing --break-system-packages.
hint: See PEP 668 for the detailed specification.


인자없이 모듈만 불러오면 당연히(?) 실행 안되고 에러가 난다.

$ python3 -m venv 
usage: python3 -m venv [-h] [--system-site-packages] [--symlinks | --copies] [--clear] [--upgrade]
                       [--without-pip] [--prompt PROMPT] [--upgrade-deps] [--without-scm-ignore-files]
                       ENV_DIR [ENV_DIR ...]
python3 -m venv: error: the following arguments are required: ENV_DIR


activate를 불러오고 deactivate 명령으로 종료한다.

아무생각없이 자꾸 exit 해서 터미널 닫아버리네 -_-

$ python3 -m venv venv
$ source venv/
.gitignore  bin/        include/    lib/        lib64/      pyvenv.cfg  
$ source venv/bin/activate
(venv) $ 

(venv) $ deactivate


대충 rootfs가 생겨난다.

$ tree venv/ -d -L 1
venv/
├── bin
├── include
├── lib
└── lib64 -> lib


어쩐지 찾아도 안나온다 했더니 함수로 등록해버리는 듯

$ cat venv/bin/activate
# This file must be used with "source bin/activate" *from bash*
# You cannot run it directly

deactivate () {
    # reset old environment variables
    if [ -n "${_OLD_VIRTUAL_PATH:-}" ] ; then
        PATH="${_OLD_VIRTUAL_PATH:-}"
        export PATH
        unset _OLD_VIRTUAL_PATH
    fi
    if [ -n "${_OLD_VIRTUAL_PYTHONHOME:-}" ] ; then
        PYTHONHOME="${_OLD_VIRTUAL_PYTHONHOME:-}"
        export PYTHONHOME
        unset _OLD_VIRTUAL_PYTHONHOME
    fi

    # Call hash to forget past locations. Without forgetting
    # past locations the $PATH changes we made may not be respected.
    # See "man bash" for more details. hash is usually a builtin of your shell
    hash -r 2> /dev/null

    if [ -n "${_OLD_VIRTUAL_PS1:-}" ] ; then
        PS1="${_OLD_VIRTUAL_PS1:-}"
        export PS1
        unset _OLD_VIRTUAL_PS1
    fi

    unset VIRTUAL_ENV
    unset VIRTUAL_ENV_PROMPT
    if [ ! "${1:-}" = "nondestructive" ] ; then
    # Self destruct!
        unset -f deactivate
    fi
}


새로 생성한 환경은 13M 정도

$ du -h -d 1 test
13M test/lib
40K test/bin
4.0K test/include
13M test


3개 설치했더니

pip3 install keras mobilenet-v3 numpy


161M 로 확 늘었다. 내려가서 보니 pip가 설치되서 그렇네.

$ du -h -d 1 venv/
161M venv/lib
128K venv/bin
4.0K venv/include
161M venv/
Posted by 구차니
Programming/qt2026. 6. 5. 17:03

전체 화면을 scaling 하는 방법. 일장일단이 있겠지만

화면 비율이 다르면 답없는 건 매한가지 ㅠㅠ


[링크 : https://doc.qt.io/archives/qt-5.15/qgraphicsproxywidget.html]

Posted by 구차니
Programming/qt2026. 6. 5. 14:57

QComboBox 등으로 언어를 선택하고 app.installTranslator()를 호출하면

모든 위젯들에게 자동으로 changeLanguage()가 발송된다 (즉, 수동으로 언어 변경 메시지를 전체에 뿌릴 필요가 없다)

int main(int argc, char *argv[])
{
    QApplication app(argc, argv);

    QTranslator myappTranslator;
    if (myappTranslator.load(QLocale::system(), u"myapp"_s, u"_"_s, u":/i18n"_s))
        app.installTranslator(&myappTranslator);

    return app.exec();
}


위젯들에게 각각 아래의 이벤트 핸들러를 추가해주면 되는데

헤더에는 protected: 에 override 해서 해주면되고

protected:
    void resizeEvent(QResizeEvent *event) override;
    void changeEvent(QEvent *event) override;


함수에서는 별거 없이 retranslateUi()를 호출해주면된다.

void MyWidget::changeEvent(QEvent *event)
{
    if (event->type() == QEvent::LanguageChange) {
        ui.retranslateUi(this);
    } else
        QWidget::changeEvent(event);
}

[링크 : https://doc.qt.io/qt-6/ko/i18n-source-translation.html#prepare-for-dynamic-language-changes]


확실히 이렇게 하니 시그널들 서로 연결한다고 고생안해도 되서 개꿀

Posted by 구차니
Programming/qt2026. 6. 5. 12:07

위젯 생성시 this를 넣어서 하면, 자식으로 생성되어 별도의 창으로 뜨지 않는다.

QWidget test = new QWidget(); // 독립된 창으로 뜸
test.show();

QWidget test2 = new QWidget(this); // Mainwindow 안에 뜸
test2.show();


간단하게(?) parent를 지정해주냐 안해주냐의 차이인듯.

class test : public QWidget
{
    Q_OBJECT

public:
    explicit test(QWidget *parent = nullptr);
    ~test();
}


'Programming > qt' 카테고리의 다른 글

QGraphicsProxyWidget  (0) 2026.06.05
QT 다국어 언어 설정 전파  (0) 2026.06.05
qt QTabWidget 사용  (0) 2026.06.04
qt 다국어지원 - 보이지 않는 메시지 추가하기  (0) 2026.06.02
QCombobox + 다국어  (0) 2026.05.21
Posted by 구차니
Programming/qt2026. 6. 4. 11:49

도움은 크게 안되었지만 아이디어를 얻은 페이지

[링크 : https://stackoverflow.com/questions/59594800/confining-background-color-to-triangular-tab-on-qtabbar]


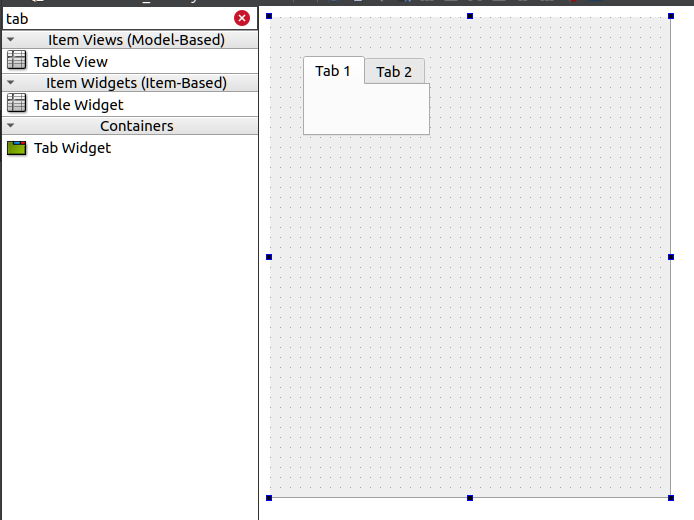
Step 1. widget에 Tab Widget을 드래그 한다.


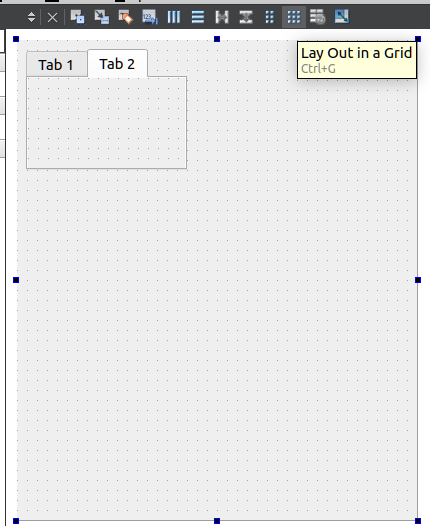
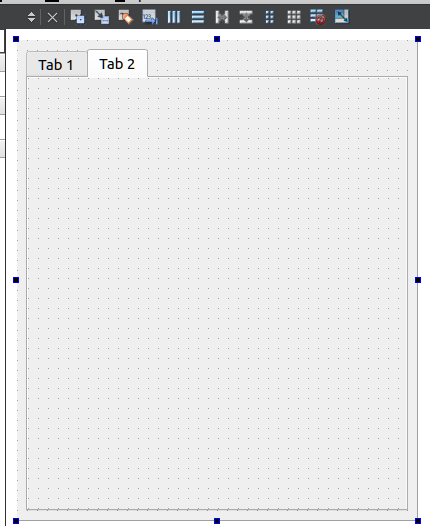
Step 2. Tab Widget 사이즈 조절. 만만한게 바로 grid 커져라 얍!


Step 3. 탭하나 추가하기

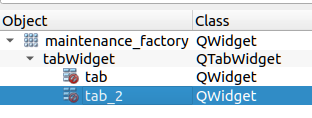
원하는 탭을 하나 선택하고 


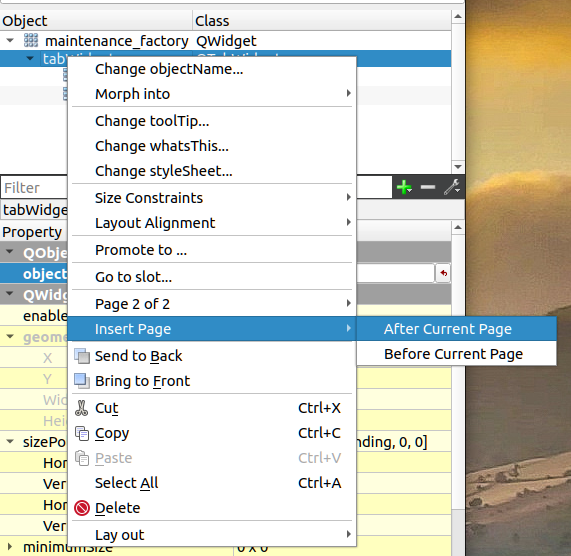
상위 QTabWidget 에서 우클릭해서 Insert Page - After Current Page


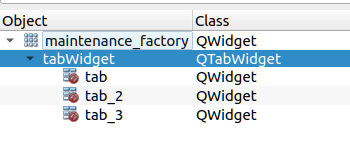
그러면 tab_3 추가


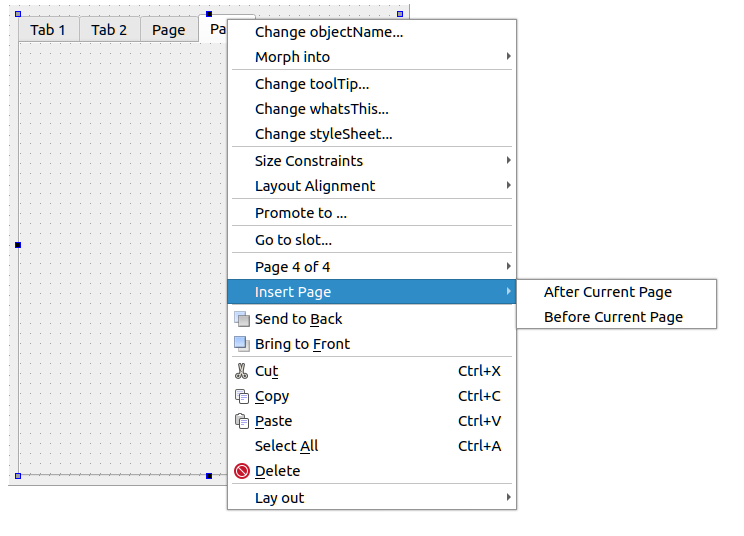
gui 상에서 우클릭해도 바로 되긴한다.

Posted by 구차니
Programming/qt2026. 6. 2. 15:52

gpt 가라사대~

아래와 같이 QT_TRANSLATE_NOOP()을 이용해서 추가하면

GUI 에서 내용이 바뀌기 때문에 여러개 메시지를 넣고 출력하지 않도록 할 필요 없이

내부적으로 tr()을 이용해 끌어오면 될 듯 하다.

static const char *dummy[] = {
    QT_TRANSLATE_NOOP("Language", "Korean"),
    QT_TRANSLATE_NOOP("Language", "English"),
    QT_TRANSLATE_NOOP("Language", "Japanese")
};


아래 정의 된 것 처럼, scope와 메시지로 되어있는데

#define QT_TRANSLATE_NOOP(scope, x) x


scope는 qt에서 생성한 class 이름으로 하면, 별도의 번역으로 분리되지 않고 하나로 잘 뭉쳐서 나오게 된다.

Posted by 구차니