udev는 user space device 라고 해야하나.. 아무튼 좋은거(!)
아래 경로에 설정 파일들이 있고
| /etc/udev/rules.d/ |
이전에 추가되었던것들 열어보면 아래와 같은 내용들이 있어서
해당되는 VID나 PID가 존재하면 옵션에 따라 장치를 생성해준다.
| $ cat 90-kinect2.rules # this file belongs in /etc/udev/rules.d/ # ATTR{product}=="Kinect2" SUBSYSTEM=="usb", ATTR{idVendor}=="045e", ATTR{idProduct}=="02c4", MODE="0666" SUBSYSTEM=="usb", ATTR{idVendor}=="045e", ATTR{idProduct}=="02d8", MODE="0666" SUBSYSTEM=="usb", ATTR{idVendor}=="045e", ATTR{idProduct}=="02d9", MODE="0666" |
아래는 digilient analog discovery 꺼. 이건.. RUN 이라는게 보이네
| $ cat 52-digilent-usb.rules ATTR{idVendor}=="1443", MODE:="666" ACTION=="add", ATTR{idVendor}=="0403", ATTR{manufacturer}=="Digilent", MODE:="666", RUN+="/usr/sbin/dftdrvdtch %s{busnum} %s{devnum}" |
요건 stlink. 어떤 장치명으로 붙게 하려고 이렇게 하나본데..
| $ cat 49-stlinkv1.rules # stm32 discovery boards, with onboard st/linkv1 # ie, STM32VL. SUBSYSTEMS=="usb", ATTRS{idVendor}=="0483", ATTRS{idProduct}=="3744", \ MODE="660", GROUP="plugdev", TAG+="uaccess", ENV{ID_MM_DEVICE_IGNORE}="1", \ SYMLINK+="stlinkv1_%n" $ cat 49-stlinkv2.rules # stm32 discovery boards, with onboard st/linkv2 # ie, STM32L, STM32F4. SUBSYSTEMS=="usb", ATTRS{idVendor}=="0483", ATTRS{idProduct}=="3748", \ MODE:="0666", \ SYMLINK+="stlinkv2_%n" $ cat 49-stlinkv2-1.rules # stm32 nucleo boards, with onboard st/linkv2-1 # ie, STM32F0, STM32F4. SUBSYSTEMS=="usb", ATTRS{idVendor}=="0483", ATTRS{idProduct}=="374b", \ MODE:="0666", \ SYMLINK+="stlinkv2-1_%n" SUBSYSTEMS=="usb", ATTRS{idVendor}=="0483", ATTRS{idProduct}=="3752", \ MODE:="0666", \ SYMLINK+="stlinkv2-1_%n" |
stlinkv2 규칙에 의해서 붙었나 보다.
| $ ls -al /dev/stlinkv2_2 lrwxrwxrwx 1 root root 15 8월 14 14:55 /dev/stlinkv2_2 -> bus/usb/001/021 |
udev 관리용 유틸리티 옵션
| $ udevadm --help udevadm [--help] [--version] [--debug] COMMAND [COMMAND OPTIONS] Send control commands or test the device manager. Commands: info Query sysfs or the udev database trigger Request events from the kernel settle Wait for pending udev events control Control the udev daemon monitor Listen to kernel and udev events test Test an event run test-builtin Test a built-in command See the udevadm(8) man page for details. |
| $ udevadm info --help udevadm info [OPTIONS] [DEVPATH|FILE] Query sysfs or the udev database. -h --help Print this message -V --version Print version of the program -q --query=TYPE Query device information: name Name of device node symlink Pointing to node path sysfs device path property The device properties all All values -p --path=SYSPATH sysfs device path used for query or attribute walk -n --name=NAME Node or symlink name used for query or attribute walk -r --root Prepend dev directory to path names -a --attribute-walk Print all key matches walking along the chain of parent devices -d --device-id-of-file=FILE Print major:minor of device containing this file -x --export Export key/value pairs -P --export-prefix Export the key name with a prefix -e --export-db Export the content of the udev database -c --cleanup-db Clean up the udev database -w --wait-for-initialization[=SECONDS] Wait for device to be initialized |
| $ udevadm trigger --help udevadm trigger [OPTIONS] DEVPATH Request events from the kernel. -h --help Show this help -V --version Show package version -v --verbose Print the list of devices while running -n --dry-run Do not actually trigger the events -q --quiet Suppress error logging in triggering events -t --type= Type of events to trigger devices sysfs devices (default) subsystems sysfs subsystems and drivers -c --action=ACTION|help Event action value, default is "change" -s --subsystem-match=SUBSYSTEM Trigger devices from a matching subsystem -S --subsystem-nomatch=SUBSYSTEM Exclude devices from a matching subsystem -a --attr-match=FILE[=VALUE] Trigger devices with a matching attribute -A --attr-nomatch=FILE[=VALUE] Exclude devices with a matching attribute -p --property-match=KEY=VALUE Trigger devices with a matching property -g --tag-match=TAG Trigger devices with a matching tag -y --sysname-match=NAME Trigger devices with this /sys path --name-match=NAME Trigger devices with this /dev name -b --parent-match=NAME Trigger devices with that parent device -w --settle Wait for the triggered events to complete --wait-daemon[=SECONDS] Wait for udevd daemon to be initialized before triggering uevents --uuid Print synthetic uevent UUID |
| $ udevadm settle --help udevadm settle [OPTIONS] Wait for pending udev events. -h --help Show this help -V --version Show package version -t --timeout=SEC Maximum time to wait for events -E --exit-if-exists=FILE Stop waiting if file exists |
| $ udevadm settle --help udevadm settle [OPTIONS] Wait for pending udev events. -h --help Show this help -V --version Show package version -t --timeout=SEC Maximum time to wait for events -E --exit-if-exists=FILE Stop waiting if file exists |
| $ udevadm control --help udevadm control OPTION Control the udev daemon. -h --help Show this help -V --version Show package version -e --exit Instruct the daemon to cleanup and exit -l --log-level=LEVEL Set the udev log level for the daemon -s --stop-exec-queue Do not execute events, queue only -S --start-exec-queue Execute events, flush queue -R --reload Reload rules and databases -p --property=KEY=VALUE Set a global property for all events -m --children-max=N Maximum number of children --ping Wait for udev to respond to a ping message -t --timeout=SECONDS Maximum time to block for a reply |
| $ udevadm monitor --help udevadm monitor [OPTIONS] Listen to kernel and udev events. -h --help Show this help -V --version Show package version -p --property Print the event properties -k --kernel Print kernel uevents -u --udev Print udev events -s --subsystem-match=SUBSYSTEM[/DEVTYPE] Filter events by subsystem -t --tag-match=TAG Filter events by tag |
| $ udevadm test --help udevadm test [OPTIONS] DEVPATH Test an event run. -h --help Show this help -V --version Show package version -a --action=ACTION|help Set action string -N --resolve-names=early|late|never When to resolve names |
| $ udevadm test-builtin --help udevadm test-builtin [OPTIONS] COMMAND DEVPATH Test a built-in command. -h --help Print this message -V --version Print version of the program Commands: blkid Filesystem and partition probing btrfs btrfs volume management hwdb Hardware database input_id Input device properties keyboard Keyboard scan code to key mapping kmod Kernel module loader net_id Network device properties net_setup_link Configure network link path_id Compose persistent device path usb_id USB device properties uaccess Manage device node user ACL |
/etc/rules.d/에 넣고 룰 갱신후 꽂혀있는 애들 중에 안된애들을 트리거 강제로 붙이기(뽑았다 꼽기 귀찮을때)
| sudo udevadm control --reload-rules sudo udevadm trigger |
[링크 : https://chatgpt.com/share/6a7ea79e-3c80-83e8-b6f3-37cfcce74b1a]
아래는 명령어별 출력 포맷
info는 자기 자신과 부모들이 보는 정보를 출력해준다.
| $ udevadm info -a /dev/ttyUSB0 Udevadm info starts with the device specified by the devpath and then walks up the chain of parent devices. It prints for every device found, all possible attributes in the udev rules key format. A rule to match, can be composed by the attributes of the device and the attributes from one single parent device. looking at device '/devices/pci0000:00/0000:00:14.0/usb1/1-2/1-2:1.0/ttyUSB0/tty/ttyUSB0': KERNEL=="ttyUSB0" SUBSYSTEM=="tty" DRIVER=="" ATTR{power/async}=="disabled" ATTR{power/control}=="auto" ATTR{power/runtime_active_kids}=="0" ATTR{power/runtime_active_time}=="0" ATTR{power/runtime_enabled}=="disabled" ATTR{power/runtime_status}=="unsupported" ATTR{power/runtime_suspended_time}=="0" ATTR{power/runtime_usage}=="0" looking at parent device '/devices/pci0000:00/0000:00:14.0/usb1/1-2/1-2:1.0/ttyUSB0': KERNELS=="ttyUSB0" SUBSYSTEMS=="usb-serial" DRIVERS=="cp210x" ATTRS{port_number}=="0" ATTRS{power/async}=="enabled" ATTRS{power/control}=="auto" ATTRS{power/runtime_active_kids}=="0" ATTRS{power/runtime_active_time}=="0" ATTRS{power/runtime_enabled}=="disabled" ATTRS{power/runtime_status}=="unsupported" ATTRS{power/runtime_suspended_time}=="0" ATTRS{power/runtime_usage}=="0" looking at parent device '/devices/pci0000:00/0000:00:14.0/usb1/1-2/1-2:1.0': KERNELS=="1-2:1.0" SUBSYSTEMS=="usb" DRIVERS=="cp210x" ATTRS{authorized}=="1" ATTRS{bAlternateSetting}==" 0" ATTRS{bInterfaceClass}=="ff" ATTRS{bInterfaceNumber}=="00" ATTRS{bInterfaceProtocol}=="00" ATTRS{bInterfaceSubClass}=="00" ATTRS{bNumEndpoints}=="02" ATTRS{interface}=="CP2102 USB to UART Bridge Controller" ATTRS{physical_location/dock}=="no" ATTRS{physical_location/horizontal_position}=="center" ATTRS{physical_location/lid}=="no" ATTRS{physical_location/panel}=="unknown" ATTRS{physical_location/vertical_position}=="center" ATTRS{power/async}=="enabled" ATTRS{power/runtime_active_kids}=="0" ATTRS{power/runtime_enabled}=="enabled" ATTRS{power/runtime_status}=="suspended" ATTRS{power/runtime_usage}=="0" ATTRS{supports_autosuspend}=="1" looking at parent device '/devices/pci0000:00/0000:00:14.0/usb1/1-2': KERNELS=="1-2" SUBSYSTEMS=="usb" DRIVERS=="usb" ATTRS{authorized}=="1" ATTRS{avoid_reset_quirk}=="0" ATTRS{bConfigurationValue}=="1" ATTRS{bDeviceClass}=="00" ATTRS{bDeviceProtocol}=="00" ATTRS{bDeviceSubClass}=="00" ATTRS{bMaxPacketSize0}=="64" ATTRS{bMaxPower}=="100mA" ATTRS{bNumConfigurations}=="1" ATTRS{bNumInterfaces}==" 1" ATTRS{bcdDevice}=="0100" ATTRS{bmAttributes}=="80" ATTRS{busnum}=="1" ATTRS{configuration}=="" ATTRS{devnum}=="20" ATTRS{devpath}=="2" ATTRS{idProduct}=="ea60" ATTRS{idVendor}=="10c4" ATTRS{ltm_capable}=="no" ATTRS{manufacturer}=="Silicon Labs" ATTRS{maxchild}=="0" ATTRS{physical_location/dock}=="no" ATTRS{physical_location/horizontal_position}=="center" ATTRS{physical_location/lid}=="no" ATTRS{physical_location/panel}=="unknown" ATTRS{physical_location/vertical_position}=="center" ATTRS{power/active_duration}=="833919" ATTRS{power/async}=="enabled" ATTRS{power/autosuspend}=="2" ATTRS{power/autosuspend_delay_ms}=="2000" ATTRS{power/connected_duration}=="833919" ATTRS{power/control}=="on" ATTRS{power/level}=="on" ATTRS{power/persist}=="1" ATTRS{power/runtime_active_kids}=="0" ATTRS{power/runtime_active_time}=="833679" ATTRS{power/runtime_enabled}=="forbidden" ATTRS{power/runtime_status}=="active" ATTRS{power/runtime_suspended_time}=="0" ATTRS{power/runtime_usage}=="1" ATTRS{product}=="CP2102 USB to UART Bridge Controller" ATTRS{quirks}=="0x0" ATTRS{removable}=="removable" ATTRS{rx_lanes}=="1" ATTRS{serial}=="0001" ATTRS{speed}=="12" ATTRS{tx_lanes}=="1" ATTRS{urbnum}=="12" ATTRS{version}==" 1.10" looking at parent device '/devices/pci0000:00/0000:00:14.0/usb1': KERNELS=="usb1" SUBSYSTEMS=="usb" DRIVERS=="usb" ATTRS{authorized}=="1" ATTRS{authorized_default}=="1" ATTRS{avoid_reset_quirk}=="0" ATTRS{bConfigurationValue}=="1" ATTRS{bDeviceClass}=="09" ATTRS{bDeviceProtocol}=="01" ATTRS{bDeviceSubClass}=="00" ATTRS{bMaxPacketSize0}=="64" ATTRS{bMaxPower}=="0mA" ATTRS{bNumConfigurations}=="1" ATTRS{bNumInterfaces}==" 1" ATTRS{bcdDevice}=="0608" ATTRS{bmAttributes}=="e0" ATTRS{busnum}=="1" ATTRS{configuration}=="" ATTRS{devnum}=="1" ATTRS{devpath}=="0" ATTRS{idProduct}=="0002" ATTRS{idVendor}=="1d6b" ATTRS{interface_authorized_default}=="1" ATTRS{ltm_capable}=="no" ATTRS{manufacturer}=="Linux 6.8.0-136-generic xhci-hcd" ATTRS{maxchild}=="12" ATTRS{power/active_duration}=="703559455" ATTRS{power/async}=="enabled" ATTRS{power/autosuspend}=="0" ATTRS{power/autosuspend_delay_ms}=="0" ATTRS{power/connected_duration}=="703559986" ATTRS{power/control}=="auto" ATTRS{power/level}=="auto" ATTRS{power/runtime_active_kids}=="3" ATTRS{power/runtime_active_time}=="703559815" ATTRS{power/runtime_enabled}=="enabled" ATTRS{power/runtime_status}=="active" ATTRS{power/runtime_suspended_time}=="0" ATTRS{power/runtime_usage}=="0" ATTRS{power/wakeup}=="disabled" ATTRS{power/wakeup_abort_count}=="" ATTRS{power/wakeup_active}=="" ATTRS{power/wakeup_active_count}=="" ATTRS{power/wakeup_count}=="" ATTRS{power/wakeup_expire_count}=="" ATTRS{power/wakeup_last_time_ms}=="" ATTRS{power/wakeup_max_time_ms}=="" ATTRS{power/wakeup_total_time_ms}=="" ATTRS{product}=="xHCI Host Controller" ATTRS{quirks}=="0x0" ATTRS{removable}=="unknown" ATTRS{rx_lanes}=="1" ATTRS{serial}=="0000:00:14.0" ATTRS{speed}=="480" ATTRS{tx_lanes}=="1" ATTRS{urbnum}=="1823" ATTRS{version}==" 2.00" looking at parent device '/devices/pci0000:00/0000:00:14.0': KERNELS=="0000:00:14.0" SUBSYSTEMS=="pci" DRIVERS=="xhci_hcd" ATTRS{ari_enabled}=="0" ATTRS{broken_parity_status}=="0" ATTRS{class}=="0x0c0330" ATTRS{consistent_dma_mask_bits}=="64" ATTRS{d3cold_allowed}=="1" ATTRS{dbc}=="disabled" ATTRS{dbc_bInterfaceProtocol}=="01" ATTRS{dbc_bcdDevice}=="0010" ATTRS{dbc_idProduct}=="0010" ATTRS{dbc_idVendor}=="1d6b" ATTRS{dbc_poll_interval_ms}=="64" ATTRS{device}=="0x02ed" ATTRS{dma_mask_bits}=="64" ATTRS{driver_override}=="(null)" ATTRS{enable}=="1" ATTRS{index}=="5" ATTRS{irq}=="123" ATTRS{label}=="Onboard - Other" ATTRS{local_cpulist}=="0-7" ATTRS{local_cpus}=="ff" ATTRS{msi_bus}=="1" ATTRS{msi_irqs/123}=="msi" ATTRS{msi_irqs/124}=="msi" ATTRS{msi_irqs/125}=="msi" ATTRS{msi_irqs/126}=="msi" ATTRS{msi_irqs/127}=="msi" ATTRS{msi_irqs/128}=="msi" ATTRS{msi_irqs/129}=="msi" ATTRS{msi_irqs/130}=="msi" ATTRS{numa_node}=="-1" ATTRS{power/async}=="enabled" ATTRS{power/control}=="auto" ATTRS{power/runtime_active_kids}=="2" ATTRS{power/runtime_active_time}=="703560520" ATTRS{power/runtime_enabled}=="enabled" ATTRS{power/runtime_status}=="active" ATTRS{power/runtime_suspended_time}=="0" ATTRS{power/runtime_usage}=="0" ATTRS{power/wakeup}=="enabled" ATTRS{power/wakeup_abort_count}=="0" ATTRS{power/wakeup_active}=="0" ATTRS{power/wakeup_active_count}=="0" ATTRS{power/wakeup_count}=="0" ATTRS{power/wakeup_expire_count}=="0" ATTRS{power/wakeup_last_time_ms}=="0" ATTRS{power/wakeup_max_time_ms}=="0" ATTRS{power/wakeup_total_time_ms}=="0" ATTRS{power_state}=="D0" ATTRS{revision}=="0x00" ATTRS{subsystem_device}=="0xc832" ATTRS{subsystem_vendor}=="0x144d" ATTRS{vendor}=="0x8086" looking at parent device '/devices/pci0000:00': KERNELS=="pci0000:00" SUBSYSTEMS=="" DRIVERS=="" ATTRS{power/async}=="enabled" ATTRS{power/control}=="auto" ATTRS{power/runtime_active_kids}=="10" ATTRS{power/runtime_active_time}=="0" ATTRS{power/runtime_enabled}=="disabled" ATTRS{power/runtime_status}=="unsupported" ATTRS{power/runtime_suspended_time}=="0" ATTRS{power/runtime_usage}=="0" ATTRS{waiting_for_supplier}=="0" |
먼가 이거 udev 디버깅 메시지 같은 느낌?
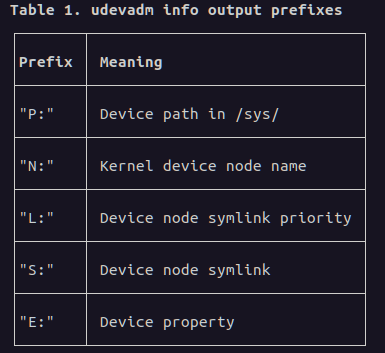
앞에 보면 P N L S E가 나오는데 manpage에는 아래와 같이 정의 되어있다.
P - Path
N : Name
L : ??? (symLink Priority)
S : Symlink
E : propErty ?
| $ udevadm info -q all /dev/ttyUSB0 P: /devices/pci0000:00/0000:00:14.0/usb1/1-2/1-2:1.0/ttyUSB0/tty/ttyUSB0 N: ttyUSB0 L: 0 S: serial/by-id/usb-Silicon_Labs_CP2102_USB_to_UART_Bridge_Controller_0001-if00-port0 S: serial/by-path/pci-0000:00:14.0-usb-0:2:1.0-port0 E: DEVPATH=/devices/pci0000:00/0000:00:14.0/usb1/1-2/1-2:1.0/ttyUSB0/tty/ttyUSB0 E: DEVNAME=/dev/ttyUSB0 E: MAJOR=188 E: MINOR=0 E: SUBSYSTEM=tty E: USEC_INITIALIZED=702727509637 E: ID_BUS=usb E: ID_VENDOR_ID=10c4 E: ID_MODEL_ID=ea60 E: ID_PCI_CLASS_FROM_DATABASE=Serial bus controller E: ID_PCI_SUBCLASS_FROM_DATABASE=USB controller E: ID_PCI_INTERFACE_FROM_DATABASE=XHCI E: ID_VENDOR_FROM_DATABASE=Silicon Labs E: ID_AUTOSUSPEND=1 E: ID_MODEL_FROM_DATABASE=CP210x UART Bridge E: ID_VENDOR=Silicon_Labs E: ID_VENDOR_ENC=Silicon\x20Labs E: ID_MODEL=CP2102_USB_to_UART_Bridge_Controller E: ID_MODEL_ENC=CP2102\x20USB\x20to\x20UART\x20Bridge\x20Controller E: ID_REVISION=0100 E: ID_SERIAL=Silicon_Labs_CP2102_USB_to_UART_Bridge_Controller_0001 E: ID_SERIAL_SHORT=0001 E: ID_TYPE=generic E: ID_USB_INTERFACES=:ff0000: E: ID_USB_INTERFACE_NUM=00 E: ID_USB_DRIVER=cp210x E: ID_PATH=pci-0000:00:14.0-usb-0:2:1.0 E: ID_PATH_TAG=pci-0000_00_14_0-usb-0_2_1_0 E: ID_MM_CANDIDATE=1 E: ID_FOR_SEAT=tty-pci-0000_00_14_0-usb-0_2_1_0 E: DEVLINKS=/dev/serial/by-id/usb-Silicon_Labs_CP2102_USB_to_UART_Bridge_Controller_0001-if00-port0 /dev/serial/by-path/pci-0000:00:14.0-usb-0:2:1.0-port0 E: TAGS=:snap_cups_ippeveprinter:systemd:snap_cups_cupsd:seat:uaccess: E: CURRENT_TAGS=:snap_cups_ippeveprinter:systemd:snap_cups_cupsd:seat:uaccess: |
| $ udevadm info -q name /dev/ttyUSB0 ttyUSB0 |
| $ udevadm info -q symlink /dev/ttyUSB0 serial/by-path/pci-0000:00:14.0-usb-0:2:1.0-port0 serial/by-id/usb-Silicon_Labs_CP2102_USB_to_UART_Bridge_Controller_0001-if00-port0 |
| $ udevadm info -q path /dev/ttyUSB0 /devices/pci0000:00/0000:00:14.0/usb1/1-2/1-2:1.0/ttyUSB0/tty/ttyUSB0 |
| $ udevadm info -q property /dev/ttyUSB0 DEVPATH=/devices/pci0000:00/0000:00:14.0/usb1/1-2/1-2:1.0/ttyUSB0/tty/ttyUSB0 DEVNAME=/dev/ttyUSB0 MAJOR=188 MINOR=0 SUBSYSTEM=tty USEC_INITIALIZED=702727509637 ID_BUS=usb ID_VENDOR_ID=10c4 ID_MODEL_ID=ea60 ID_PCI_CLASS_FROM_DATABASE=Serial bus controller ID_PCI_SUBCLASS_FROM_DATABASE=USB controller ID_PCI_INTERFACE_FROM_DATABASE=XHCI ID_VENDOR_FROM_DATABASE=Silicon Labs ID_AUTOSUSPEND=1 ID_MODEL_FROM_DATABASE=CP210x UART Bridge ID_VENDOR=Silicon_Labs ID_VENDOR_ENC=Silicon\x20Labs ID_MODEL=CP2102_USB_to_UART_Bridge_Controller ID_MODEL_ENC=CP2102\x20USB\x20to\x20UART\x20Bridge\x20Controller ID_REVISION=0100 ID_SERIAL=Silicon_Labs_CP2102_USB_to_UART_Bridge_Controller_0001 ID_SERIAL_SHORT=0001 ID_TYPE=generic ID_USB_INTERFACES=:ff0000: ID_USB_INTERFACE_NUM=00 ID_USB_DRIVER=cp210x ID_PATH=pci-0000:00:14.0-usb-0:2:1.0 ID_PATH_TAG=pci-0000_00_14_0-usb-0_2_1_0 ID_MM_CANDIDATE=1 ID_FOR_SEAT=tty-pci-0000_00_14_0-usb-0_2_1_0 DEVLINKS=/dev/serial/by-id/usb-Silicon_Labs_CP2102_USB_to_UART_Bridge_Controller_0001-if00-port0 /dev/serial/by-path/pci-0000:00:14.0-usb-0:2:1.0-port0 TAGS=:seat:systemd:uaccess:snap_cups_ippeveprinter:snap_cups_cupsd: CURRENT_TAGS=:seat:systemd:uaccess:snap_cups_ippeveprinter:snap_cups_cupsd: |
'프로그램 사용 > udev' 카테고리의 다른 글
| udev (0) | 2021.01.05 |
|---|---|
| udev rule (0) | 2014.12.18 |
| udevinfo -> udevadm (0) | 2010.05.03 |