'embeded/raspberry pi'에 해당되는 글 437건

  1. 2022.03.18 라즈베리 파이2 / 마인크래프트
  2. 2022.03.08 rpi opencv python pid servo
  3. 2022.02.10 rpi i2c oled
  4. 2022.02.09 라즈베리 파이 부품 도착
  5. 2022.01.21 rpi csi to dsi...
  6. 2022.01.21 rpi 7" dsi
  7. 2022.01.20 rpi DSI 7인치 터치 스크린
  8. 2021.12.22 rpitx on rpi4
  9. 2021.12.16 rpitx
  10. 2021.11.22 wayland on rpi
embeded/raspberry pi2022. 3. 18. 23:42

이거 하나 찾으려고 개고생중

일단 wheezy 에 있다고 하는데

jessie 이미지 받아서 해보니 라즈베리 3는 작동 안되고 2에서는 울프람과 마인크래프트가 존재하는 것 확인


bullseye 32bit나 64bit에는 당연히(!) 없네 

'embeded > raspberry pi' 카테고리의 다른 글

linux iio adc + rpi  (0) 2022.06.20
PI 400 써봄  (0) 2022.05.25
rpi opencv python pid servo  (0) 2022.03.08
rpi i2c oled  (0) 2022.02.10
라즈베리 파이 부품 도착  (0) 2022.02.09
Posted by 구차니
embeded/raspberry pi2022. 3. 8. 19:35

이건 어디다 넣어야 하나 -_-?

영상을 통해서 중앙으로 이동시키는건 서보를 이용해서

한번에 못가면 점진적으로 오류를 보정하면서 가면되는거고

그걸 PID를 통해 보정을 해주면 되는데 보정 주기라던가..

새로운 위치값을 어떤식으로 주면 될지 몰라서 검색.


[링크 : https://pyimagesearch.com/2019/04/01/pan-tilt-face-tracking-with-a-raspberry-pi-and-opencv/]


'embeded > raspberry pi' 카테고리의 다른 글

PI 400 써봄  (0) 2022.05.25
라즈베리 파이2 / 마인크래프트  (0) 2022.03.18
rpi i2c oled  (0) 2022.02.10
라즈베리 파이 부품 도착  (0) 2022.02.09
rpi csi to dsi...  (0) 2022.01.21
Posted by 구차니
embeded/raspberry pi2022. 2. 10. 10:45

동일한 녀석인듯? 일단 시도 해봐야 겠다.


[링크 : https://rudalskim.tistory.com/109]


+

일단 사용한 라이브러리는 deprecated 이고

[링크 : https://github.com/adafruit/Adafruit_Python_SSD1306]


이미지를 출력하도록 해놔서 python의 image 라이브러리를 이용하여 text도 그려서 출력하는 듯.

[링크 : https://github.com/adafruit/Adafruit_Python_SSD1306/blob/master/examples/animate.py]


+

하라는 대로 해서 하니 나오긴 한데, 해당 라이브러리에서 이미지 말고 텍스트를 출력 할 수 있는진 좀 봐야 할 듯.

import time 
import Adafruit_GPIO.SPI as SPI 
import Adafruit_SSD1306 
from PIL import Image

RST = 25
DC = 24
SPI_PORT = 0
SPI_DEVICE = 0

disp = Adafruit_SSD1306.SSD1306_128_64(rst=RST)
disp.begin()
disp.clear()
disp.display()

image = Image.open('test.png').resize((disp.width, disp.height), Image.ANTIALIAS).convert('1')
disp.image(image)
disp.display()


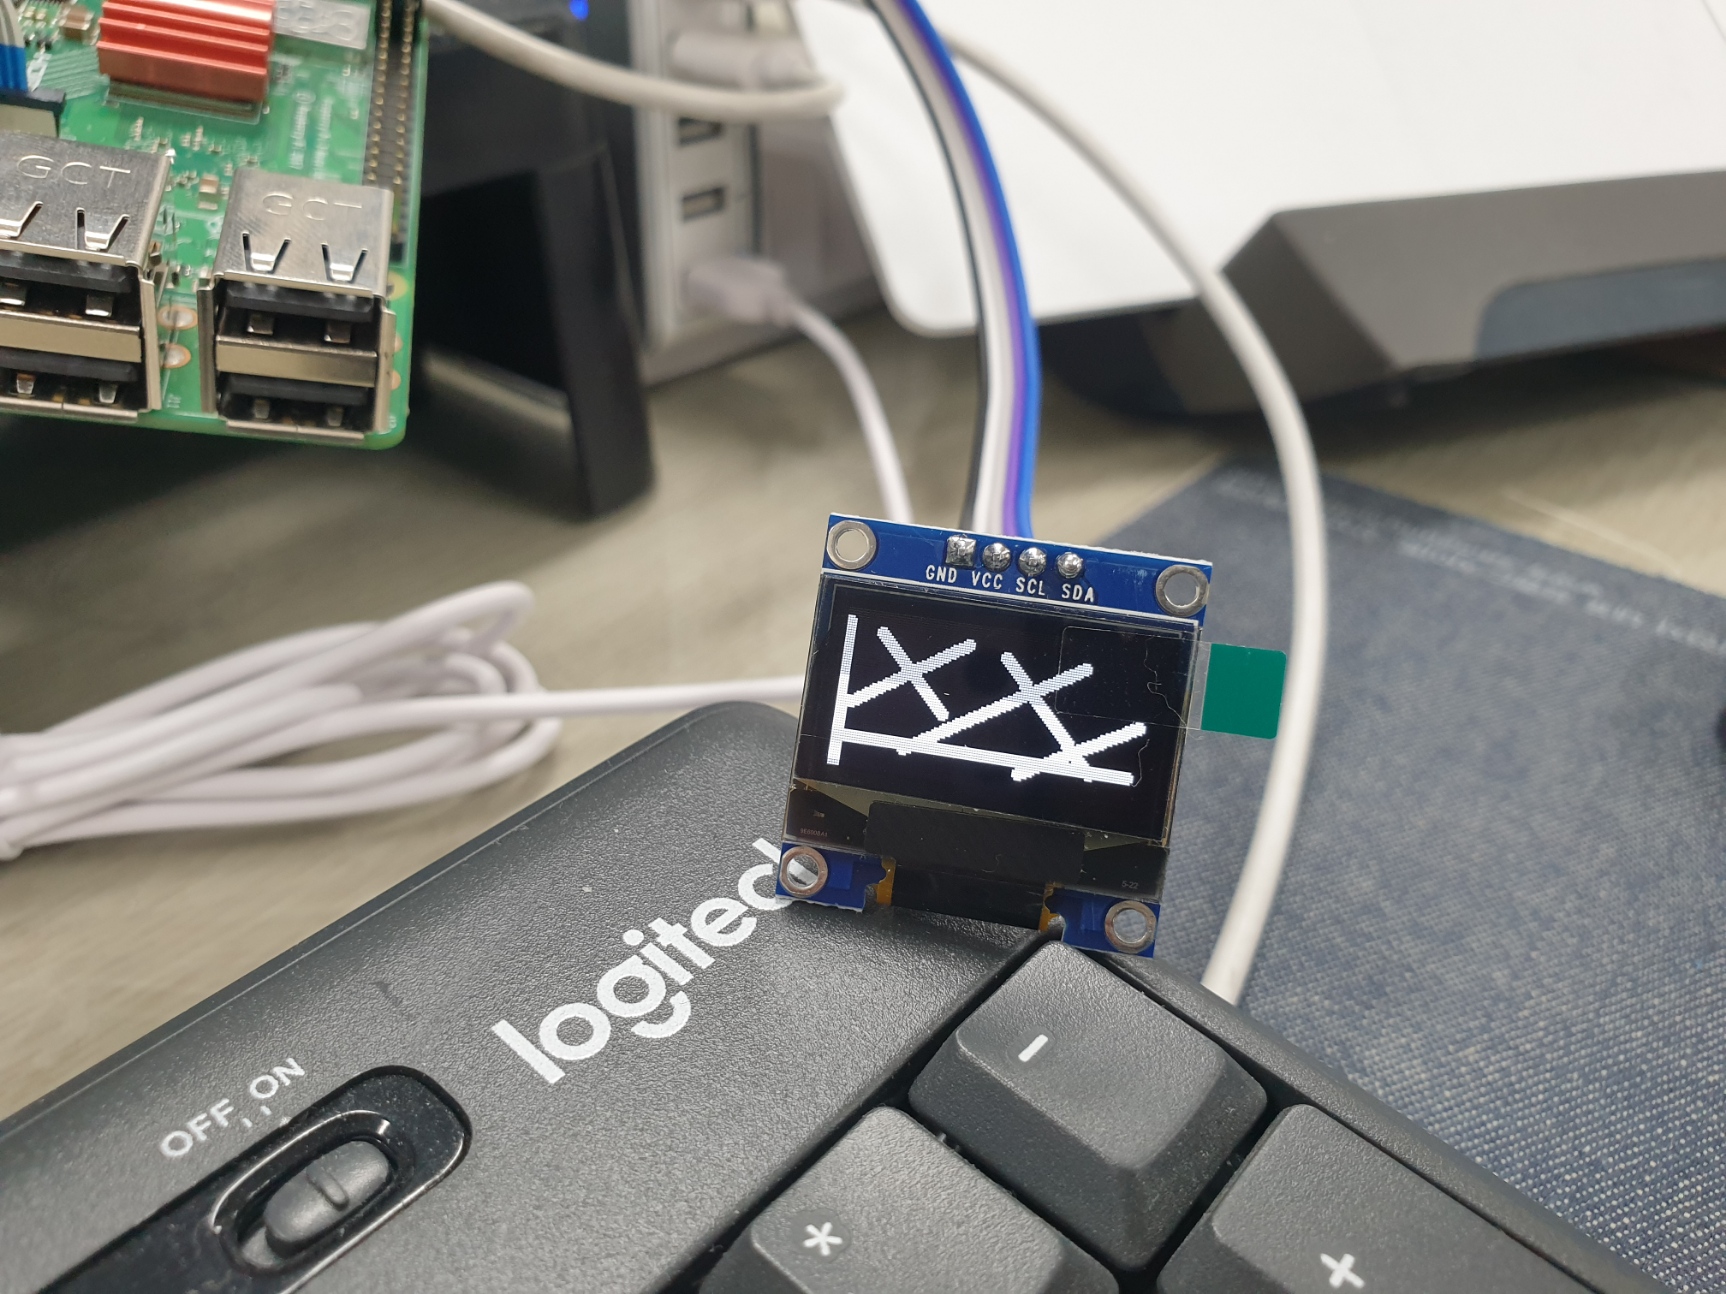
테스트 용으로 대충 128x64 사이즈로 만든 png 파일


아래와 같이 잘 나온다.


다만 OLED 라고 해도 리프레시는 존재하는지(당연한건가...?)

셔터속도에 따라 비어보이는 경우가 존재한다.

'embeded > raspberry pi' 카테고리의 다른 글

라즈베리 파이2 / 마인크래프트  (0) 2022.03.18
rpi opencv python pid servo  (0) 2022.03.08
라즈베리 파이 부품 도착  (0) 2022.02.09
rpi csi to dsi...  (0) 2022.01.21
rpi 7" dsi  (0) 2022.01.21
Posted by 구차니
embeded/raspberry pi2022. 2. 9. 22:31

0.96인치 128x64 화이트 OLED

1인치도 안되서 그런가 무지 작긴 하네

16x16 폰트로 8*4 대충.. 32글짜 정도 표시할 수 있으려나?


라즈베리 카메라

머.. 싼걸로 사서 jetson nano 에는 쓸 수 없다지만

문득.. 카메라가 다르면 드라이버 차이로 cpu 점유율이 어떻게 달라지나 궁금하긴 하네?

'embeded > raspberry pi' 카테고리의 다른 글

rpi opencv python pid servo  (0) 2022.03.08
rpi i2c oled  (0) 2022.02.10
rpi csi to dsi...  (0) 2022.01.21
rpi 7" dsi  (0) 2022.01.21
rpi DSI 7인치 터치 스크린  (0) 2022.01.20
Posted by 구차니
embeded/raspberry pi2022. 1. 21. 12:01

간단하게 말하면.. 두개가 인터페이스 다르니 연결안됨 이라고 하는데..

DSI to LVDS / LVDS to CSI 하면 가능할 것 같다고 이야기 하지만...

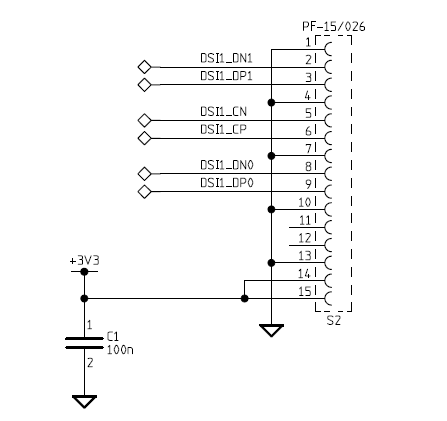
그냥 DSI의 데이터 2채널과 컨트롤 포트를 CSI의 2채널과 컨트롤 포트를 연결하면 안되는 건가?


[링크 : https://raspberrypi.stackexchange.com/questions/107117/]


+

[링크 : https://www.mipi.org/specifications/csi-2]

[링크 : https://www.mipi.org/specifications/dsi]


DSI  D-PHY
DSI-2 C_PHY


CSI-1 D-PHY
CSI-2 C-PHY
CSI-3 M-PHY

[링크 : https://m.blog.naver.com/prnbada7/221194846455]

[링크 : https://en.wikipedia.org/wiki/Display_Serial_Interface]

'embeded > raspberry pi' 카테고리의 다른 글

rpi i2c oled  (0) 2022.02.10
라즈베리 파이 부품 도착  (0) 2022.02.09
rpi 7" dsi  (0) 2022.01.21
rpi DSI 7인치 터치 스크린  (0) 2022.01.20
rpitx on rpi4  (0) 2021.12.22
Posted by 구차니
embeded/raspberry pi2022. 1. 21. 11:39

라즈베리 파이 3B+ 에 2021-03-04-raspios-buster-armhf-full.img 을 이용해서 테스트 함.


선은 넉넉하게 주니(4개) 핀번호 3,5번도 같이 연결해준다.(SDA/SCL 서로 연결)

전원만 연결해도 터치 되는데 저~~~언혀 문제 없다. DSI 컨트롤 채널을 통해서 터치 정보가 넘어가나 보네..?

[링크 : https://community.element14.com/.../raspberry-pi-7-touchscreen-display]


buster가 oldstable이 되면서 업데이트 하려면 allow-releaseinfo-change 인지 먼지는 해주어야 하고

정말 아무런 설정없이 바로 터치 + DSI 출력이 된다.

다만 10포인트 멀티터치라는데 라즈베리 기본 lxde 에서 해당 기능을 테스트 할 수 있는진 알 수 없다.


라즈베리 기본 이미지에서 아래와 같이 xrandr 하면 800x480으로 인식하고

$ xrandr
Screen 0: minimum 800 x 480, current 800 x 480, maximum 800 x 480
default connected 800x480+0+0 0mm x 0mm
   800x480        0.00*


공식 7인치 터치 LCD인데 waveshare의 것과 동일하게 sysfs에 생겨서 밝기는 조절이 가능하다.

$ cd /sys/class/backlight/rpi_backlight/
$ ls -al
합계 0
drwxr-xr-x 3 root root    0  3월  5  2021 .
drwxr-xr-x 3 root root    0  3월  5  2021 ..
-r--r--r-- 1 root root 4096  1월 21 11:29 actual_brightness
-rw-r--r-- 1 root root 4096  1월 21 11:29 bl_power
-rw-r--r-- 1 root root 4096  1월 21 11:23 brightness
lrwxrwxrwx 1 root root    0  1월 21 11:29 device -> ../../../rpi_backlight
-r--r--r-- 1 root root 4096  1월 21 11:29 max_brightness
drwxr-xr-x 2 root root    0  1월 21 11:29 power
-r--r--r-- 1 root root 4096  1월 21 11:29 scale
lrwxrwxrwx 1 root root    0  1월 21 11:29 subsystem -> ../../../../../class/backlight
-r--r--r-- 1 root root 4096  1월 21 11:29 type
-rw-r--r-- 1 root root 4096  1월 21 11:29 uevent

# echo 100 > brightness
# echo 255 > brightness

[링크 : https://www.waveshare.com/wiki/7inch_DSI_LCD]


+

HDMI + LCD 성공한 분이 계시니(마침 rpi3b+) 시도해봄

아래와 같은 구성으로 화면은 잡히는데 터치스크린은 두개를 합친 크기로 인식되어 쓰기에는 좀 미묘...


실행하기 위해서는 xorg.conf에 파일 하나 내용 갈아 엎어야 한다.

$ sudo service lightdm stop
$ sudo startx -- -layout Multihead

[링크 : https://louie0724.tistory.com/345]


---------------------

이것저것 하다가 기억이 꼬였는데

display_default_lcd=1을 해주면 부팅하고 약 3~5분 정도만 HDMI로 나오다 DSI로도 HDMI로도 화면이 안나온다

완전히 죽는건 아닌지 감으로 터미널 단축키로 열고 종료하면 종료 되는걸 봐서는

hdmi / dsi 출력 설정에 무언가 영향을 줘서 DSI로 강제 설정되며 HDMI가 꺼지는것으로 추측.

display_default_lcd
If a Raspberry Pi DSI LCD is detected it will be used as the default display and will show the framebuffer. Setting display_default_lcd=0 will ensure the LCD is not the default display, which usually implies the HDMI output will be the default. The LCD can still be used by choosing its display number from supported applications, for example, omxplayer.

[링크 : https://www.raspberrypi.com/documentation/computers/config_txt.html#lcd-displays-and-touchscreens]


+

HDMI + DSI는 쉽진 않은 듯?

[링크 : https://forums.raspberrypi.com/viewtopic.php?t=247696]

[링크 : https://forums.raspberrypi.com/viewtopic.php?t=246384]

'embeded > raspberry pi' 카테고리의 다른 글

라즈베리 파이 부품 도착  (0) 2022.02.09
rpi csi to dsi...  (0) 2022.01.21
rpi DSI 7인치 터치 스크린  (0) 2022.01.20
rpitx on rpi4  (0) 2021.12.22
rpitx  (0) 2021.12.16
Posted by 구차니
embeded/raspberry pi2022. 1. 20. 18:20

처음으로 만져보는 DSI 디스플레이 (회사 어딘가 짱박혀 있던...)

DSI는 자체적으로 통신을 해서 켤수 있는거라 rpi config.txt를 손대지 않아도

기본으로 작동하는 것으로 보인다(rpi 3b+)

HDMI + DSI로 하려면 먼가 해야 한다는데 내용이 없음.

The Raspberry Pi Touch Display is an LCD display which connects to the Raspberry Pi through the DSI connector. In some situations, it allows for the use of both the HDMI and LCD displays at the same time (this requires software support).


DSI를 연결하고 demsg 확인해보니 아래정도의 내용밖에 없다.

[    1.958699] bcm2708_fb soc:fb: FB found 1 display(s)
[    1.974466] Console: switching to colour frame buffer device 100x30
[    1.983719] bcm2708_fb soc:fb: Registered framebuffer for display 0, size 800x480
[    1.990749] Serial: 8250/16550 driver, 1 ports, IRQ sharing enabled


그리고 i2c의 sda / scl도 연결해놔서 확인을 해보는데

배선이 문제인지 노이즈를 타서.. 일단 두 개 정도 i2c를 통해 보인다.

$ i2cdetect -y 1
     0  1  2  3  4  5  6  7  8  9  a  b  c  d  e  f
00:          -- -- -- -- -- -- -- -- -- -- -- -- --
10: -- -- -- -- -- -- -- -- -- -- -- -- -- -- -- --
20: -- -- -- -- -- -- -- -- -- -- -- -- -- -- -- --
30: -- -- -- -- -- -- -- -- 38 -- -- -- -- -- -- --
40: -- -- -- -- -- 45 -- -- -- -- -- -- -- -- -- --
50: -- -- -- -- -- -- -- -- -- -- -- -- -- -- -- --
60: -- -- -- -- -- -- -- -- -- -- -- -- -- -- -- --
70: -- -- -- -- -- -- -- --


터치는 USB로 하는줄 알았는데 그건 또 아닌 것 같고(내용상 USB 전원이라고..)

pwm 백라이트 제어와 전원 제어를 i2c를 통해 할 수 있다는걸 보면 하나는 터치 다른 하나는 pwm 제어인 듯.

PWM backlight control and power control over I2C interface


[링크 : https://www.raspberrypi.com/documentation/accessories/display.html]

[링크 : https://kr.element14.com/raspberry-pi/raspberrypi-display/raspberry-pi-7inch-touchscreen/dp/2473872]

[링크 : https://www.devicemart.co.kr/goods/view?no=1273487]


0x38이 touch i2c 인 것으로 생각되네.

[링크 : https://www.newhavendisplay.com/app_notes/FT5x06.pdf]

[링크 : https://titanwolf.org/Network/Articles/Article?AID=21afc5b0-03fa-4179-b818-de7e73f36573]


config.txt에 아래를 추가하니

dtoverlay=rpi-ft5406


dmesg 상에서는 아래의 하나가 추가 되는 것 같다.

[    7.641514] input: raspberrypi-ts as /devices/platform/soc/soc:firmware/soc:firmware:touchscreen/input/input1

'embeded > raspberry pi' 카테고리의 다른 글

rpi csi to dsi...  (0) 2022.01.21
rpi 7" dsi  (0) 2022.01.21
rpitx on rpi4  (0) 2021.12.22
rpitx  (0) 2021.12.16
wayland on rpi  (0) 2021.11.22
Posted by 구차니
embeded/raspberry pi2021. 12. 22. 16:53

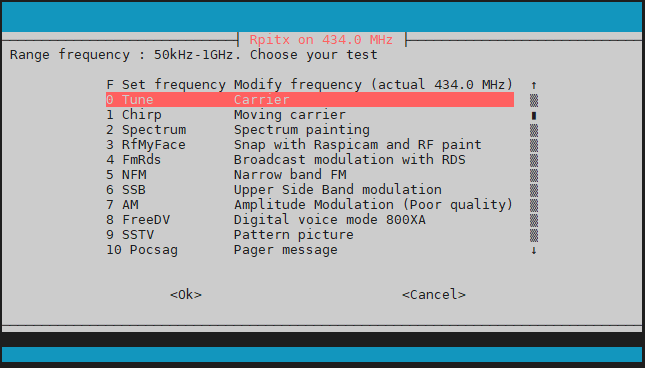
install.sh 하면 이것저것 받고 config.txt를 수정하냐고 물어본다.

easytest.sh는 ncurse 기반으로 테스트 프로그램을 이것저것 실행할 수 있다.

git clone https://github.com/F5OEO/rpitx
cd rpitx
./install.sh
./easytest.sh


install.sh로 설치하면 config.txt에 아래와 같이 추가되는데,

라즈베리 4로 하다 보니 굳이 저걸 넣을 필요있나 싶어서 주석처리 해주고 리부팅 안하는데 문제없이 실행된다.

gpu_freq=250
force_turbo=1


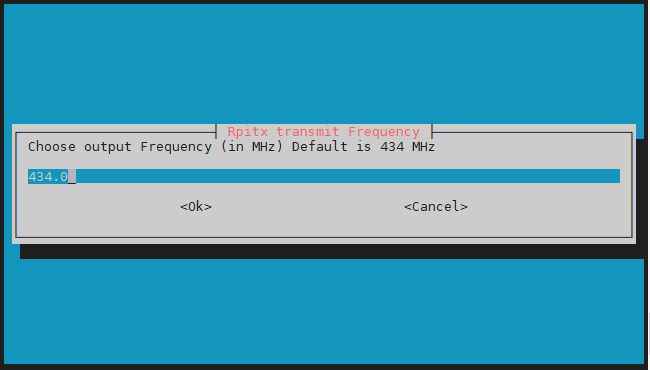
easytest 실행하면 가장 처음에 주파수 넣으라는데 기본값은 434MHz


아직 신호가 나가진 않고, F Set frequency 에서 다시 설정이 가능하다.


0 Tune을 엔터치면 다음화면이 나오면서 송출된다.


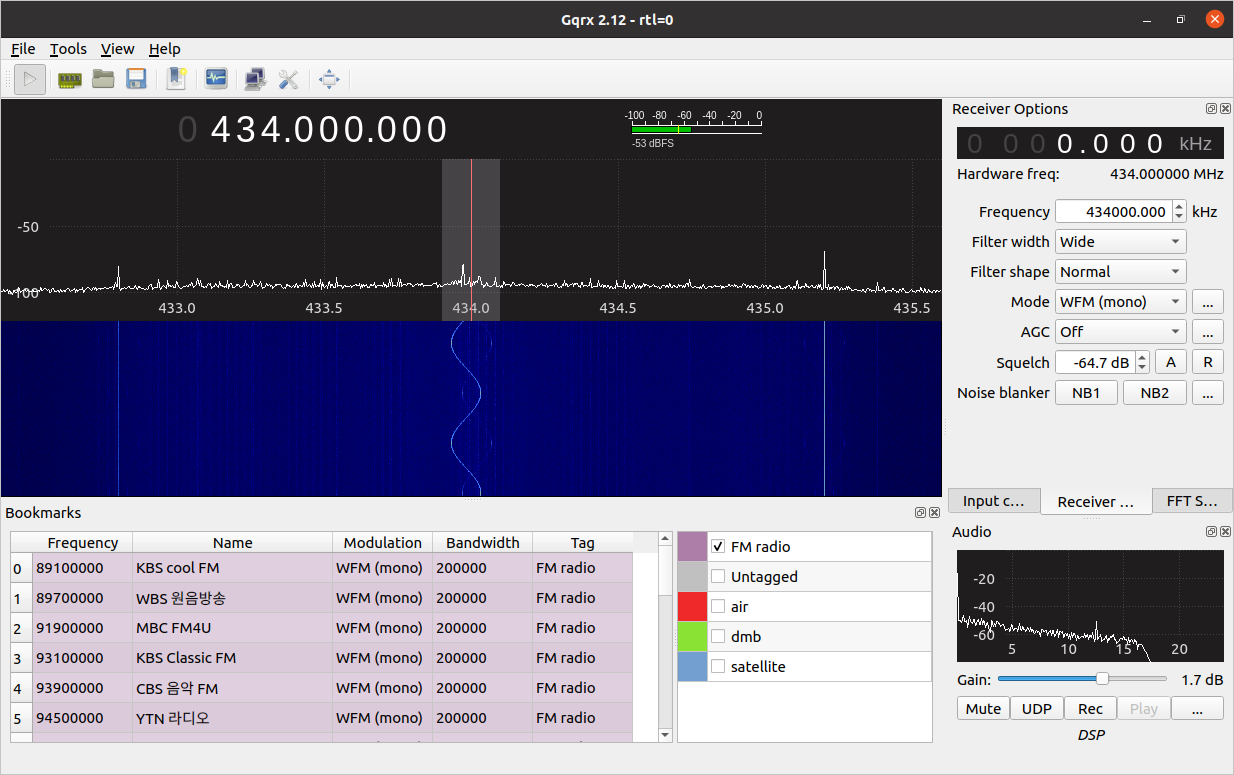
Tune 을 해보면 아래와 같이 나오는데, GPIO에 핀연결없이 그냥 보드에서 송출하는 거라 신호가 약하다.

대충 직선거리 3m 이내에서는 저정도 세기로 나오는 듯(gqrx에서 신호 강도의 단위를 모름..)


Chirp

IQ balance를 켜놔서 그런가 이중 나선 처럼 나온다.


한번.. 5MHz HF 쪽을 시도해보는데

direct sampling 해야하니 아래와 같이 설정하고

5MHz 에 Chrip 하니 신호가 잘나온다.

10cm 남짓한 점퍼선으로는 파장 길이를 충족시키지 못해서 인지 수신이 안되고 손으로 잡고 있어주니 송출된다.

(물론 24cm 정도 되는 DMB 안테나라 수신측도 정상은 아니지만..)

아무튼 안테나는 UV가 아닌 HF로 해주니 수신 확인 성공!

(이전에 점퍼 날려서 HF쪽 작동은 하게 해놨던게 효과는 있는지 보려면 또 떼야 하나?!)


주파수는 1Ghz 까지 가능하다고 되어있는데 그거 보다 높은 주파수로 하면 라즈베리 자체가 뻗어버리니 주의!

3MHz는 되는데 2MHz는 또 죽는다. 50kHz 되는거 맞나?

[링크 : https://github.com/F5OEO/rpitx]

'embeded > raspberry pi' 카테고리의 다른 글

rpi 7" dsi  (0) 2022.01.21
rpi DSI 7인치 터치 스크린  (0) 2022.01.20
rpitx  (0) 2021.12.16
wayland on rpi  (0) 2021.11.22
rpi 3b 2초 부팅 fs  (0) 2021.11.20
Posted by 구차니
embeded/raspberry pi2021. 12. 16. 16:10

5kHz ~ 1.5GHz 까지 송출이 가능한데, 밴드패스 필터 쓰지 않고 송출하다가는

다른 대역을 쓰면서 전파법에 철퇴 맞을수 있으니 주의가 필요하다고 경고가 써있는데

밴드패스 필터 따위 만들줄 모르니 일단 패~~~~쓰 ㅠㅠ

[링크 : https://github.com/F5OEO/rpitx]

[링크 : https://hellocomputer.tistory.com/8]


pifm의 GPIO 4를 쓰는것이 동일한걸 보면

DMA를 통한 ext. clk out을 쓰는 것 같은데 pifm은 1MHz~250MHz를 할 수 있다고 하는데 반해

rpitx는 1.5GHz 까지 가능하다고 한데 무슨 차이가 있어서 범위의 변화가 생기는지 궁금해지네?

[링크 : https://github.com/rm-hull/pifm]


+

pifm은 FM만 되는데 반해 pitx는 fm, am, ssb, sstv, fsq 와 같이 다양한 모듈레이션을 제공한다고 한다.

PiTx is a software which permit to transmit HF directly through a pin of Raspberry Pi GPIO. Unlike PiFM which transmit only in FM, PiTx is able to perform multi modulation (FM,AM,SSB,SSTV,FSQ) : it has an I/Q input to be agnostic.
The demonstration here is done in several steps :
– Record an I/Q file from a doorbell transmitter on 434MHZ (first part)
– Playing it with the Raspberry Pi using Pitx on HF on same frequency
– Listen to the doorbell receiver which recognize the signal

[링크 : https://www.rtl-sdr.com/transmitting-fm-am-ssb-sstv-and-fsq-with-just-a-raspberry-pi/]

'embeded > raspberry pi' 카테고리의 다른 글

rpi DSI 7인치 터치 스크린  (0) 2022.01.20
rpitx on rpi4  (0) 2021.12.22
wayland on rpi  (0) 2021.11.22
rpi 3b 2초 부팅 fs  (0) 2021.11.20
img 파일 마운트 하기  (0) 2021.11.20
Posted by 구차니
embeded/raspberry pi2021. 11. 22. 22:10

라즈베리 파이 2B 이긴한데 buster 버전.

$ cat /etc/os-release
PRETTY_NAME="Raspbian GNU/Linux 10 (buster)"
NAME="Raspbian GNU/Linux"
VERSION_ID="10"
VERSION="10 (buster)"
VERSION_CODENAME=buster
ID=raspbian
ID_LIKE=debian
HOME_URL="http://www.raspbian.org/"
SUPPORT_URL="http://www.raspbian.org/RaspbianForums"
BUG_REPORT_URL="http://www.raspbian.org/RaspbianBugs"

$ cat /etc/rpi-issue
Raspberry Pi reference 2020-08-20
Generated using pi-gen, https://github.com/RPi-Distro/pi-gen, 9a3a10bf1019ebb2d59053564dc6b90068bad27d, stage2l


혹시나 해서 검색해보는데 흐음...

$ sudo apt-cache search wayland
libwayland-bin - wayland compositor infrastructure - binary utilities
libwayland-client0 - wayland compositor infrastructure - client library
libwayland-cursor0 - wayland compositor infrastructure - cursor library
libwayland-dev - wayland compositor infrastructure - development files
libwayland-doc - wayland compositor infrastructure - documentation files
libwayland-egl-backend-dev - wayland compositor infrastructure - EGL backend development files
libwayland-egl1 - wayland compositor infrastructure - EGL library
libwayland-egl1-mesa - transitional dummy package
libwayland-server0 - wayland compositor infrastructure - server library
libweston-5-0 - reference implementation of a wayland compositor (shared libs)
libweston-5-dev - reference implementation of a wayland compositor (shared libs)
wayland-protocols - wayland compositor protocols
weston - reference implementation of a wayland compositor


weston에 줄줄이 비엔나로 깔리는데 한번 시도는 해볼까나?

$ sudo apt-get install weston
Reading package lists... Done
Building dependency tree
Reading state information... Done
The following additional packages will be installed:
  libdrm-amdgpu1 libdrm-common libdrm-nouveau2 libdrm-radeon1 libdrm2 libegl-mesa0 libegl1 libegl1-mesa libevdev2 libgbm1 libgl1-mesa-dri libglapi-mesa libgles2 libglvnd0 libgudev-1.0-0
  libinput-bin libinput10 libllvm9 libmtdev1 libsensors-config libsensors5 libwacom-bin libwacom-common libwacom2 libwayland-server0 libweston-5-0 libx11-xcb1 libxcb-composite0 libxcb-dri2-0
  libxcb-dri3-0 libxcb-present0 libxcb-shape0 libxcb-sync1 libxcb-xfixes0 libxcb-xkb1 libxshmfence1
Suggested packages:
  lm-sensors
The following NEW packages will be installed:
  libdrm-amdgpu1 libdrm-common libdrm-nouveau2 libdrm-radeon1 libdrm2 libegl-mesa0 libegl1 libegl1-mesa libevdev2 libgbm1 libgl1-mesa-dri libglapi-mesa libgles2 libglvnd0 libgudev-1.0-0
  libinput-bin libinput10 libllvm9 libmtdev1 libsensors-config libsensors5 libwacom-bin libwacom-common libwacom2 libwayland-server0 libweston-5-0 libx11-xcb1 libxcb-composite0 libxcb-dri2-0
  libxcb-dri3-0 libxcb-present0 libxcb-shape0 libxcb-sync1 libxcb-xfixes0 libxcb-xkb1 libxshmfence1 weston
0 upgraded, 37 newly installed, 0 to remove and 0 not upgraded.
Need to get 21.6 MB of archives.
After this operation, 554 MB of additional disk space will be used.
Do you want to continue? [Y/n]

'embeded > raspberry pi' 카테고리의 다른 글

rpitx on rpi4  (0) 2021.12.22
rpitx  (0) 2021.12.16
rpi 3b 2초 부팅 fs  (0) 2021.11.20
img 파일 마운트 하기  (0) 2021.11.20
rpi 3b 2초 부팅 이미지 테스트  (0) 2021.11.17
Posted by 구차니