'프로그램 사용/yolo_tensorflow'에 해당되는 글 133건

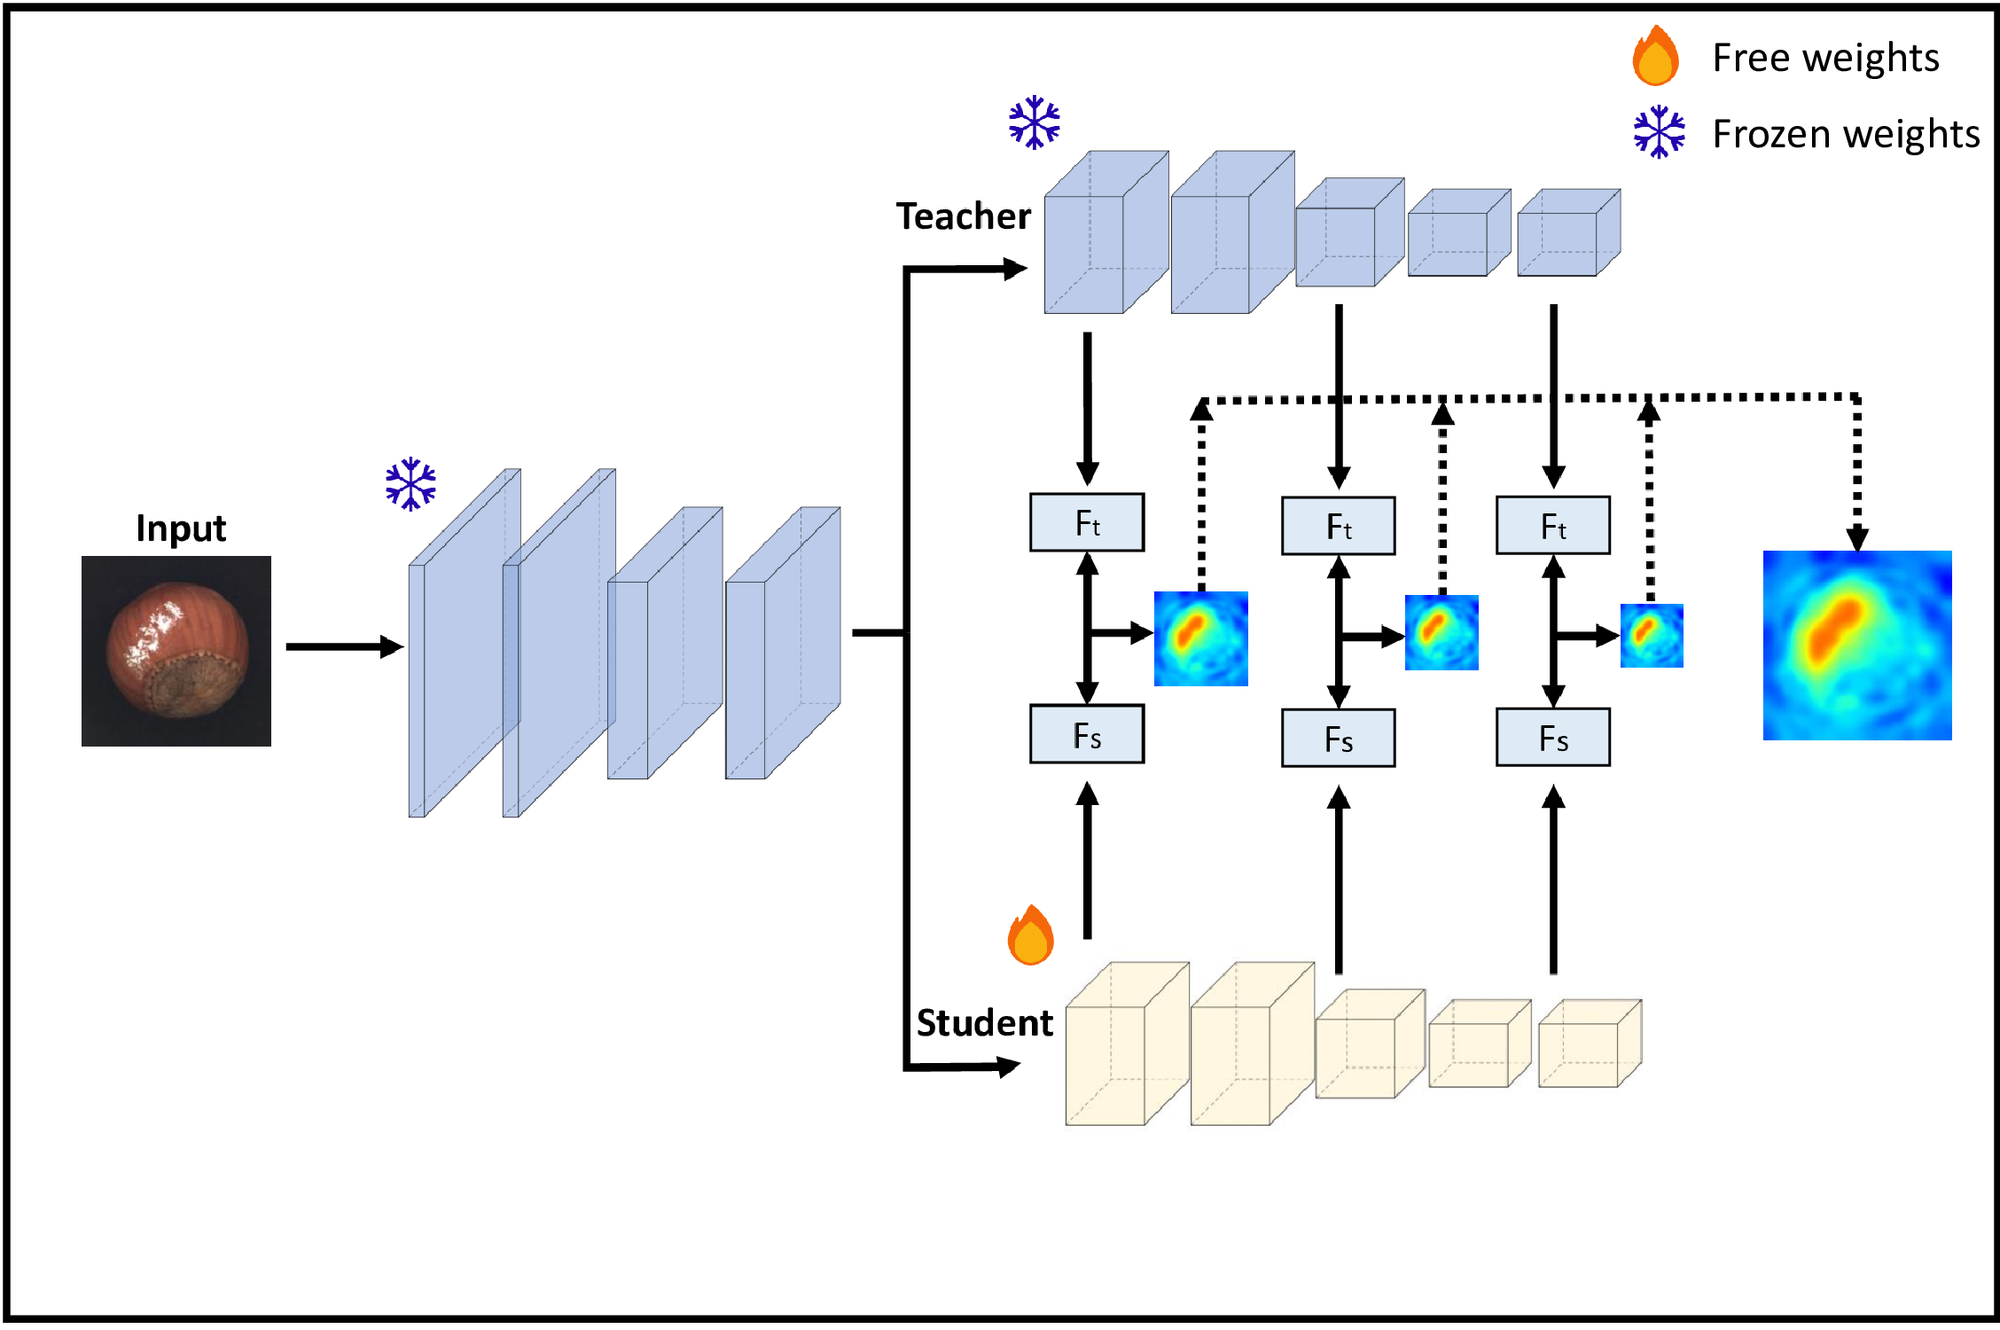
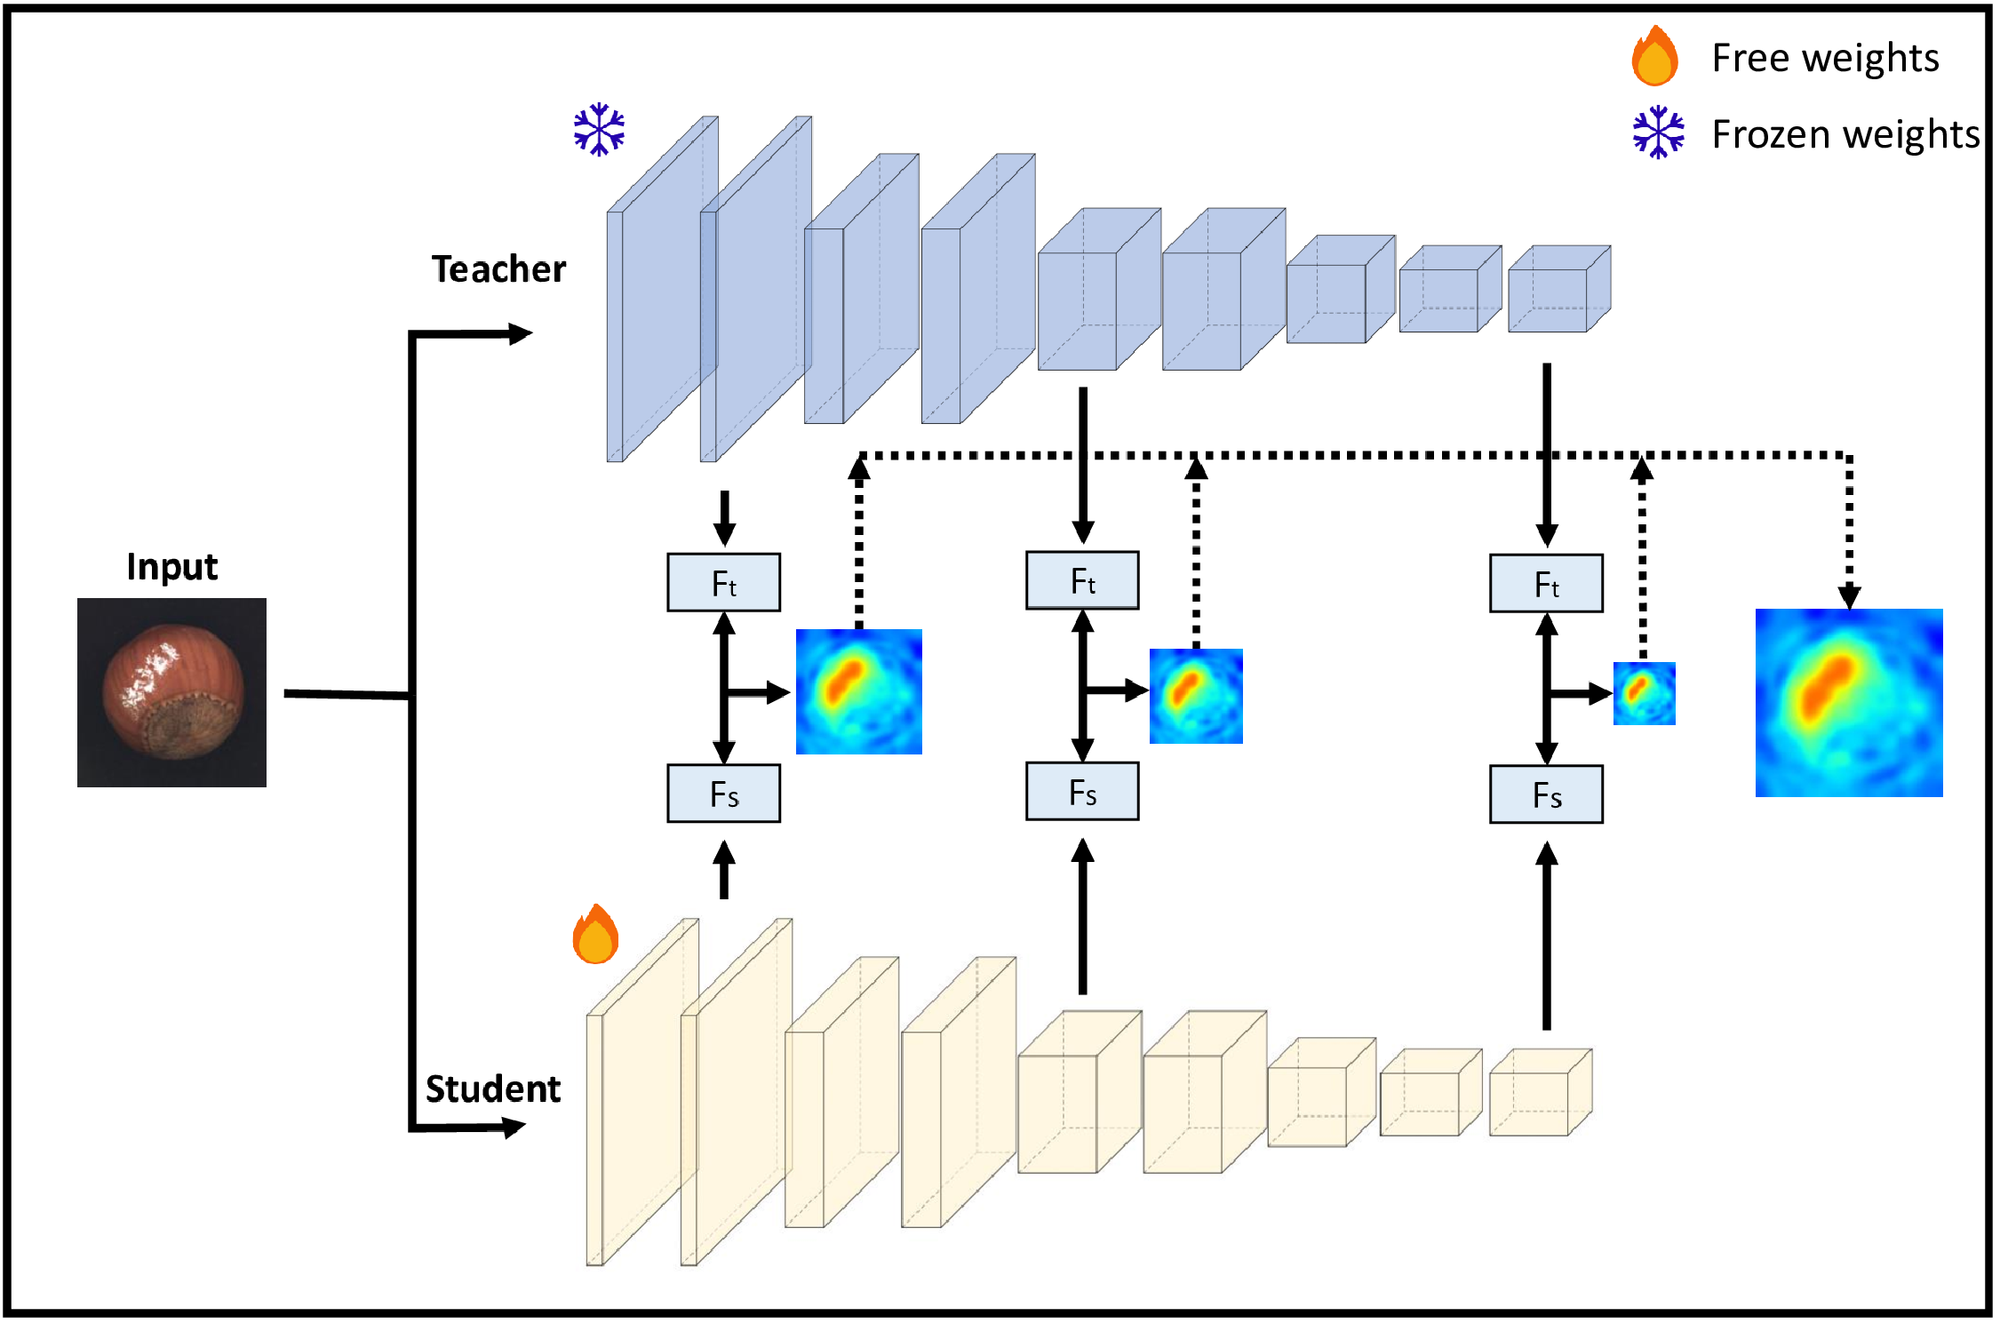
  1. 2026.05.20 STFPM - Student-Teacher Feature Pyramid Matching
  2. 2026.05.20 EfficientAD
  3. 2026.05.20 patchcore
  4. 2026.05.20 MVTec AD 데이터 셋
  5. 2026.05.19 VAD - PaDiM, Patchcore - 정상이 아님을 탐지
  6. 2026.05.14 U-net, segmentation
  7. 2026.05.14 QAT, PTQ .. 모델 경량화
  8. 2026.05.06 unet
  9. 2025.10.02 얼굴인식 관련 조사
  10. 2025.09.17 keras - transfer learning / fine tuning

[링크 : https://github.com/gdwang08/STFPM]

[링크 : https://blog.naver.com/kingjykim/223495332696]


[링크 : https://claude.ai/share/6d307c41-77bc-411e-90a8-982fb5ce0467]


STFPM PaSTe

Student-Teacher Feature Pyramid Matching

[링크 : https://www.alphaxiv.org/ko/overview/2503.02691v1]


Partially Shared Teacher-student

Our results show that PaSTe decreases the inference time by 25%, while reducing the training time by 33% and peak RAM usage during training by 76%.

[링크 : https://github.com/AMCO-UniPD/PaSTe]

'프로그램 사용 > yolo_tensorflow' 카테고리의 다른 글

NAS - Neural Architecture Search  (0) 2026.05.21
MCUNet  (0) 2026.05.21
EfficientAD  (0) 2026.05.20
patchcore  (0) 2026.05.20
MVTec AD 데이터 셋  (0) 2026.05.20
Posted by 구차니

'프로그램 사용 > yolo_tensorflow' 카테고리의 다른 글

MCUNet  (0) 2026.05.21
STFPM - Student-Teacher Feature Pyramid Matching  (0) 2026.05.20
patchcore  (0) 2026.05.20
MVTec AD 데이터 셋  (0) 2026.05.20
VAD - PaDiM, Patchcore - 정상이 아님을 탐지  (0) 2026.05.19
Posted by 구차니

VAD 분야 SOTA(state of the art. 별걸 다 줄여 -_-) 모델이라는데 무거워서 모바일이나 엣지에서 돌리긴 좀 무리일 듯.


[링크 : https://coderecording.tistory.com/9]

[링크 : https://github.com/amazon-science/patchcore-inspection]

[링크 : https://github.com/tiskw/patchcore-ad]

'프로그램 사용 > yolo_tensorflow' 카테고리의 다른 글

STFPM - Student-Teacher Feature Pyramid Matching  (0) 2026.05.20
EfficientAD  (0) 2026.05.20
MVTec AD 데이터 셋  (0) 2026.05.20
VAD - PaDiM, Patchcore - 정상이 아님을 탐지  (0) 2026.05.19
U-net, segmentation  (0) 2026.05.14
Posted by 구차니

가장 만만한(?) 데이터 셋인 것 같은데

DAGM 데이터셋은 총 10가지 도메인의 데이터로 구성되어 있으며, 모델링을 통해 가상으로 결함을 합성하여 만든 데이터셋입니다. NanoTWICE 데이터셋은 nanofibrous material 데이터이며 5장의 정상 데이터와 40장의 결함 데이터로 구성이 되어있습니다

자, 이제 오늘의 본론인 MVTec-AD 데이터셋에 대해 설명드리겠습니다. 앞서 설명드렸던 DAGM, NanoTWICE의 아쉬웠던 부분들을 개선하며 총 15종류의 도메인의 데이터셋을 구축하였습니다. 크게는 Texture와 Object로 구분을 하였고, 각각 5가지, 10가지 종류의 도메인 데이터로 구성이 되어있습니다

[링크 : https://hoya012.github.io/blog/MVTec-AD/]


5.3 GB(!!)

[링크 : https://www.kaggle.com/datasets/ipythonx/mvtec-ad]

[링크 : https://www.mvtec.com/research-teaching/datasets/mvtec-ad]

[링크 : https://huggingface.co/datasets/Voxel51/mvtec-ad]


5.9 GB(!!!)

[링크 : https://www.kaggle.com/datasets/mhskjelvareid/dagm-2007-competition-dataset-optical-inspection]

[링크 : https://github.com/M-3LAB/awesome-industrial-anomaly-detection]

'프로그램 사용 > yolo_tensorflow' 카테고리의 다른 글

EfficientAD  (0) 2026.05.20
patchcore  (0) 2026.05.20
VAD - PaDiM, Patchcore - 정상이 아님을 탐지  (0) 2026.05.19
U-net, segmentation  (0) 2026.05.14
QAT, PTQ .. 모델 경량화  (0) 2026.05.14
Posted by 구차니

비정상을 학습시키는게 아니라

정상만 학습시키고 정상에서 벗어나는 것을 탐지하는 기법


PaDiM

Ganomaly (GAN + Anomaly Detection)

[링크 : https://actionpower.medium.com/액션파워-lab-이미지에서-이상-영역-탐지-visual-anomaly-detection-는-어떻게-할까-6da65866366b]


PaDiM-Lite / PatchCore-Lite

[링크 : https://www.alphaxiv.org/ko/overview/2603.20288v1]


PaDiM (Patch Ditrubution Modeling)

[링크 : https://huggingface.co/papers/2011.08785]

[링크 : https://data-analysis-expertise.tistory.com/128]

[링크 : https://dippingtodeepening.tistory.com/110]

[링크 : https://cumulu-s.tistory.com/44]


VAD - Visual Anomaly Detection

MVTec-AD, MVTec-3D, MVTec-LOCO, VisA  데이터 셋

[링크 : https://velog.io/@barley_15/논문-리뷰-A-Survey-on-Visual-Anomaly-Detection-Challenge-Approach-and-Prospect]


PatchCore

[링크 : https://velog.io/@ljwljy51/PatchCore-Paper-Review]


PatchCore

SPADE , PaDiM

[링크 : https://ffighting.net/deep-learning-paper-review/anomaly-detection/patchcore/]

'프로그램 사용 > yolo_tensorflow' 카테고리의 다른 글

patchcore  (0) 2026.05.20
MVTec AD 데이터 셋  (0) 2026.05.20
U-net, segmentation  (0) 2026.05.14
QAT, PTQ .. 모델 경량화  (0) 2026.05.14
unet  (0) 2026.05.06
Posted by 구차니


[링크 : https://github.com/PINTO0309/TensorflowLite-UNet]

[링크 : https://huggingface.co/qualcomm/Unet-Segmentation]

[링크 : https://github.com/milesial/Pytorch-UNet]

[링크 : https://github.com/Rumit95/Auto_Segmentation] semantic segmentation

[링크 : https://github.com/Rumit95/Semantic-Segmentation-of-Image]


  • 클래스 1: 애완 동물에 속하는 픽셀
  • 클래스 2: 애완동물과 접하는 픽셀
  • 클래스 3: 위에 속하지 않음/주변 픽셀

[링크 : https://www.tensorflow.org/tutorials/images/segmentation?hl=ko]

'프로그램 사용 > yolo_tensorflow' 카테고리의 다른 글

MVTec AD 데이터 셋  (0) 2026.05.20
VAD - PaDiM, Patchcore - 정상이 아님을 탐지  (0) 2026.05.19
QAT, PTQ .. 모델 경량화  (0) 2026.05.14
unet  (0) 2026.05.06
얼굴인식 관련 조사  (0) 2025.10.02
Posted by 구차니

QAT - Quantization Aware Training

양자화 하지 않고 학습후

# Load MNIST dataset
mnist = keras.datasets.mnist
(train_images, train_labels), (test_images, test_labels) = mnist.load_data()

# Normalize the input image so that each pixel value is between 0 to 1.
train_images = train_images / 255.0
test_images = test_images / 255.0

# Define the model architecture.
model = keras.Sequential([
  keras.layers.InputLayer(input_shape=(28, 28)),
  keras.layers.Reshape(target_shape=(28, 28, 1)),
  keras.layers.Conv2D(filters=12, kernel_size=(3, 3), activation='relu'),
  keras.layers.MaxPooling2D(pool_size=(2, 2)),
  keras.layers.Flatten(),
  keras.layers.Dense(10)
])

# Train the digit classification model
model.compile(optimizer='adam',
              loss=tf.keras.losses.SparseCategoricalCrossentropy(from_logits=True),
              metrics=['accuracy'])

model.fit(
  train_images,
  train_labels,
  epochs=1,
  validation_split=0.1,
)


양자화 모델로 변환하고, 파인튜닝

import tensorflow_model_optimization as tfmot

quantize_model = tfmot.quantization.keras.quantize_model

# q_aware stands for for quantization aware.
q_aware_model = quantize_model(model)

# `quantize_model` requires a recompile.
q_aware_model.compile(optimizer='adam',
              loss=tf.keras.losses.SparseCategoricalCrossentropy(from_logits=True),
              metrics=['accuracy'])

q_aware_model.summary()

train_images_subset = train_images[0:1000] # out of 60000
train_labels_subset = train_labels[0:1000]

q_aware_model.fit(train_images_subset, train_labels_subset,
                  batch_size=500, epochs=1, validation_split=0.1)

[링크 : https://www.tensorflow.org/model_optimization/guide/quantization/training?hl=ko]


PTQ - Post Training Quantization

[링크 : https://www.tensorflow.org/model_optimization/guide/quantization/post_training?hl=ko]


pruning - 0에 가까운 애들 없애기 (가지치기)

quantization (양자화)

distillation (증류)

low rank factorization (NxM -> Xxk kxM)

[링크 : https://u-b-h.tistory.com/13]

[링크 : https://asidefine.tistory.com/318]

'프로그램 사용 > yolo_tensorflow' 카테고리의 다른 글

VAD - PaDiM, Patchcore - 정상이 아님을 탐지  (0) 2026.05.19
U-net, segmentation  (0) 2026.05.14
unet  (0) 2026.05.06
얼굴인식 관련 조사  (0) 2025.10.02
keras - transfer learning / fine tuning  (0) 2025.09.17
Posted by 구차니

'프로그램 사용 > yolo_tensorflow' 카테고리의 다른 글

U-net, segmentation  (0) 2026.05.14
QAT, PTQ .. 모델 경량화  (0) 2026.05.14
얼굴인식 관련 조사  (0) 2025.10.02
keras - transfer learning / fine tuning  (0) 2025.09.17
keras ssd mobilenet  (0) 2025.09.16
Posted by 구차니


2단계: 특징점 추출과 벡터 변환
감지된 얼굴에서 고유한 특징을 추출하는 단계입니다. 눈 코 입의 위치와 형태 얼굴 윤곽선 그리고 각 부위 간의 거리와 비율 등이 수치화됩니다. 현재는 딥러닝 기반의 임베딩(Embedding) 기술을 통해 얼굴의 특징을 고차원 벡터로 변환합니다. 이 벡터는 개인마다 고유한 값을 가지며 얼굴인식의 핵심 데이터가 됩니다.

Siamese Network와 학습 방식
최신 얼굴인증 시스템에서는 Siamese Network 구조가 널리 사용됩니다. 이는 동일한 가중치를 공유하는 두 개의 신경망이 각각 서로 다른 얼굴 이미지를 처리한 후 그 결과를 비교하는 방식입니다. Triplet Loss 함수를 사용하여 같은 사람의 얼굴 간 거리는 가깝게 다른 사람의 얼굴 간 거리는 멀어지도록 학습시킵니다.

[링크 : https://www.alchera.ai/resource/blog/face-authentication-628a0]


DeepFace는 2014 년 Facebook 연구 그룹이 만든 심층 컨볼루션 신경망을 기반으로 하는 안면 인식 시스템입니다. 디지털 이미지에서 사람의 얼굴을 식별합니다. 97 %의 정확도로 얼굴 인식에 딥 러닝을 사용하는 것이 큰 도약이었습니다.

DeepID 또는 "Deep hidden IDentity 기능"은 Yi Sun 등에 의해 처음 설명 된 일련의 시스템 (예 : DeepID, DeepID2 등)입니다. 2014 년 논문에서“1 만개의 클래스를 예측하는 심층 학습 얼굴 표현”이라는 제목의 논문에서 시스템은 DeepFace와 유사하게 처음 설명되었지만 대조적인 손실을 통한 교육을 통해 식별 및 검증 작업을 모두 지원하도록 확장되었습니다.

VGGFace (더 나은 이름이 없음)는 Omkar Parkhi 등이 개발했습니다. 옥스포드의 VGG (Visual Geometry Group)의 2015년 논문 인 "Deep Face Recognition (딥 얼굴 인식)"에 설명되어 있습니다. 더 잘 조정 된 모델 외에도 작업의 초점은 매우 큰 훈련 데이터 세트를 수집하고 사용하는 방법에 있었습니다. 이를 통해 얼굴 인식을 위한 매우 깊은 CNN 모델을 훈련시켜 표준 데이터 세트에서 최첨단 결과를 얻을 수 있었습니다.

FaceNet은 2015 년 Google 연구원이 개발한 얼굴 인식 시스템으로, 다양한 얼굴 인식 벤치 마크 데이터 세트에서 최첨단 결과를 달성했습니다. FaceNet 시스템은 모델의 여러 타사 오픈 소스 구현 및 사전 훈련된 모델의 가용성 덕분에 광범위하게 사용할 수 있습니다.

[링크 : https://jjeongil.tistory.com/830]


딥러닝을 이용하는 최근의 방법들도 종래의 "PCA(Principle Component Analysis)와 ICA(Independent Component Analysis)"와 유사한 방법을 사용하는데, 오토인코더(Autoencoder)와 같은 인공신경망도 낮은 차원의 벡터로 얼굴 정보를 임베딩(Embedding)하여 차원을 축소한다.<

[링크 : https://mangastorytelling.tistory.com/entry/ITFIND-인공지능과-얼굴-정보-처리-기술]


yolo face

[링크 : https://github.com/YapaLab/yolo-face]


Face PSIM 

[링크 : https://www.axxonsoft.com/products/integration/face-recognition]


Physical Security Information Management

[링크 : https://www.ifsecglobal.com/psim/]


ResNet-50 / ResNet-100
Inception-ResNet
MobileNetV2 (모바일용)
EfficientNet (경량 고성능)

FaceNet (Google, 2015)
ArcFace (DeepInsight, 2018)
InsightFace (2020~)

[링크 : https://techoutside.co.kr/58]


arcface

[링크 :https://blog.naver.com/damtaja/223590383667] learnopencv 번역


평균제곱 차이 유사도 - msd(mean squared difference)
코사인 유사도
피어슨 유사도 - 코사인 유사도의 단점 보완

[링크 : https://blog.naver.com/thinkhong99/222629093644]


자카드 유사도(jaccard Similarity) - 두 벡터의 교집합/합집합을 구함
코사인 유사도

[링크 : https://blog.naver.com/smmok/222439545464]


jaccard index
euclidean distance
cosine similarity
- 임베딩이라고 하는 벡터값 필요

TD-IDF
Wiord2vec
Doc2Vec
ELMo (신경망 기반)
BERT (신경망 기반, 자연어 처리 최고 성능)

[링크 : https://medium.com/cdri/머신러닝-모델로-성분-규제-데이터-의미있게-활용하기-be56461eab2c]


픽셀 기반 유사도 측정 - MSE(Mean Squared Error)
픽셀 기반 방법 - PSNR (Peak SNR) , MSE 기반으로 SNR 을 계산
구조기반 - SSIM (Structural Similarity Index) - 밝기 대비 구조를 이용
특징기반 - SIFT (Scale-Invariant Feature Transform) - 특징점 추출 매칭
특징기반 - SURF (Speeded Up Robust Features) - SIFT 대안, openCV 3.4.2 이상 비활성화됨(옵션활성화 후 빌드하면 사용가능)
벡터공간 - 코사인 유사도, hamming distance(이진벡터간의 차이를 측정)

[링크 : https://pupbani.tistory.com/285]


거리기반
- 유클리디안 거리 (최단거리)
- 맨하튼 거리 (직각거리)
- 체비쇼프 거리 (가징 긴 거리)
- 민코프스키 거리 (?????)
- 하버사인 거리 (구체의 표면 이동 거리)

관계기반
- 코사인 유사도
- 해밍거리 (두 비트열에 서로 다른 기호의 개수로 산출)
- 자카드 인덱스 (합집합과 교집합의 비율로 산출)
- 소렌슨-다이슨 인덱스 (공통 원소 와 평균 원소의 비율)

[링크 : https://blog.skby.net/유사도-측정법-similarity-measure/]


[링크 : https://t2match.kr/wp-content/uploads/ETRI_AI_01_face_recognition_tech.pdf]

[링크 : https://지산학부산.kr/data/market/367.pdf]
'프로그램 사용 > yolo_tensorflow' 카테고리의 다른 글

QAT, PTQ .. 모델 경량화  (0) 2026.05.14
unet  (0) 2026.05.06
keras - transfer learning / fine tuning  (0) 2025.09.17
keras ssd mobilenet  (0) 2025.09.16
mobilenet 학습시키기 with keras, tensorflow  (0) 2025.09.15
Posted by 구차니

tflite 에서 weight만 빼서 거기서 부터 학습 시키면 그게 fine tune / transfer learning(전이학습)이 되는건가?

The conversion from a TensorFlow SaveModel or tf.keras H5 model to .tflite is an irreversible process. Specifically, the original model topology is optimized during the compilation by the TFLite converter, which leads to some loss of information. Also, the original tf.keras model's loss and optimizer configurations are discarded, because those aren't required for inference.

However, the .tflite file still contains some information that can help you restore the original trained model. Most importantly, the weight values are available, although they might be quantized, which could lead to some loss in precision.

The code example below shows you how to read weight values from a .tflite file after it's created from a simple trained tf.keras.Model.


import numpy as np
import tensorflow as tf

# First, create and train a dummy model for demonstration purposes.
model = tf.keras.Sequential([
    tf.keras.layers.Dense(10, input_shape=[5], activation="relu"),
    tf.keras.layers.Dense(1, activation="sigmoid")])
model.compile(loss="binary_crossentropy", optimizer="sgd")

xs = np.ones([8, 5])
ys = np.zeros([8, 1])
model.fit(xs, ys, epochs=1)

# Convert it to a TFLite model file.
converter = tf.lite.TFLiteConverter.from_keras_model(model)
tflite_model = converter.convert()
open("converted.tflite", "wb").write(tflite_model)

# Use `tf.lite.Interpreter` to load the written .tflite back from the file system.
interpreter = tf.lite.Interpreter(model_path="converted.tflite")
all_tensor_details = interpreter.get_tensor_details()
interpreter.allocate_tensors()

for tensor_item in all_tensor_details:
  print("Weight %s:" % tensor_item["name"])
  print(interpreter.tensor(tensor_item["index"])())

[링크 : https://stackoverflow.com/questions/59559289/is-there-any-way-to-convert-a-tensorflow-lite-tflite-file-back-to-a-keras-fil]


읽어오든.. tf.keras.application.MobileNetV2 해서 만들던 weight의 유무를 제외하면 동일하게 불러오는건가 보다.

# Create the base model from the pre-trained model MobileNet V2
IMG_SHAPE = IMG_SIZE + (3,)
base_model = tf.keras.applications.MobileNetV2(input_shape=IMG_SHAPE,
                                               include_top=False,
                                               weights='imagenet')
#or load your own
#base_modeltf.saved_model.load("./pretrained_models/ssd_mobilenet_v2_320x320_coco17_tpu-8/saved_model")

[링크 : https://www.aranacorp.com/en/training-a-tensorflow2-model-with-keras/]


다시 찾아보니 keras쪽 표현으로

transfer-learning은 기존의 값을 변화시키지 않고 추가 레이어에 학습시키는 것 같고

The typical transfer-learning workflow
This leads us to how a typical transfer learning workflow can be implemented in Keras:

Instantiate a base model and load pre-trained weights into it.
Freeze all layers in the base model by setting trainable = False.
Create a new model on top of the output of one (or several) layers from the base model.
Train your new model on your new dataset.
Note that an alternative, more lightweight workflow could also be:

Instantiate a base model and load pre-trained weights into it.
Run your new dataset through it and record the output of one (or several) layers from the base model. This is called feature extraction.
Use that output as input data for a new, smaller model.


First, instantiate a base model with pre-trained weights.

base_model = keras.applications.Xception(
    weights='imagenet',  # Load weights pre-trained on ImageNet.
    input_shape=(150, 150, 3),
    include_top=False)  # Do not include the ImageNet classifier at the top.
Then, freeze the base model.

base_model.trainable = False


Create a new model on top.

inputs = keras.Input(shape=(150, 150, 3))
# We make sure that the base_model is running in inference mode here,
# by passing `training=False`. This is important for fine-tuning, as you will
# learn in a few paragraphs.
x = base_model(inputs, training=False)
# Convert features of shape `base_model.output_shape[1:]` to vectors
x = keras.layers.GlobalAveragePooling2D()(x)
# A Dense classifier with a single unit (binary classification)
outputs = keras.layers.Dense(1)(x)
model = keras.Model(inputsoutputs)
Train the model on new data.

model.compile(optimizer=keras.optimizers.Adam(),
              loss=keras.losses.BinaryCrossentropy(from_logits=True),
              metrics=[keras.metrics.BinaryAccuracy()])
model.fit(new_dataset, epochs=20, callbacks=..., validation_data=...)


fine tuning은 모델 자체의 가중치를 변경시킬수 있도록 해서, 천천히 학습 시키는 것 같다.

Fine-tuning
Once your model has converged on the new data, you can try to unfreeze all or part of the base model and retrain the whole model end-to-end with a very low learning rate.

This is an optional last step that can potentially give you incremental improvements. It could also potentially lead to quick overfitting – keep that in mind.

It is critical to only do this step after the model with frozen layers has been trained to convergence. If you mix randomly-initialized trainable layers with trainable layers that hold pre-trained features, the randomly-initialized layers will cause very large gradient updates during training, which will destroy your pre-trained features.

It's also critical to use a very low learning rate at this stage, because you are training a much larger model than in the first round of training, on a dataset that is typically very small. As a result, you are at risk of overfitting very quickly if you apply large weight updates. Here, you only want to readapt the pretrained weights in an incremental way.


This is how to implement fine-tuning of the whole base model:

# Unfreeze the base model
base_model.trainable = True

# It's important to recompile your model after you make any changes
# to the `trainable` attribute of any inner layer, so that your changes
# are take into account
model.compile(optimizer=keras.optimizers.Adam(1e-5),  # Very low learning rate
              loss=keras.losses.BinaryCrossentropy(from_logits=True),
              metrics=[keras.metrics.BinaryAccuracy()])

# Train end-to-end. Be careful to stop before you overfit!
model.fit(new_dataset, epochs=10, callbacks=..., validation_data=...)

[링크 : https://keras.io/guides/transfer_learning/]


+

[링크 : https://89douner.tistory.com/270] vgg16 기준 추가학습


SavedModel 형식과 비교하여 H5 파일에 포함되지 않은 두 가지가 있습니다.

model.add_loss() 및 model.add_metric()을 통해 추가된 외부 손실 및 메트릭은 저장되지 않습니다(SavedModel과 다름). 모델에 이러한 솔실 및 메트릭이 있고 훈련을 다시 시작하려면 모델을 로드한 후 이러한 손실을 다시 추가해야 합니다. 이는 self.add_loss() 및 self.add_metric()을 통해 레이어 내부에서 생성한 손실/메트릭에는 적용되지 않습니다. 이러한 손실 및 메트릭은 레이어가 로드되는 한 레이어의 call 메서드의 일부이기 때문에 계속 유지됩니다.
사용자 정의 레이어와 같은 사용자 정의 객체의 계산 그래프는 저장 파일에 포함되지 않습니다. 로드 시 Keras는 모델을 다시 구성하기 위해 이러한 객체의 Python 클래스/함수에 액세스해야 합니다. 사용자 정의 객체를 참고하세요.

[링크 : https://www.tensorflow.org/guide/keras/save_and_serialize?hl=ko]

'프로그램 사용 > yolo_tensorflow' 카테고리의 다른 글

unet  (0) 2026.05.06
얼굴인식 관련 조사  (0) 2025.10.02
keras ssd mobilenet  (0) 2025.09.16
mobilenet 학습시키기 with keras, tensorflow  (0) 2025.09.15
ssd mobilenet  (0) 2025.09.11
Posted by 구차니