embeded/FPGA - ALTERA2023. 10. 2. 23:02

또 병이 도져서 중고장터 뒤지다가

sockit 이라는 제품에서 HSMC 라는 커넥터가 있어서 보는데

아래 사진에서 우측의 희한한 커넥터가 바로 그녀석

웬지. 회사에서 사용하는걸 본적이 있는 느낌인데...

[링크 : https://www.terasic.com.tw/cgi-bin/page/archive.pl?Language=English&CategoryNo=205&No=816&PartNo=2#contents]


아무튼 아래와 같은 스펙을 지닌 고속 인터페이스인데

반대로 생각하면 캐리어 보드가 없으면 de10-nano 처럼 HDMI도 없는 녀석이라

메모리만 AP 쪽이 1기가, FPGA쪽에 1기가 넣어주는게 무의미해질 수 있는 구성이라는게 함정

[링크 : http://www.mwftr.com/SoCs14/Altera%20hsmc_spec.pdf]

'embeded > FPGA - ALTERA' 카테고리의 다른 글

terasic sockit  (0) 2023.11.06
altera(intel fpga) m9k m10k  (0) 2023.05.14
altera uart ip  (0) 2023.05.14
altera - partial reconfigure  (0) 2023.04.24
altera nios 2 epcs to ram  (0) 2023.03.28
Posted by 구차니
embeded/raspberry pi2023. 9. 23. 23:18

저번에 구매했던 브라켓을 이용해서 대충대충 만들었는데, 드럽게 부피를 많이 먹는다.


나중에 라즈베리를 틸트 기구에 길~게 해서 위쪽으로 FFC/CSI 케이블 연결해주고

본체도 같이 pan(팬)으로 회전하도록 두개를 놔둬야 하나 고민된다.

라즈베리 하나에 한쪽 눈깔씩 해서 영상처리하면서 중앙으로 전송하는 구조로 가야하나..

눈깔만 해도 저만한 부피인데 목까지 만들려면 진짜 사람 머리 크기 되겠네 -_-


조립하고 나서 검색해보니 무언가 나오는데.. 이렇게 리얼한건 바란게 아니라고..

[링크 : https://circuitdigest.com/microcontroller-projects/diy-3d-printed-animatronic-eye-with-arduino]


ESP32에다가 이런거 비슷한거 달아서 쓰고 있긴한데..

FFC 케이블을 길게해서 팬을 해도 케이블에 무리가 적게 가게 하는 방향으로 해결하는 듯.

[링크 : https://makersportal.com/blog/2020/3/21/raspberry-pi-servo-panning-camera]


이건 USB 카메라 같네..

[링크 : https://www.electroniclinic.com/raspberry-pi-servo-motor-for-camera-controlling/]

'embeded > raspberry pi' 카테고리의 다른 글

mariadb 라즈베리 파이 설정값  (0) 2024.01.02
MCP2515 on rpi  (0) 2023.10.31
서보 팬틸트 브라켓 구매  (0) 2023.09.19
DHT22 도착!  (0) 2023.09.19
bmp280 HW-611  (0) 2023.09.19
Posted by 구차니
embeded/raspberry pi2023. 9. 19. 21:02

조립법이 없어서

결국에는 판매페이지 저장을 하게 되네 -_ㅠ

[링크 : http://itempage3.auction.co.kr/DetailView.aspx?ItemNo=B722540913]

'embeded > raspberry pi' 카테고리의 다른 글

MCP2515 on rpi  (0) 2023.10.31
서보 pan/tilt 조립  (0) 2023.09.23
DHT22 도착!  (0) 2023.09.19
bmp280 HW-611  (0) 2023.09.19
라즈베리 파이 openOCD jtag?  (0) 2023.07.24
Posted by 구차니
embeded/raspberry pi2023. 9. 19. 14:18

저장소 손보고

pi@raspberrypi:~/src $ sudo apt-get update
Get:1 http://archive.raspberrypi.org/debian bullseye InRelease [23.6 kB]
Get:2http://raspbian.raspberrypi.org/raspbian bullseye InRelease [15.0 kB]
Get:3 http://raspbian.raspberrypi.org/raspbian bullseye/main armhf Packages [13.2 MB]
Get:4 http://archive.raspberrypi.org/debian bullseye/main armhf Packages [314 kB]
Fetched 13.6 MB in 25s (534 kB/s)                                                                                                
Reading package lists... Done
N: Repository ' http://raspbian.raspberrypi.org/raspbian bullseye InRelease' changed its 'Suite' value from 'stable' to 'oldstable'

pi@raspberrypi:~/src $ sudo apt full-upgrade

[링크 : https://forums.raspberrypi.com/viewtopic.php?t=318302]


pip를 이용하여 패키지 설치하고

$ sudo apt-get install python3-pip

[링크 : https://foreverhappiness.tistory.com/67] // pip3가 아니다 ㅠㅠ


adafruit_dht 패키지 설치하고

sudo pip3 install Adafruit_DHT
Looking in indexes: https://pypi.org/simple, https://www.piwheels.org/simple
Collecting Adafruit_DHT
  Downloading Adafruit_DHT-1.4.0.tar.gz (15 kB)
Building wheels for collected packages: Adafruit-DHT
  Building wheel for Adafruit-DHT (setup.py) ... done
  Created wheel for Adafruit-DHT: filename=Adafruit_DHT-1.4.0-cp39-cp39-linux_armv7l.whl size=26725 sha256=6d328e4cac264d9807d07a3f20bbc7eb687bf002ae850b3dcfdae1d5fc4a9a64
  Stored in directory: /root/.cache/pip/wheels/2b/75/fa/27f8bc06878df2b751d348ad98e92361f78ea9f9640c7e6277
Successfully built Adafruit-DHT
Installing collected packages: Adafruit-DHT
Successfully installed Adafruit-DHT-1.4.0


소스는 adafruit 에서 만든걸 써서 별거 없는데

import Adafruit_DHT as dht
import time

while True:
    humidity, temperature = dht.read_retry(dht.DHT22, 4)
    print("Temp={0:0.1f}*C  Humidity={1:0.1f}%".format(temperature, humidity))   
time.sleep(1)

[링크 : https://kdjun97.github.io/iot/raspberry-pi-dht22/]


예상외로 읽는데 실패가 좀 많은지 의외로 빈번하게 4초 정도 걸리는 경우가 나온다.

pi@raspberrypi:~/src $ time python sen.py 
Temp=26.6*C  Humidity=55.6%
Temperature in Celsius : 26.74 C
Pressure : 1003.37 hPa

real 0m3.937s
user 0m0.370s
sys 0m0.060s

pi@raspberrypi:~/src $ time python sen.py 
Temp=26.6*C  Humidity=55.5%
Temperature in Celsius : 26.74 C
Pressure : 1003.42 hPa

real 0m1.415s
user 0m0.352s
sys 0m0.058s


python 에서 멀티 쓰레드로 해서 읽어오게 해야하나..

'embeded > raspberry pi' 카테고리의 다른 글

서보 pan/tilt 조립  (0) 2023.09.23
서보 팬틸트 브라켓 구매  (0) 2023.09.19
bmp280 HW-611  (0) 2023.09.19
라즈베리 파이 openOCD jtag?  (0) 2023.07.24
rpi bear metal  (0) 2023.07.10
Posted by 구차니
embeded/raspberry pi2023. 9. 19. 12:02

코드가 python 2.x 용인것 같아서 3.x로 되도록 대충 바꾸었고,

import smbus 에서 에러가 나서 아래 패키지를 설치하면 해결된다.

$ sudo apt-get install python3-smbus

[링크 : https://forums.raspberrypi.com/viewtopic.php?t=192909]


BMP280 이지 BME280이 아니라 습도가 안되서 좀 아쉽..

$ cat bmp280.py 
# Distributed with a free-will license.
# Use it any way you want, profit or free, provided it fits in the licenses of its associated works.
# BMP280
# This code is designed to work with the BMP280_I2CS I2C Mini Module available from ControlEverything.com.
# https://www.controleverything.com/content/Barometer?sku=BMP280_I2CSs#tabs-0-product_tabset-2 
import smbus
import time

# Get I2C bus
bus = smbus.SMBus(1)

# BMP280 address, 0x76(118)
# Read data back from 0x88(136), 24 bytes
b1 = bus.read_i2c_block_data(0x76, 0x88, 24)

# Convert the data
# Temp coefficents
dig_T1 = b1[1] * 256 + b1[0]
dig_T2 = b1[3] * 256 + b1[2]
if dig_T2 > 32767 :
    dig_T2 -= 65536
dig_T3 = b1[5] * 256 + b1[4]
if dig_T3 > 32767 :
    dig_T3 -= 65536


# Pressure coefficents
dig_P1 = b1[7] * 256 + b1[6]
dig_P2 = b1[9] * 256 + b1[8]
if dig_P2 > 32767 :
    dig_P2 -= 65536
dig_P3 = b1[11] * 256 + b1[10]
if dig_P3 > 32767 :
    dig_P3 -= 65536
dig_P4 = b1[13] * 256 + b1[12]
if dig_P4 > 32767 :
    dig_P4 -= 65536
dig_P5 = b1[15] * 256 + b1[14]
if dig_P5 > 32767 :
    dig_P5 -= 65536
dig_P6 = b1[17] * 256 + b1[16]
if dig_P6 > 32767 :
    dig_P6 -= 65536
dig_P7 = b1[19] * 256 + b1[18]
if dig_P7 > 32767 :
    dig_P7 -= 65536
dig_P8 = b1[21] * 256 + b1[20]
if dig_P8 > 32767 :
    dig_P8 -= 65536
dig_P9 = b1[23] * 256 + b1[22]
if dig_P9 > 32767 :
    dig_P9 -= 65536


# BMP280 address, 0x76(118)
# Select Control measurement register, 0xF4(244)
# 0x27(39) Pressure and Temperature Oversampling rate = 1
# Normal mode
bus.write_byte_data(0x76, 0xF4, 0x27)
# BMP280 address, 0x76(118)
# Select Configuration register, 0xF5(245)
# 0xA0(00) Stand_by time = 1000 ms
bus.write_byte_data(0x76, 0xF5, 0xA0)

time.sleep(0.5)

# BMP280 address, 0x76(118)
# Read data back from 0xF7(247), 8 bytes
# Pressure MSB, Pressure LSB, Pressure xLSB, Temperature MSB, Temperature LSB
# Temperature xLSB, Humidity MSB, Humidity LSB
data = bus.read_i2c_block_data(0x76, 0xF7, 8)

# Convert pressure and temperature data to 19-bits
adc_p = ((data[0] * 65536) + (data[1] * 256) + (data[2] & 0xF0)) / 16
adc_t = ((data[3] * 65536) + (data[4] * 256) + (data[5] & 0xF0)) / 16

# Temperature offset calculations
var1 = ((adc_t) / 16384.0 - (dig_T1) / 1024.0) * (dig_T2)
var2 = (((adc_t) / 131072.0 - (dig_T1) / 8192.0) * ((adc_t)/131072.0 - (dig_T1)/8192.0)) * (dig_T3)
t_fine = (var1 + var2)
cTemp = (var1 + var2) / 5120.0
fTemp = cTemp * 1.8 + 32


# Pressure offset calculations
var1 = (t_fine / 2.0) - 64000.0
var2 = var1 * var1 * (dig_P6) / 32768.0
var2 = var2 + var1 * (dig_P5) * 2.0
var2 = (var2 / 4.0) + ((dig_P4) * 65536.0)
var1 = ((dig_P3) * var1 * var1 / 524288.0 + ( dig_P2) * var1) / 524288.0
var1 = (1.0 + var1 / 32768.0) * (dig_P1)
p = 1048576.0 - adc_p
p = (p - (var2 / 4096.0)) * 6250.0 / var1
var1 = (dig_P9) * p * p / 2147483648.0
var2 = p * (dig_P8) / 32768.0
pressure = (p + (var1 + var2 + (dig_P7)) / 16.0) / 100

# Output data to screen
print("Temperature in Celsius : %.2f C" %cTemp)
print("Temperature in Fahrenheit : %.2f F" %fTemp)
print("Pressure : %.2f hPa" %pressure)

[링크 : http://www.pibits.net/code/raspberry-pi-and-bmp280-sensor-example.php]


+

[링크 : https://cdn-shop.adafruit.com/datasheets/BST-BMP280-DS001-11.pdf]


내가 가진거. HW-611 이라고 써있고 칩은 별다른 마킹이 없는데

i2c 주소는 0x76 이니 맞는거 같긴한데 아닌것 같기도 하고 모르겠다 -ㅁ-


'embeded > raspberry pi' 카테고리의 다른 글

서보 팬틸트 브라켓 구매  (0) 2023.09.19
DHT22 도착!  (0) 2023.09.19
라즈베리 파이 openOCD jtag?  (0) 2023.07.24
rpi bear metal  (0) 2023.07.10
라즈베리 3 전원 off  (0) 2023.07.02
Posted by 구차니
embeded/ARM2023. 9. 14. 12:33


On ARMv6 and above, you can just use the rev instruction, but I assume that you're not allowed to do that for whatever reason.

[링크 : https://stackoverflow.com/questions/2755171/arm-assembly-converting-endianness]


REV
Reverse the byte order in a word.

Syntax
REV{cond} Rd, Rn

where:

cond
is an optional condition code.

Rd
is the destination register.

Rn
is the register holding the operand.

[링크 : https://developer.arm.com/documentation/dui0473/m/arm-and-thumb-instructions/rev]


unsigned int foo(unsigned int a)
{
  return __builtin_bswap32(a);
}

[링크 : https://stackoverflow.com/questions/35133829/does-arm-gcc-have-a-builtin-function-for-the-assembly-rev-instruction]

[링크 : https://teus.me/726]


gcc built-in function 이고 자매품(?) 으로 __builtin_bswap16 이라는 녀석도 있다.

Built-in Function: uint32_t __builtin_bswap32 (uint32_t x)
Similar to __builtin_bswap16, except the argument and return types are 32-bit.

[링크 : https://gcc.gnu.org/onlinedocs/gcc/Other-Builtins.html]


어.. vertorized 안되면.. 그냥 쌩으로 for 돌려야 하는건데...?! 이럼 나가리인데?!?!?

지원되는 GCC 비벡터 내장 함수
마지막 업데이트 날짜: 2023-07-13

IBM® Open XL C/C++ for AIX® 17.1.1 는 다음 GCC 비벡터 내장 함수를 지원합니다.

[링크 : https://www.ibm.com/docs/en/openxl-c-and-cpp-aix/17.1.0?topic=functions-supported-gcc-non-vector-built-in]

'embeded > ARM' 카테고리의 다른 글

emmc 파티션 정렬  (0) 2024.02.07
cortex-a53  (0) 2023.08.31
aarch64 vector register  (0) 2023.08.23
arm vsub operator  (0) 2023.08.09
ARM NEON SLP  (0) 2023.08.07
Posted by 구차니
embeded/odroid2023. 9. 5. 11:08

라즈베리 파이 3b

$ cat /proc/cpuinfo 
processor : 0
BogoMIPS : 38.40
Features : fp asimd evtstrm crc32 cpuid
CPU implementer : 0x41
CPU architecture: 8
CPU variant : 0x0
CPU part : 0xd03
CPU revision : 4


odroid-c2

$ cat /proc/cpuinfo 
processor : 0
BogoMIPS : 2.00
Features : fp asimd crc32
CPU implementer : 0x41
CPU architecture: 8
CPU variant : 0x0
CPU part : 0xd03
CPU revision : 4


소스코드

#include <stdint.h>
#include "timer.h"

void main()
{
opal_sys_timer_freq();
}
#ifndef OPAL_SYS_ARCH_TIMER_H
#define OPAL_SYS_ARCH_TIMER_H 1

#include <sys/times.h>

typedef uint64_t opal_timer_t;

static inline opal_timer_t
opal_sys_timer_get_cycles(void)
{
    opal_timer_t ret;

    __asm__ __volatile__ ("isb" ::: "memory");
    __asm__ __volatile__ ("mrs %0,  CNTVCT_EL0" : "=r" (ret));

    return ret;
}


static inline opal_timer_t
opal_sys_timer_freq(void)
{
    opal_timer_t freq;
    __asm__ __volatile__ ("mrs %0,  CNTFRQ_EL0" : "=r" (freq));
    return (opal_timer_t)(freq);
}

#define OPAL_HAVE_SYS_TIMER_GET_CYCLES 1

#endif /* ! OPAL_SYS_ARCH_TIMER_H */


실행파일 디스어셈블

0000000000000724 <opal_sys_timer_freq>:
 724: d10043ff  sub sp, sp, #0x10
 728: d53be000  mrs x0, cntfrq_el0
 72c: f90007e0  str x0, [sp, #8]
 730: f94007e0  ldr x0, [sp, #8]
 734: 910043ff  add sp, sp, #0x10
 738: d65f03c0  ret


라즈베리 파이(좌), odroid-c2(우)

(gdb) r
Starting program: /home/pi/src/a.out 
[Inferior 1 (process 2762) exited normally]


(gdb) r
Starting program: /root/src/a.out 

Program received signal SIGILL, Illegal instruction.
0x0000005555555720 in opal_sys_timer_freq ()


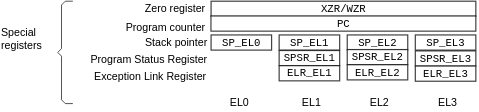
MRS
Move the contents of the CPSR or SPSR to a general-purpose register.

Usage
Use MRS in combination with MSR as part of a read-modify-write sequence for updating a PSR, for example to change processor mode, or to clear the Q flag.

Caution
You must not attempt to access the SPSR when the processor is in User or System mode. This is your responsibility. The assembler cannot warn you about this as it does not know what processor mode code will be executed in.

Architectures
This instruction is available in ARM architecture versions 3 and above.

[링크 : https://developer.arm.com/documentation/dui0068/b/ARM-Instruction-Reference/Miscellaneous-ARM-instructions/MRS]


MSR
Load specified fields of the CPSR or SPSR with an immediate constant, or from the contents of a general-purpose register.

Architectures
This instruction is available in ARM architecture versions 3 and above.

[링크 : https://developer.arm.com/documentation/dui0068/b/ARM-Instruction-Reference/Miscellaneous-ARM-instructions/MSR]


[링크 :https://developer.arm.com/documentation/ddi0601/2022-03/AArch64-Registers/CNTFRQ-EL0--Counter-timer-Frequency-register]


Saved Process Status Register

[링크 : https://developer.arm.com/documentation/den0024/a/ARMv8-Registers/AArch64-special-registers/Saved-Process-Status-Register]


AArch64 (ARM64)에서는 ARMv7의 CPSR (Current Program Status Register)과 directly 연결되는 개념을 갖고 있지 않다. 그 대신 AArch64에서는 CPSR field의 각 값을 PSTATE로 정의하였다.

[링크 : https://gongpd.tistory.com/9]


EL이라는 것에 따라서 PSR 접근이 달라지는 거라면.. 명령어도 illegal이 될 수 있으려나?

[링크 : https://developer.arm.com/documentation/den0024/a/ARMv8-Registers/AArch64-special-registers]


EL0 = ARMv7의 User 모드
EL1 = ARMv7의 Supervisor 모드(커널 코드 실행)
EL2 = 하이퍼바이저 모드(하이퍼바이저 실행)
EL3 = Secure 모드(트러스트 존 실행)

[링크 : https://blog.naver.com/crushhh/222093330435]


분위기를 보아하니.. cpu ring level(privilige mode) 에 따라서 접근 가능한 레지스터가 바뀌는데

그러면서 특정 명령어가 사용불능이 되기도 하는건가 싶은데


라즈베리 파이 3b / 64 odroid c2
$ uname -a
Linux raspberrypi 6.1.21-v8+ #1642 SMP PREEMPT Mon Apr  3 17:24:16 BST 2023 aarch64 GNU/Linux
# uname -a
Linux odroid 3.16.85-65 #1 SMP PREEMPT Mon Jan 18 13:32:38 UTC 2021 aarch64 aarch64 aarch64 GNU/Linux


설마 커널 버전에 따른 atf 혹은 el 설정방법 차이나 누락으로 인해 이런 문제가 발생하는건가?


시간나면 odroid-c2용 armbian 으로 시도해봐야겠다. 커널 버전이 너무 차이나네..

Armbian 23.8 Bookworm
Kernel 6.1, Size: 467Mb, Release date: Aug 31, 2023

[링크 : https://www.armbian.com/odroid-c2/]


+

걍 armbian 하니 잘 된다. 커널 버전이나 aarch64 지원이 미흡한 구버전 커널이라 그럴수도 있을 듯 하다.

minimonk@odroidc2:~$ mpirun
--------------------------------------------------------------------------
mpirun could not find anything to do.

It is possible that you forgot to specify how many processes to run
via the "-np" argument.
--------------------------------------------------------------------------

'embeded > odroid' 카테고리의 다른 글

wayland on odroid-c2  (0) 2021.11.22
odroid c2 gpio 와 wiringpi  (0) 2021.09.29
g_mass_storage rpi - odroid c2  (0) 2021.09.28
g_mass_storage ins/rm 실패  (0) 2021.09.28
odroid c2 ubuntu 18.04, 20.04 kernel 버전 정보  (0) 2021.09.27
Posted by 구차니
embeded/ARM2023. 8. 31. 10:46

주로 다루고 있는게 A9(zynq z7020, imx6q) 과 A53(imx8mp) 인데

A53만 해도 나온지 10년이 된 녀석.. A5x 시리즈의 최초 버전


벤치해보면 의외로 빠르지 않았는데, 클럭빨이었나.. A9보다 낮은 2.3DMIPS라니..


라즈베리 같은데 A7 인데 얘도 공정빨로 클럭이 높아서 쓸만할뿐 1.9DMIPS 로 성능이 좋은편은 아니다

A9이 클럭이 낮고 열이 많이 나서 그렇지(!) 기본 성능 자체는 2.5DMIPS로 의외로 좋게 설계되어 있다.

(물론 설계대로 성능이 나온다는 말은 아님)

근데 A9도 out-of-order를 지원하는데 A53은 in-order 라니!! 이게 무슨 소리요!!

다른 의미로는 A53 보다는 A57 이후 버전은 되어야 그나마(?) 쓸만 하다는 의미?


[링크 : https://en.wikipedia.org/wiki/List_of_ARM_processors]

'embeded > ARM' 카테고리의 다른 글

emmc 파티션 정렬  (0) 2024.02.07
arm asm rev  (0) 2023.09.14
aarch64 vector register  (0) 2023.08.23
arm vsub operator  (0) 2023.08.09
ARM NEON SLP  (0) 2023.08.07
Posted by 구차니
embeded/i.mx 8m plus2023. 8. 31. 10:33

cortex-a53 에서 neon 으로 실수 나누기를 하는데

이상하게 적용이 안되서 확인중


소스는 아래 한줄인데 stdev_val은 앞서 단계에서 계산한 변수라 그런가

scope 문제로 인해서 안될 것 같진 않은데

int tempval = (int)((value - abs_avg) / (int)stdev_val);


아무튼 에러는 아래와 같이. 332 라인은 for() 337은 위의 소스인데

modules/m7_adc.c:332:27: missed: couldn't vectorize loop
modules/m7_adc.c:337:11: missed: not vectorized: relevant stmt not supported: tempval_168 = _73 / stdev_val_162;


얘 되고

int tempval = (int)((double)(value - abs_avg) / (double)stdev_val);


얘도 된다.

int tempval = (int)((value - abs_avg) / (double)stdev_val);


나누기 연산에서 피 연산자가 int 형이면 안되고, double 형이면 된다라..

아래 문서를 참조해도 딱히 divide 연산자에 대한 이야기는 없고

cortex-a53이라면.. cortex-a9도 아니고.. hardware divider가 없을리도 없을 것 같은데.

아무튼.. 의외의 점이라면 예제코드 중에 곱셈은 있어도 나눗셈은 없다. (에이 설마..)

[링크 : https://gcc.gnu.org/projects/tree-ssa/vectorization.html]

'embeded > i.mx 8m plus' 카테고리의 다른 글

NXP i.mx8mp LF_v6.1.55-2.2.0 테스트  (0) 2023.12.21
nxp i.mx8mp win iot part 2  (0) 2023.05.26
nxp i.mx8mp win iot  (0) 2023.05.26
rpmsg-lite  (0) 2023.03.23
i.mx8m plus cortex-m7 part.2  (0) 2023.02.23
Posted by 구차니
embeded/ARM2023. 8. 23. 18:57

armv7에 비해서 armv8(aarch64)의 simd 통합은 더 강해졌는지

명령어가 사라지고 src와 dst의 레지스터에 vertor와 scalar가 사용된다.


예전에 이상하다 싶어서 찾아두기만 한 녀석인데

add 명령은 그대로이고 v0 이라는 vertor 레지스터에 4s, 4개의 32bit 변수형(아마도 signed int?)을

한번에 더하는 계산을 하라고 시킨다.

dst, src1, oper 일테니까 v0.4s = v0.4s + v1.4s 로 보면 될 듯.


add     v0.4s, v0.4s, v1.4s


2021.06.30 - [embeded/raspberry pi] - aarch, armv8 asimd build (neon)


scalar

평범(?)한 Q / D / S / H / B

[링크 : https://developer.arm.com/documentation/den0024/a/ARMv8-Registers/NEON-and-floating-point-registers/Scalar-register-sizes]


vector

D가 아마도 double형 같은 64bit(8byte) 변수일텐데

그것 조차도 한번에 2개씩 연산이 가능한 레지스터라니..

[링크 : https://developer.arm.com/documentation/den0024/a/ARMv8-Registers/NEON-and-floating-point-registers/Vector-register-sizes]

'embeded > ARM' 카테고리의 다른 글

arm asm rev  (0) 2023.09.14
cortex-a53  (0) 2023.08.31
arm vsub operator  (0) 2023.08.09
ARM NEON SLP  (0) 2023.08.07
cortex a9 ptm  (0) 2023.07.21
Posted by 구차니